TilePlus Demo Apps
The TilePlusExtras folder has a number of demo programs. Most of them have a .txt or .md doc file in the demo's folder.
The contents of this online copy may be different or newer than what's in the distribution.
Animated Tiles
Purpose
-
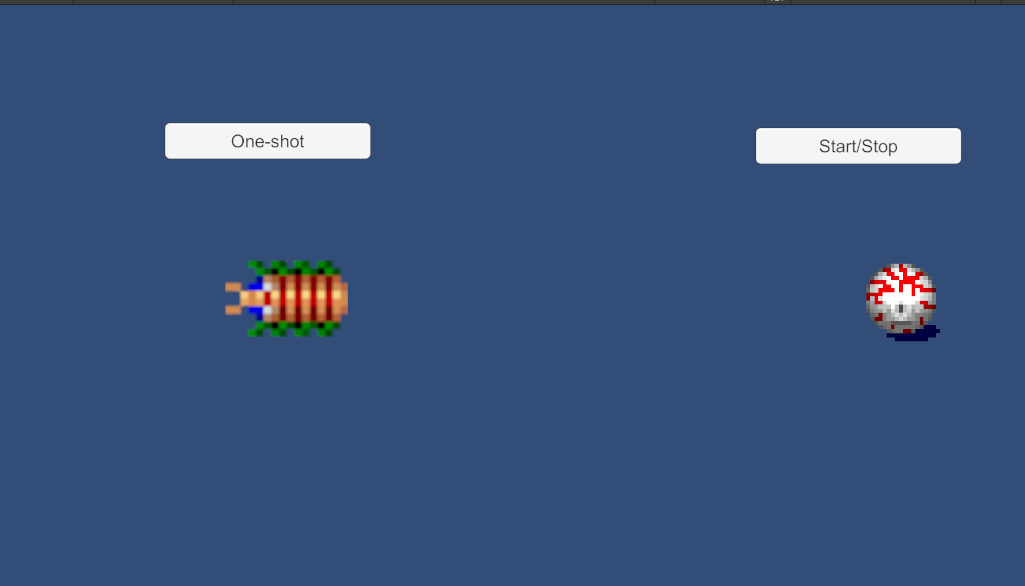
This demo illustrates how to control tiles from mouse clicks or from Unity UI buttons.
-
There are three scenes:
- MouseClicks:
- This scene uses a script called TpPickTile. Just click on the tiles themselves.
- TpPickTile uses either input system to directly message tiles.
- When you click the mouse it translates the pointer position into tilemap coordinates.
- Then it uses TpLib to locate the tile.
- If a tile is found it's ActivateAnimation method is used to toggle animation on/off.
- This scene uses a script called TpPickTile. Just click on the tiles themselves.
- MouseClicksDirect:
- This is a better approach for most practical uses (but not UnityUi) where you want to message a tile when using a tile as an active element in your scene.
- This scene uses a component called TpInputActionToTile.
- It REQUIRES the New Input System.
- It merely creates an instance of a TpActionToTile Scriptable Object.
- That S.O. does much the same work as TpPickTile, and sends ActionToTile packets to the tile if it supports being sent that type of message.
- Note that this S.O. supports Hover messages, which aren't used here.
- See the TileUi demo for more advanced uses of this S.O. variety.
- UnityUi:
- This scene uses a component called TpGuidToAction.
- The buttons each have their on-click events set to the 'Controller' GO with the TpGuidToAction.SendAction method as the target AND the GUID of the target tile as the parameter.
- The GUID is easily available with Painter or the Tile+Brush, just view the tile in the Selection Inspector and click the eyedropper icon to copy the GUID to the clipboard.
- It functions similarly to TpPickTile.
- MouseClicks:
Basic Demo
Purpose
-
This demo just shows some very basic use.
-
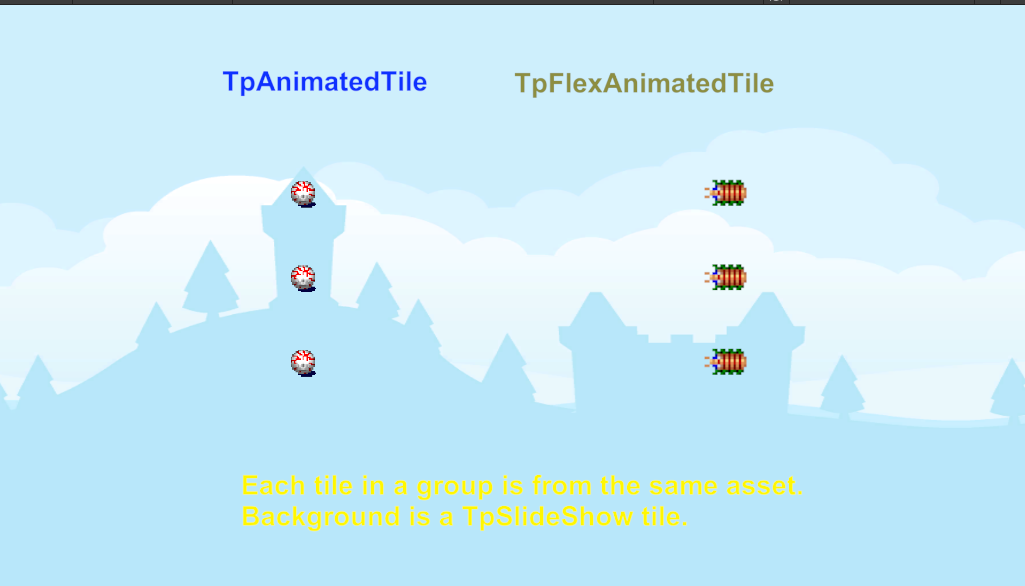
Before you click Play, notice that there are three of each sort of tile. When the demo is Playing, it first copies and pastes the existing tiles so that there are 6 of each type. This shows how you can duplicate tiles resulting in new independent tile instances at runtime.
-
After that, the tiles are picked/pasted (i.e., moved) repeatedly, the visual effect is that they're moving around.
-
Also note that the animation on each of the tiles restarts properly when they are moved from place to place.
-
The single slideshow tile is used for the background. The 'slide' changes every 16 times through the loop.
Top-Down Layout
Important:
This demo requires the New Input System and won't work unless it's enabled.
Purpose
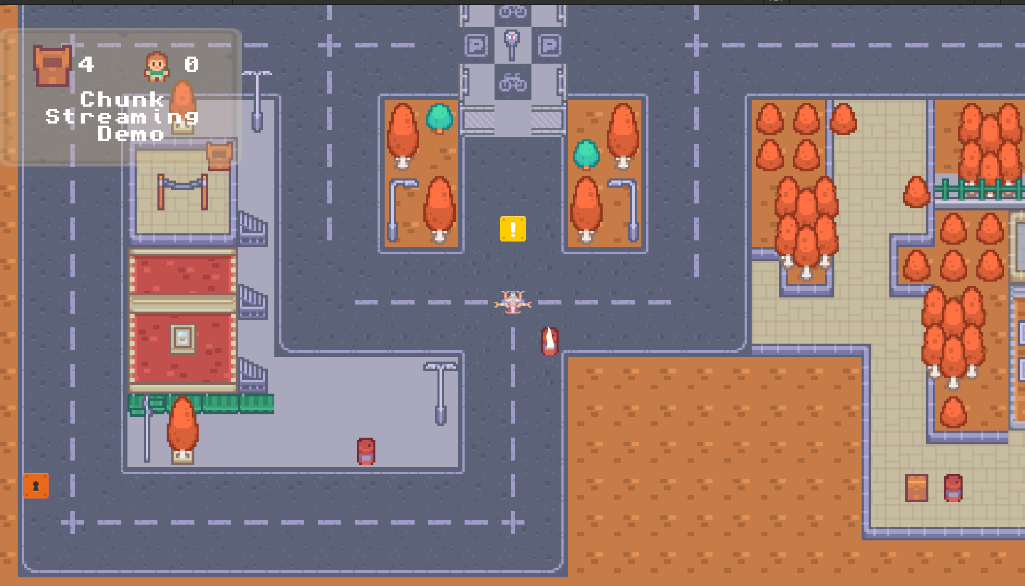
This demo uses almost every main feature of the TilePlus system.
- Tile Scenes and Initializers
- TileFabs and Bundles
- TpMessaging, TpSpawner, TpTilePositionDb, and TpTweener Scriptable Runtime Services (SRS)
- Tile Ui: UiAnimButtonTile, UiAsciiCharTile, UiButtonTile, etc.
- TilePlus Events, EventActions, ZoneActions
- TpFlexAnimatedTile, TpSlideShow, TpAnimatedSpawner, TpImmortalizer, TpAnimZoneSpawner, TpZoneAnimator
If you aren't yet familiar with what a Scriptable Runtime Service or SRS is, please see this.
If you look in the Demo code you'll see a Services folder. There you'll find several ScriptableRuntimeService scripts:
- LayoutDemoFile: a simple data save/restore back-end
- LayoutDemoGameState: all of the global state for this minigame.
- LayoutDemoLayout: the customized code for using the Layout system with this minigame.
- DialogBox: pops up a TileUi-based dialog box.
Next, look at the Demo code's Components folder. Here you'll find:
- TdDemoPlayerController: interacts with the New Input system to move the player character.
- If the player moves from one Grid position to the next an event is issued.
- TdDemoGameController is the subscriber to that event.
- TdDemoGameController: custom code for this demo.
- When it gets the OnPlayerHasMoved event from PlayerController it invokes UpdateLayout on the LayoutDemoLayout Service.
TdDemoGameController's Start doesn't do much:
- Verifies that the fields in the inspector are set up properly and load the player prefab.
- Loads and initializes the demo's services
- Loads and initializes the PositionDatabase Service. This requires initialization: others used by this demo like TpMessaging and TpSpawner don't require any initialization.
- Tries to get the 'GuidKey' from the filesystem
- the GuidKey is the last-used TScene GUID.
- TScenes are discussed elsewhere in documentation about the layout system.
- They're used by the SceneManager
- Initializes the SceneManager.
- The SceneManager loads the first TScene.
- A TScene is a specification that tells the layout system what to load on which Tilemap.
- The SceneManager issues events during this process:
- OnBeforeSceneChange is issued just prior to anything actually occurring but after the SceneManager evaluates all its inputs for correctness. Here, the event handler just clears 'Collidables'.
- Collidables are just prefabs which have been instantiated and placed during the scene loading.
- It makes sense that when changing to a new TScene you'd want to auto-delete these.
- OnNewTSceneChosen is issued when a new TScene is chosen.
- This handler Creates a new blank game dataset for this scene.
- If there IS a save file existing from a previous playthrough this will get updated with the saved values.
- We also save the GUID key for the new scene: that way the next time the minigame starts up it'll use the save data/
- This handler Creates a new blank game dataset for this scene.
- OnAfterTSceneChange is issued when the SceneManager has completed its work.
- This is the most complex part of the TScene loading process: it's where you customize.
- The code comments should help but basically:
- Restore Data
- If not possible, use a new Game Dataset.
- Check the waypoint data to see if we can find an initial waypoint from the save-game data.
- If not, we check all the waypoints to find one that has the 'start waypoint' field = true.
- Then we move the camera to that spot.
- And move the player character to that same spot
- UpdateLayout is called: note that throttling is inhibited so it loads immediately in this case.
- Normally throttling is used to smear the work across multiple frames.
- Wait for the start waypoint tile to appear in TpLib's data: we know it's been loaded.
- ClearAllCollidables again to be sure.
- Update all loaded tiles: this uses the save data to restore said data to tiles that implement the ITpPersistence interface.
- Restore Data
- OnBeforeSceneChange is issued just prior to anything actually occurring but after the SceneManager evaluates all its inputs for correctness. Here, the event handler just clears 'Collidables'.
- The SceneManager loads the first TScene.
At this point the code mostly runs on its own: events from PlayerController cause re-layout as the player character moves around.
As the player character moves around, its position is messaged to all tiles implementing ITpMessaging<PositionPacket>.MessageTarget. This packet is used to send the current Tilemap position of the player character to each of these tiles. If the position sent matches the position of a tile, it posts an Event to TpEvents.
TpEvents is outwardly pretty simple: it just stores references to any tile which 'posts' an event. The ChunkingDemoGameState Service subscribes to TpEvents, and gets notified when an event is posted; setting a flag variable.
Note that LayoutDemoGameStateService is less of a 'service' and more like a global variables class; that is, a singleton. In a non-demo app you probably don't want to use this approach but it's easier to understand.
The Update method of LayoutDemoGameStateService AND the UpdateTiles method of LayoutDemoLayoutService both use TpEvents.ProcessEvents.
Why both?
In LayoutService, TpEvents.ProcessEvents is called after we have sent position data to tiles. So it makes sense to process events here. However, if the app is using the "TileUi" feature of TPT, these tiles can and will send events if a tile is clicked on (or otherwise messaged via the 'New Input System'). Hence, GameStateService's UpdateMethod handles any of these type of UI events.
If you look at the code for ProcessEvents it doesn't look like it does much. However it's a really important part of the system.
Basically, what it does is look at all the tiles in the HashSet of tiles which had posted events. Unless you have a lot of overlapping tiles receiving position messages, there will usually be only one instance to evaluate.
A really simple method would be to look at each tile, determine its type, and have custom code for each situation. Obviously, that's really bad. Hard to add features, easy to create bugs, hard to maintain.
In the TPT system, each tile instance has a field for a scriptable object called an EventAction. There's also one for a ZoneAction, which is a different thing I'll discuss a bit later.
Event Actions have one method: Exec, and one property: Incomplete.
As ProcessEvents looks at each tile in its HashSet it sees if there is an EventAction reference. If there is, it calls Exec and passes in the tile reference along with an optional object called the EventActionObject, which is an object (c# object) with whatever sort of data that you want to pass to EventAction.Exec.
You can see the use of EventActionObjects in UiButtonTile. Here, we pass along a tag string, the zone bounds, and the tile instance (which is redundant). The TileUi demo has UiButtonToAsciiEventAction which uses this mechanism to pass along the target control.
Being able to pass-in arbitrary data from the tile to the EventAction means that the EventAction itself does not have any state information. That's important because it's a ScriptableObject and changing anything in it during Editor-Play will alter the fields. Not good. Avoiding state info in the EventAction means that we can use this S.O. for several tiles of the same type or of any other type.
If the Incomplete property is true, the event isn't discarded and is returned ProcessEvents' caller for further custom processing.
As implemented in this demo, everything is done via Event and Zone actions. Hence, no list for returned tile instances is even provided to ProcessEvents.
Let's examine an EventAction used for TreasureChests.
The minigame's goal is to get all of the chests. Can't change to another level (TScene) until that's met.
Open the Scripts/Actions/TreasureChestEventAction.cs and look at Exec().
After some simple validity checks, the treasure chest count is incremented. This is saved on a per-level basis in the game data which is periodically saved to the filesystem.
It checks to see if it's 'parent' tile actually implements the ITpPersistence interface. If it does, the tile's save data is obtained and 'Poked' into the save data using the ChunkingDemoGameState Service.
Next it does something sort of fun: opens a tile-based dialog box. The dialog box is a pre-made TileBundle which is just loaded to a separate tilemap for UI tiles.
After setting a flag in the GameState to temporarily block other UI (ie - a modal dialog) it just waits for a callback to unblock ui, which occurs when the user closes the box.
Here's an EventAction used for Waypoints
You can find WaypointEventAction in the same folder.
This action checks for the proper type of tile, disables all other waypoints, and checks to see if the waypoint is marked as a level change waypoint.
If not, it saves the game, directly from this S.O. `` If this IS a level change waypoint, is the SceneExitGoalAchieved?
If it is, Save the game and change levels (TScene).
As you can see, the EventActions can be used to move object-specific code from a core part of your app back to the object itself. The relatively simple mechanism used by ProcessEvents can handle it all.
Side-Scroll Layout with Parallax
Requires 'New Input System'
This simple example shows how to implement side-scrolling behaviour while using the TilePlus Layout system and Parallaxing.

This example also shows how to directly use ZoneLayout and ZoneManagers without the Scene Manager.
In SsLayoutGameController, the Start method enables the Zone Managers via TileFabLib and then uses the ZoneLayout component to initialize it, then performs the initial layout. The OnPlayerHasMoved callback also updates the layout as the player moves. Only left-right movement is possible.
The SsDemoPlayerController is similar to the one used in the Top-down Layout demo with the added feature of limiting directions to left-right only and enforcing limits for the left and right boundaries.
The scene's middle and rear Tilemaps have a TilemapParallax component. This merely shifts the Tilemap transform based on a target's position.
This example was created specifically to ensure that the Layout system could properly handle a position-shifted Tilemap.
TileUi

Purpose
-
Demonstrate Sample UI 'elements' made from tiles.
-
It's not a complete UI system and it's not made to be. BUT it's an easy way to add interactive features to your 2D game.
-
A button does not have to look like one!
Requires 'New Input System'
This is an example of how to use TpActionToTile and the TpInputActionToTile component as well as hovering for tooltips and hovering for animation.
On the left is an AnimatedButtonTile. It supports changing animation on hover and on click. It uses a simple event action which changes the value of the AsciiChar tile just above it.
Clicking on a number in the Keypad area will
- change color of the number for a few hundred mSec (this is set via a variable in the tile instance).
- make a noise using a callback to this component. The noise is different depending on if a tile was clicked or not.
The box next to the keypad is a toggle and the two sets of boxes underneath that are two sets of radio buttons. One uses tags and the other uses Zones to create a radio group.
The number dials comprise up/down arrows and a UiAsciiCharTile to show the number.
Clicking on the arrow buttons will make the numbers go up/down. That's done with ZoneActions.
Each one of these buttons implements a 1x1 zone that's placed over the number tile that's between the buttons. You can see this
with Painter's Edit mode: select one of these and click visualize in the Zone controls section.
- These are all of size 1x1 and offset by +- 1 in the X or Y direction.
The 'HZ' tiles are Hover Zones. These can be used for tooltips. In this example, they're used to print a description of the Control in the text box.
- The text box is a set of AsciiChar tiles managed by an AsciiString tile. AsciiString tiles use a zone around some number of AsciiChar tiles to create an area to show text.
- When you hover over an area demarked by a HoverZone the text description of that area is sent to the AsciiString tile for display.
All of the "which tile is it" code etc is in TpActionToTile.cs which is managed by the TpInputActionToTile mono-component.
Tweening
Purpose
-
A playground to experiment with the tweener
-
Five scenes
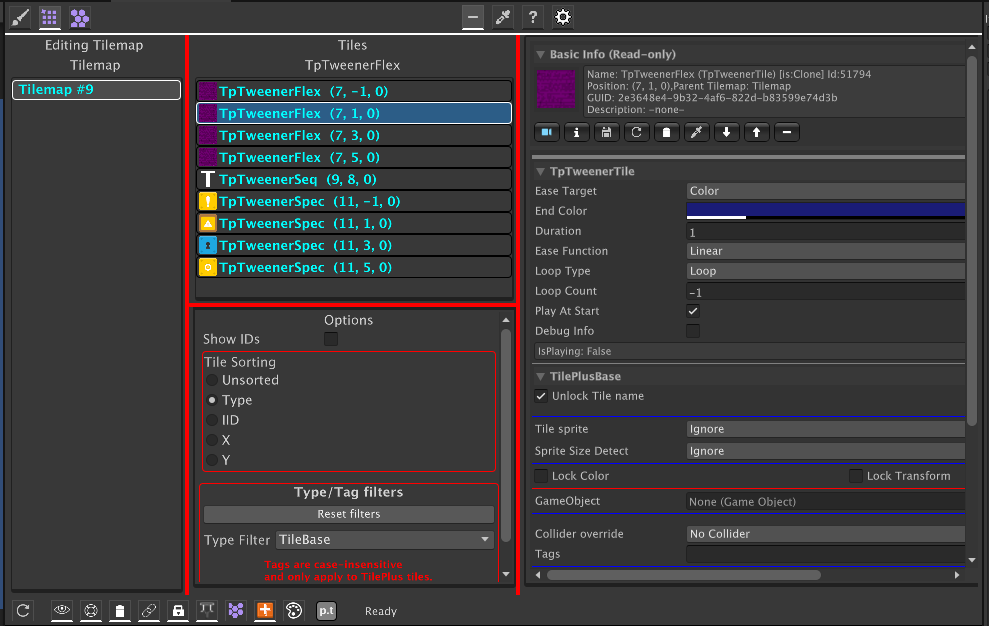
- Basic Tween Types
- The image shows Painter displaying a TweenerFlex tile.
- TweenerFlex tiles expose every possible parameter for you to play with.
- The visible fields change as you select different tween varieties.
- This is done entirely with TPT attributes!
- The visible fields change as you select different tween varieties.
- The other tiles use an asset to set up the tweens.
- Please read the tweener documentation or it may be really confusing!
- GameObjectExamples: Several examples of GameObject tweens
- Bezier Tween: animate a G.O. on a Bezier path
- GoSequence: play a sequence of tweens on a G.O. from an asset.
- SimpleGameObjTween: as it says
- Spline Tween : shows how to use a Unity spline to animate a G.O. position
- Note: just an example, not an alternative to the various spline components from Unity.
- Requires the Splines package
- TextFontSize: How to tween something with a simple
float
- MatrixTweenPlayground
- Here are four TweenerFlex tiles preset with a few different types of tweens.
- MoreStrangeTweens
- Illustrates some interesting things you can do with Matrix tweens using the three types of tweener tiles.
- StressTest
- This runs almost 400 sequences and several color tweens simultaneously. Use the TPT SysInfo window with 'Show Tweener...' checked and you can observe the frame rate.
- You can also use the Services Inspector or Tween Monitor to show the tweener status. Note however that it can slow down execution: try it with the Stress Test.
- Basic Tween Types