Paint Mode
- Paint Mode Basics
- Object Sources
- Favorites
- Palettes
- Painting Prefabs
- TileFabs, Bundles, and Chunk Snapping
- List of Objects from Selected Source
Paint Mode Basics
The left column always displays a list of Tilemaps. Select which Tilemap that you want to operate on.
The center column displays sources of Objects to paint. Select the source of Objects.
Then the right column displays the contents of the selected source as a list (shown here) or a UTE display. Select an Object to paint from the right column.
Then the Paint tool will become enabled. The system normally tries to automatically activate the Paint tool but if that isn’t possible just click on the Paint tool button.
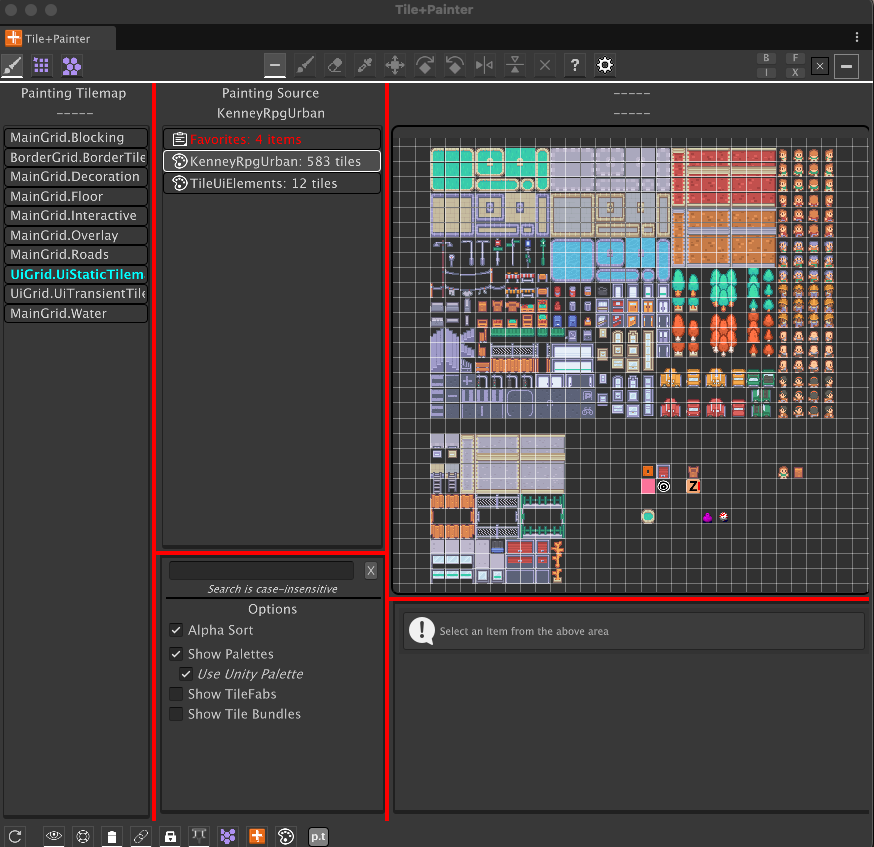
When a Unity Palette prefab is selected in the Source column and the Use Unity Palette option is ON in the center column options section as seen here, then the Unity Tilemap Editor’s Palette view is displayed in the right column rather than a list.
Click on tiles to select a single tile or drag a marquee to multiple-select.
While you can drag-drop tiles from a project folder on to the grid display to add tiles to the Palette prefab, editing the Palette itself isn’t possible in this window for safety reasons.
Use the Unity Tilemap Editor if you need to modify the Palette or create new Palettes.
Please see the FAQ entry about using Painter and the UTE at the same time.
Note:
Please note that on rare occasions the palette display may be blank and the console will have the following message:
Assertion failed on expression: 'math::all(math::isfinite(size))'
This is an error deep within the UiElements Palette component. Click on a different Palette item in the center column and switch back to the Palette that you want to use.
Object Sources
The center column is a resizable split view. The top part displays all possible sources for painting Objects. Sources can be any Palettes that you’ve created with the Unity Tilemap Editor, TileFabs, Bundles, and Favorites. Painting on a Tilemap requires a selection from this list of sources.
The bottom part of the split is a search field and option toggles. These let you easily shrink or expand the number of sources in the Painting Source column.
Object List Options
Search field: text in this field is used to filter the sources by name.
The toggles in the bottom portion of the center column control what Object sources appear in the top portion of the center column. The Favorites list is always available.
- Show Palettes: Show Palettes
- Use Unity Palette: Show Tiles in a grid (when ShowPalettes checked)
- Show TileFabs: Show TileFabs
- Matches Only: Show TileFabs that match existing Tilemaps (when Show TileFabs checked)
- Show Tile Bundles: Show Tile Bundles
- Bundle Tiles View: Show Bundle contents in a list (when Show Tile Bundles checked)
Favorites
The Favorites List operates in conjunction with the Clipboard and the Pick tool.
New items are always added to the top of the Favorites list.
You can use the Favorites List just like any other Tile Source. Tiles, Prefabs, Bundles, or Multiple-selection Picks are never modified: a copy of the selected Favorites item is placed in the Clipboard. This ensures that applied modifiers (See Custom Modifiers) never affect the selected Favorites item.
New items are always inserted at the beginning of the list. The Favorites List can be cleared with the Tools/TilePlus/Clear Painter Favorites.
When viewing Favorites, each entry displays a small ‘X’ that you can use to delete individual items. The maximum size of the list is limited to 32 items. It’s truncated when the limit is exceeded if one or more new items are added. The list is saved in the filesystem; at various times the list is pruned (see below).
Cloned tiles (e.g., TilePlus tiles) cannot be added to Favorites when picked from a scene as a single tile. However, multiple-selection scene Picks which contains clone-state TilePlus tiles can be added to Favorites and will have new GUIDs when painted on a Tilemap.
Prefabs as Favorites
You can add Project folder Prefabs to the Favorites List. Note that specific prefabs may do weird things or cause exceptions.
- For example, you can add a Palette prefab to the Favorites List and paint it. Surprisingly, this works.
- Adding a prefab with scripts which, when painted, execute out of context (e.g., have ExecuteAlways or ExecuteInEditMode attributes) may cause exceptions when painted.
- A preview icon can’t be generated for certain circumstances. Unity’s GetAssetPreview functions are used, and the result depends on GetAssetPreview’s return value. In some cases, it will generate a solid one-color texture when it can’t create a preview.
Multiple Selections as Favorites
Favorites holds three types of items in two Lists:
- Tiles, Prefabs, or Bundles
- Multiple Selection picks
These two lists aren’t visible to you: they are needed because multiple selection picks are Scriptable Objects which can’t be easily serialized to the filesystem. Hence, internally the two types of Objects are handled differently.
Multiple Selection Picks are identified as such and highlighted with a yellow text color. The sprite shown on the item is the first non-null tile in the pick or a generated icon.
Multiple Selections include area picks from the scene (when you use the Marquee Shortcut) and area picks from the Palette display (Palette picks) seen when ‘Use Unity Palette’ is checked.
Multiple-Selection scene picks are placed in the Clipboard (unless you hold down CTRL when picking from a scene, which requires some dexterity); Use the “F” button to add the pick to Favorites. Adding a pick to Favorites generates the icon for the pick. Note that this can take several seconds, depending on how many tiles are in the pick, the size of the tile sprites, whether they’re in a texture atlas, and whether or not they are marked readable.
Palette picks are always put in the Clipboard. Again, use “F” to add the picks to Favorites.
When you have a combination of the two types of items, and you exit, and restart Unity the Multiple Selection items are always displayed at the top of the Favorites list.
Bundle Multiple Selection Picks
If a Multiple Selection Pick is in the clipboard, you can copy it into a Bundle by using the Tools/TilePlus/Bundle Clipboard menu command or click the B button. An Icon will be automatically generated and added to the Bundle.
Conversely, when inspecting a Bundle in Paint mode, the small eyedropper button near the bottom of the right column can be used to convert it into a Multiple-selection Pick. Note that Prefabs in the Bundle are ignored.
Favorites Pruning
Duplicate, null (deleted) Prefab assets, or null (deleted) tile assets, or null multiple-selection picks found in the Favorites List are ignored and are deleted from the list. For example, if you select a tile or Prefab from the Favorites List and CTRL-Click the Clipboard (the thumbnail icon at the top right of the Painter window) the item won’t be added to the Favorites List a second time.
Duplicates are more difficult to detect for Multiple Selection picks. To simplify and avoid lengthy operations, comparisons don’t include all the tiles within the Selection. However, if there are any null tiles within such a pick the entire pick is deleted. This can occur if you delete an asset (Prefab, tile, Bundle) that was referenced in the Favorites list.
Palettes
If you want to omit a certain Palette from the list, change its GameObject’s layer to anything other than default. To omit a TileFab or Bundle, set its IgnoreInPainter field to true in an Inspector.
When Show Palettes is checked, the Use Unity Palette checkbox appears. Unity Palette refers to the UTE palette display, that is, the view of tiles which is and looks like a Tilemap.
When a Unity Palette is selected in the Painting Source (center) column and “Use Unity Palette” is checked, the Palette view is displayed rather than a list of tiles.
This functionality is currently deemed “experimental”. However, this display is the exact UI Toolkit element that’s used in the UTE window. Palette editing is not supported, however, you can drag-drop tiles into any existing Palettes.
You can paint single tiles or draw a marquee to select multiple tiles and paint them, just like a normal palette. However, since Painter does not use brushes, the Brush dropdown is omitted.
Different revisions of the Unity Tilemap Editor use this same component, which has several oddities when drawing marquees (selection rectangles) in the display.
When “Use Unity Palette” is checked, the “Sync Palettes” configuration setting is internally forced active (the configuration setting isn’t changed). If you use the UTE brush-select dropdown menu to select a brush that does not inherit from GridBrush (e.g., GameObject brush) the brush selection will revert to the Tile+Brush or the standard GridBrush. Note that when using Unity 6 the Sync Palettes option doesn’t appear in the Settings panel.
Note that if you have both Painter and the UTE windows open at the same time it can be confusing since they both draw marquees in the Scene view. If you need to use both Painter and Palette, try changing the Scene Marquee and Text colors in Painter’s setting panel. Also check out “Painter Exclusive Mode.” See the technical note at the end of this document for more information.
It is possible to have a tile that appears in the UTE display but does not appear when the same palette is viewed as a list due to differing behaviours for null or missing sprite references in the tile asset.
Painting Prefabs
Instantiated Prefabs are always parented to the selected Tilemap and set to the same layer.
You can use transform modification shortcuts like ALT+V, ALT+R/T/X/C/Z when previewing Prefabs. This does not affect the Prefab asset at all: when you release the mouse button, a copy of it is instantiated, has its transform modified (if only to set the position) and then painted. If you need to affect the Z-position of a Prefab prior to painting it, use the Custom Modifiers from the Painter Modifiers editor window.
It’s important to note that the preview you see when painting a prefab is an “asset preview,” like the preview seen in an inspector. It’s entirely possible and fairly easy to use the various shortcuts to create a transform that’ll place the prefab at a position and/or rotation that’d be invisible when the Scene view is in 2D mode. If it appears that your prefab disappears when you paint it, that’s probably what happened.
If the preview cannot be obtained, a ‘?’ or ‘X’ icon is displayed.
Painting Prefabs from a Bundle
When previewing a Bundle (including previewing a TileFab, which is just a collection of Bundles) up to 128 prefabs can be previewed in total, per preview cycle (which happens several times per second depending on how fast you move the mouse). So, if you have a TileFab with several Bundles and the total number of Prefabs in all the Bundles is greater than 128 then some of the bundled Prefabs won’t preview.
Aside from that, you can preview and paint Bundles (when the Bundle Tiles View option is unchecked) and TileFabs with embedded Prefabs. The preview works the same as described above: they’re asset previews. The only difference is that transform modifications are inoperative on groups of prefabs, Bundles, and TileFabs.
One advantage of using Bundles for prefabs is that any transform changes such as rotation and scale are preserved and then restored when the Bundle’s prefabs are painted via Painter or calls to the TileFabLib library.
Transform changes don’t show in the preview, and the positioning during preview may be slightly incorrect due to integer math issues.
TileFabs, Bundles, and Chunk Snapping
Recall that a Bundle (TpTileBundle) asset is an archive of a single Tilemap and a TileFab (TpTileFab) asset is a collection of Bundle assets.
To exclude a TileFab or Bundle from Painter, inspect the project asset and set the IgnoreInPainter field to true in an Inspector.
A Bundle asset can be painted like any other tile asset, and you can see the preview as you move the mouse pointer. Painting one of these will overwrite any tiles on whatever map is selected in Painter.
Additionally, if the Bundle Tiles View option is checked, the Bundle’s tiles and Prefabs are displayed in a list, and you can paint any of these objects individually. For other interesting things that you can do with Bundles in Painter, see “Fun With Prefabs and Bundles.”
Using a TileFab is a bit trickier: if you examine one you’ll see that each Tilemap in the collection has a specification for the name of a Tilemap or a tag: these are taken from the GameObject parent of the Tilemap component when the TileFab is created.
The idea is that when you paint a TileFab you’re really painting on at least one, but more likely several Tilemaps at the same time with each Bundle referenced by a TileFab corresponding to a particular Tilemap.
However, the Painter has no way of knowing which Bundle is for a particular map in your scene. And you probably don’t want it to guess! Furthermore, the TileFab may have four Bundles, but your scene may have more or fewer than that.
If you select a TileFab in the center column when the window is in Paint mode, you’ll be presented with the names and tags specified in the TileFab. It’s up to you to ensure that they exist. Mismatches are just omitted from previews and Painting.
For example, if you have Scene Tilemaps named A and B but your TileFab has a collection of four Bundle assets with Tilemaps A, B, C, and D then only A and B will be previewed or painted. C and D will be ignored and neither previewed nor painted. If your scene only has Tilemaps named X and Y, then nothing will be previewed or painted.
So, the names or tags must match.
Note that when “Show TileFabs” is checked another toggle becomes visible: “Matches Only.” If that’s checked then only TileFabs which match named Tilemaps/Tags in the scene are shown in the center column list.
“Matches Only” isn’t perfect: if you have multiple scenes loaded with similar Tilemap names and tags you can end up painting a TileFab’s embedded Bundles into different scenes. Be careful.
If you’re using Chunk-Style TileFabs for painting, Chunk Snapping can be really useful: read on...
Chunk Snapping
The Painter Settings panel has three settings that enable Chunk Snapping.
Chunk snapping allows you to easily paint and erase equal-sized Chunks on a virtual grid, with snapping.
The Chunk Snapping checkbox enables the mode and locks the fields just below.
- Set the Chunk Size for Snapping field to the fixed size of the TileFabs that you want to paint (4,6,8…).
- Set the Chunk Snapping World Origin field to the Origin position for TileFab painting. Usually 0,0,0 is what you want.
The center column will show only Chunks (TileFabs) whose bounds are the correct size.
The only active Tools are Paint and Erase.
Two marquees appear while using those tools when Snapping is on:
- At the nearest Chunk location on the virtual grid.
- At the Mouse Position
Both are the same size as the Chunk dimensions. If this doesn’t match the Chunk dimensions then Chunk Size for Snapping doesn't really match the size of the Chunk (which must be square and of even dimensions e.g., 4x4, 6x6 etc.). If the positioning seems off, check that the World Origin is set properly.
When the mouse position is on the virtual grid defined by the Chunk Size and the World Origin:
- The two Marquees merge.
- The color of the Marquee will change.
- <G> appears at the beginning of the informational text string and the font becomes italicized.
When the mouse cursor isn’t on the virtual grid and you click, the Painter paints the Chunk in that nearest virtual grid location. The mouse cursor won’t move.
If you paint the same chunk at the same virtual grid location, then the area is erased first.
When using the Erase tool when Snapping is on, a TileFab that uses the same Tilemaps must be selected in the center column so that Erase knows which maps to erase. If that’s not the case, nothing happens, and a reminder dialog box will appear.
Erase deletes all tiles in the highlighted region. Any children of the Tilemaps’ GameObjects in that area are also deleted.
Erase requires that the mouse position be aligned with the virtual grid; watch the marquees and the <G>.
Show SGrid option
Show SGrid can be activated by a mini-toolbar button at the bottom of the window or from the Configuration panel (Gear icon).
- When checked the 'SGrid' (the super-grid using the 'Chunk Size For Snapping' setting) is visible in the scene as a box around the cursor location.
- It's handy when creating Tile Scenes using the layout system.
- There's a Color field just above the checkbox to customize the color.
- It's not shown if the Settings Panel Chunk Snapping toggle is on.
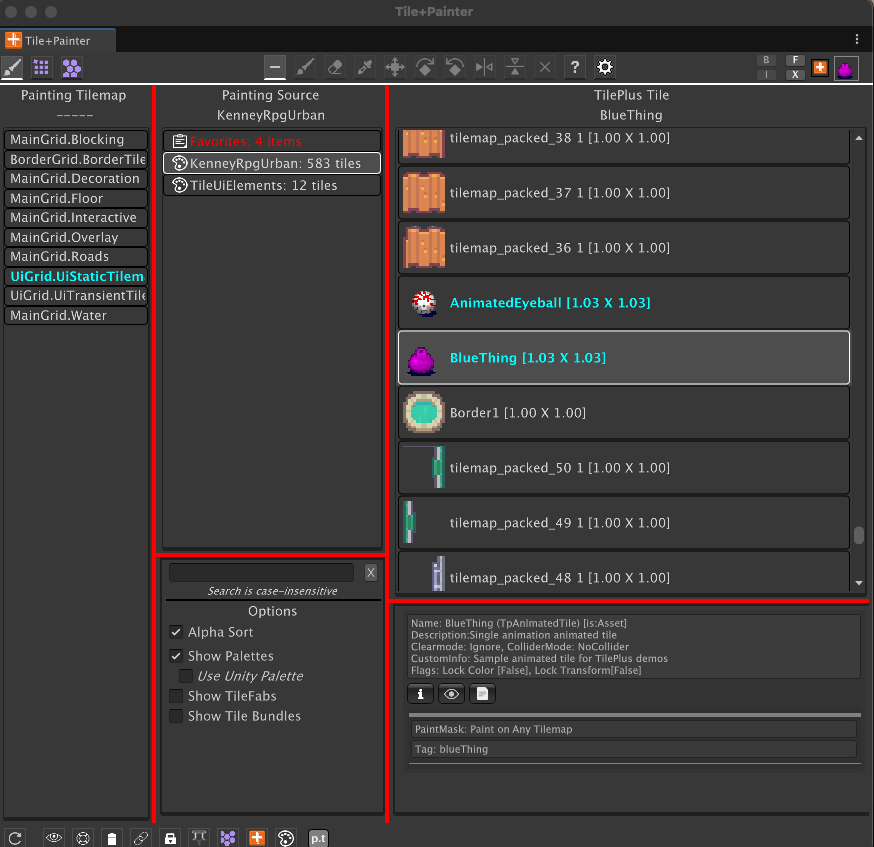
List of Objects from Selected Source
The right column is also a resizable split view. The top part of the split lists the Objects from the Source that is selected in the center column or the optional UTE palette view when the Source is a palette.
When you click on an Object in the List or Palette view, that Object is placed in the Clipboard and information about the Object is displayed in the bottom part of the view along with some UI buttons (the exact appearance depends on what is in the Clipboard).
The Clipboard content is ALWAYS what will be painted when using the Paint tool and its internal data is what’s modified when you use any functions that modify the content, e.g., rotating or flipping a tile during preview.
The bottom part of the view is called the Brush Inspector since it’s essentially the same as the Brush Inspector seen in the bottom part of the UTE when using the Tile+Brush. This shows information about whatever Object is selected in the top part of this right-hand column.
The Brush Inspector may have several buttons, depending on the context. When the Object is a Tile or a Prefab, you generally can open a Unity Inspector on the asset or focus the Project window on the asset.
If the Object is a or TilePlus Tile you can also open your IDE (VS, Rider, etc.) to view the script.
If the Source is a TileFab or Bundle (assuming Bundle Tiles View is unchecked), then there’s only one choice since these are assets and not lists of tiles. Hence, this single item is pre-selected in the right column and pre-placed in the Clipboard.
If the Object in the Clipboard is a TilePlus tile picked from the Scene:
- Such a tile is a clone.
- These are re-cloned when painted on a Tilemap.