Painting Workflow
Step by Step ...
Painting
Getting Started
Enable Painting objects by clicking on the Paintbrush icon in Paint mode.
- Select a Tilemap to paint on in the left column.
- Select a source of Objects from the center column: a Palette, the Favorites List, a TileFab, or a Bundle.
- Select a specific Object in the right column (usually not needed for TileFabs or Bundles).
- Select the Paint action button if it isn’t automatically selected.
- Move the mouse to the painting position.
- Click to Paint.
Overwrite Protection: this prevents you from accidentally replacing a TilePlus tile. This is controlled in the Settings panel, or you can toggle this on/off with an option button at the bottom of the window.
- Active: “Protected” is displayed when a tile is under the cursor position. Hold the ‘1’ key to temporarily unprotect.
- Inactive “Will Overwrite” is displayed when a tile is under the cursor position. Hold the ‘1’ key to temporarily protect.
TPT tiles also have inclusion and exclusion lists that specify which Tilemap or Tilemaps are allowable to paint on for specific tile assets. See the TilePlus Toolkit documentation for more information.
- Overwrite protection is ignored when painting TileFabs, Bundles, Multiple-selection Picks, or Prefabs. Normal Unity tiles do not use overwrite protection.
Click on the mouse to paint a single Object. Shift-Dragging will repeatedly paint the same Object. Ctrl-dragging repeatedly paints on a single row or column. You can use the six transform-modifying shortcuts prior to clicking.
- Transform modifications and Shift/Ctrl-dragging can’t be used with TileFabs or Bundles.
- Shift/Ctrl-dragging can be used with multiple-selection picks. The result can be a bit strange depending on the exact composition of the pick.
Paint Tool and Grid Selection
Recall from the Grid Selection Mode discussion that you can hold down the Marquee Drag shortcut key, click the mouse and drag a marquee to create a Grid Selection of a particular size.
This also works when using the Paint tool. If the selected Object for painting is a Prefab or any tile which is not a TPT clone tile, then dragging a Marquee will fill the resultant Grid Selection with the selected Object if the Marquee Drag Shortcut key is held down when the mouse button is released. Overwrite protection is not used.
This only works on single Objects such as tiles or Prefabs, and won’t work for multiple tile Picks, Bundles, or TileFabs. See Chunk Snapping for painting TileFabs on a grid.
If there’s an existing Grid Selection in the Scene View (including a Grid Selection that was made active from the Grid Selection pane) then clicking the mouse within the Grid Selection will fill that Selection area with the selected Prefab or non-clone tile.
The case of a TPT clone tile being unpaintable in this fashion will only occur if the selected tile (i.e., the one in the clipboard) is a ‘pick’ of a TPT clone tile in the scene.
A Grid Selection made while using the paint tool is added to the list of Grid Selections in the Grid Selection pane.
Erase
- Select a Tilemap in the left column.
- Click on a tile to delete.
- If Confirm-Delete is active, you’ll be prompted about the deletion. To Drag-Erase, hold down either Shift or Ctrl, but note that Confirm-Delete is ignored.
You can also drag a marquee using the Marquee Shortcut. When you release the mouse button, all tiles on the selected Tilemap within the area are deleted. Again, Confirm-delete is ignored.
Pick
The Pick tool is used differently in Paint and Edit modes.
Picking in Paint Mode
In Paint mode, Pick is used to copy one or more tiles from a Tilemap to the Clipboard or Favorites List. The Shift and Ctrl buttons act as options, as does the “Pick to Paint” option button at the bottom of the window (Pin icon).
- Select a Tilemap in the left column.
- Click on a tile to select a single tile or drag a marquee while holding down the Marquee Shortcut.
This creates a “Pick” or a “Multiple-tile Pick”.
Hold Ctrl to place the Pick in the Favorites List rather than the Clipboard. If you hold Ctrl and Shift together the pick operation does not occur. Text at the cursor position shows the various pick options as you select them. Also read “Picking, the Favorites List, and TPT tile cloning” elsewhere in this document.
Make a Multiple-Selection by dragging a marquee while holding down the Marquee Shortcut key. When you release the mouse button, all tiles on the selected Tilemap within the area are picked to the Clipboard. This is called a Multiple Selection or Multiple-tile selection.
To add a pick to Favorites, click the F button in the Clipboard area. An Icon will be added to the Pick. See “About the Icon” elsewhere in this document.
Pick-to-Paint Mode
If the Pick-To-Paint option button is active, then the active tool will change to Paint right after you Pick. If you just want to copy to the Clipboard, then hold down Shift when you click.
If the Pick-To-Paint option button is inactive, then the active tool will not change. If you want to change to Paint right after you pick, hold down Shift when you click.
Note: Pick-to-Paint is only available in PAINT mode.
Picking in Edit Mode
This is much simpler:
- Select a Tilemap in the left column.
- Click on a tile to select a single tile to inspect in the rightmost column.
Move
Moves a single tile or a group of tiles from one position to another, on the same or a different Tilemap.
This action has four sequential steps:
- Click the Move tool button or use the shortcut key.
- Select a Tilemap in the left column (Can be skipped if a Tilemap is already selected).
- Picking step:
- Select the tile to move (you don’t have to use the Pick tool, this is automatic).
- Multiple-select a region by dragging the Mouse while the Marquee Shortcut key is held down.
- Move: Repaint the tile or selection.
After the first Move, you can continue to Pick/Move repeatedly.
To reset the step to Pick just click the Move button again.
To cancel Move when Picking either click the button again or click the OFF button.
Note that neither Shift nor Ctrl affects the Pick operation when within a Move sequence. If the tile is a TilePlus tile, the Tilemap exclusions operate as usual when you repaint the tile.
For all tiles, Overwrite Protection for TilePlus tiles is active as well except for multiple-selections. You can use any of the transform-modifying shortcuts prior to clicking during the Move phase (which is basically Painting).
Text at the cursor position shows “Move-Pick” during the Pick step.
The center and right columns of the Painter window are disabled during all steps of the Move process to avoid inadvertent selections in those areas.
You can also drag a marquee during the Pick phase by using the Marquee Shortcut. When you release the mouse button, all tiles on the selected Tilemap within the area are copied to the Clipboard and will paint in the Paint phase of the move.
Note that during the Paint phase of the move you can use the Rotate/Flip shortcuts for single tiles or groups of tiles as well applying selected modifiers with ALT+V.
Changing Tilemap After Move-Picking
If you change the Tilemap after the Pick, then you can move the tile or selection to the new map.
If a tile has a GameObject or is a “Rule” tile, then the results might be unexpected.
Rotate, Flip, and Reset Transform
You must select a Tilemap in the left column prior to using these actions.
Text at the cursor position reminds you which action is currently available.
Note that these actions affect the Tilemap when you select a tile with the mouse, but they affect the transform of the tile or group of tiles (Picks) when applied using shortcut keys during preview (while painting, which includes the Paint phase of a Move).
Reset Transform is also handy if you’ve modified the transform of a tile at a position in a Selection Inspector and you need a quick way to reset it.
It’s important to note that if a tile asset’s Lock flags are set to Lock Transform then none of the shortcuts will work, which is what should happen but the lack of any visual feedback can be unexpected.
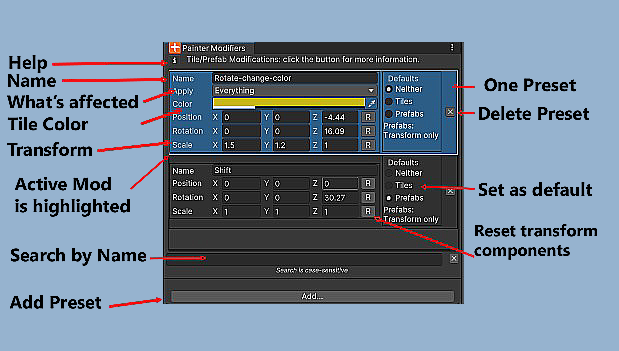
Modifiers
Custom Modifiers are “presets” and are applied with a shortcut key, defaulting to ALT+V (Win) or Option-V (Mac). This works in conjunction with an Editor window cleverly named “Painter Modifiers,” available from the Tools/TilePlus menu or by clicking on the P.T button at the bottom of the Painter window.
Looks confusing? It’s a really powerful feature but there’s a learning curve.
Each preset shown in the image has several components:
- A name field: used in conjunction with the Search box right above the Add button.
- A dropdown field “Apply” that has selections for how the preset is applied.
- A Color picker
- A three-element Position, Rotation, and Scale section (transform) with reset buttons for each element.
- A Defaults selection.
You use the Apply field to determine what this Modification does when activated. For example, you can modify just the color or just the transform for a single tile or all the tiles within a Multiple-Selection during preview.
You can also use Painter’s Grid Selection mode to apply the preset to an area of tiles on a Tilemap but within a Grid Selection.
Use the Color picker and transform fields to set up the modification.
The Defaults section of each preset is used to select a particular preset as the default for tiles or Prefabs. You might notice that the bottom preset is set as a default for Prefabs – in that case the Color picker is hidden since it doesn’t apply. That’s also true when a non-default preset is used to modify a Prefab.
What do the defaults do and what are they good for?
A good example is when you want to paint one or more tiles but always want the scale changed and you don’t want to fiddle with the keyboard shortcuts each time. Once a preset is set as a default, it is applied immediately each time that you choose a Tile or Prefab to paint, including when you Pick a tile from a Scene Tilemap during the Pick phase of a Move (that is, when you’re using the Move action).
Tip: You can use a default Tile modifier to emulate the UTE’s Z position field.
Just set the transform position Z as you like and use that modifier as the default for tiles. You can have several modifiers with different Z offsets, and it’s easier to select different modifiers than typing in UTE’s Z position field repeatedly.
Similarly, you might want to paint a Prefab several times but need it scaled the same way each time.
P.T Button
When a default tile or Prefab preset is active the Default Transform Indicator P.T at the bottom of the Painter window indicates that state.
- p.t No active default presets
- P.t Prefab default active but tile default inactive
- P.T Both defaults active
You can click P.T to open the Painter Modifiers window at any time.
How to Apply Modifiers
Non-default Modifiers are applied during the preview seen when moving the pointer over the Scene view while painting by using the ALT+V shortcut. This also applies during the Paint phase of a Move action.
When applied, the item selected (or previously selected if the Modifiers Editor window is closed) is used to change the transform of the tile or Prefab about to be painted to the one specified in the Modifiers Editor window selection.
The modification is applied to the current tile or Prefab in the Clipboard and persists until you select another object to paint.
The Reset Transform action or shortcut key (Default is ALT+Z) can also be used to reset the transform within the Clipboard.
The Clipboard’s icon shows the Transform icon when the current tile’s transform has been changed.
When using a preset on a Prefab keep in mind the same warning applied to using the Flip and Rotate shortcuts with Prefabs: it is easy to change the transform of the GameObject in such a way that it’ll be invisible to you when in 2D mode.
Search
The search field scrolls the list to the entry with a matching Name field, if any.
Tips
Tip: Dock the Modifiers Editor
- If you use it frequently, dock the Modifiers Editor to the left or right of Painter.
Tip: Copy transform and Color from Clipboard
-
If Painter has a modified single tile in the Clipboard, the Modifier editor’s "Add..." button changes to "Add from Clipboard". A click would copy the color and transform from the modified Clipboard Object to the new preset.
-
This only works with single tiles but is a nice shortcut to copy transform/color changes from a tile that you modified during preview.
Tip: Persisting Changes to Multiple Selections
- If you find that in a particular instance you can’t apply a default Modifiers to a Multiple-Selection Pick, you can use ALT-V to modify the tiles in the selection and click the F button to save that modified group of tiles as a Favorite or click the B button to save the selection as a Bundle.
Tip: Save and Load modifiers to a file.
Limitations
When changing Color or transform on tiles, the existing state of tile Flags for the tile asset will affect whether a Color or transform change is actually applied; for example, if the Lock Color flag is set at a position, then you can’t change the Color.
The system tries to check if modifications will work. For example, if you try to paint a tile after applying a Color modification but the tile asset has the Lock Color flag set, you’ll get a warning message, and the tile won’t paint.
If you were to paint the tile, the fact that the Lock Color flag is Set means that the color change will revert when the Tilemap is refreshed.
See the FAQ item: I Can’t Paint Modified Tiles
It's important to note that these modifications ONLY affect the Tilemap and never affect the tile assets themselves.
How Different Tile Types are Handled
Painter expects to encounter one of two basic tile varieties: Tile and TileBase. There’s actually a big difference between the two.
A Tile has a sprite, a transform, and a Color. All tiles derived (subclassed) from Tile have these characteristics. However, a TileBase has none of those. Any tile that isn’t derived from Tile needs special handling for accessing these properties so that icons and previews of the Sprite can be created.
For example, a Rule tile has a m_DefaultSprite field rather than a Sprite property. 2D Tilemap Extras’ AnimatedTile is also derived from TileBase and has only a list of sprites but no Sprite property.
Plugins for TileBase types
Plugins for TileBase types are easy to create, and examples can be found in the Plugins/TilePlus/Editor/Painter/TpPainterPlugins Assets folder.
Basically, a plugin is a Scriptable Object asset which you place in an Editor folder (outside of the TilePlus plugin folder). It provides access to the missing properties (sprite, transform, Color).
Please create only ONE asset for each Type (C# Type). It does not have to be in an Editor/Resources folder, just in an Editor folder (so it doesn’t become part of your build).
Plugins for basic Rule tiles and for the Unity AnimatedTile are already installed. The Rule Tile plugin works with the basic Rule tiles from Unity’s 2D Tilemap Extras package.
If there’s no plugin for a Type, then that Type of tile will not have any paint previews nor thumbnails in lists and inspectors. Hence, the plugins are a workflow convenience only.
If you add a plugin yourself, you might need to perform a scripting reload for the plugin to be recognized. This can be done in Painter via the Setup panel’s Reload button (at the bottom of the panel).
If done correctly, the plugin’s name should appear in the System Info window.
- Ensure that
Show Painter/Selection Infois checked; plugins are listed near the end of that group's information.
Picking, the Favorites List, and TPT tile Cloning
TPT tiles require special handling when picking a tile from the scene and painting it, or if a TPT tile is picked from the scene, poked into the Favorites List, and subsequently painted on a Tilemap.
Why is this? TPT tiles are cloned from the original TPT tile asset located in a Project folder somewhere. This allows each TPT tile to be its own instance in the Scene. When picked, the clone tile is what’s picked.
If that clone tile were to be repainted, any tile positions with that clone would have the same instance as the original clone. Changes to any of the clones’ fields would affect all of them. Hence, we re-clone the TPT tile, creating a fresh copy. This is all handled transparently, but you will see messages such as 'Picked tile is a clone' or similar in Painter’s Edit-mode inspector.
None of what’s mentioned in this paragraph affects any Tile or TileBase tiles; they’re never cloned.
Chunk Snapping
This is a special mode that’s useful for painting TileFab “Chunks” aligned to a grid equivalent to the size of the Chunk. Chunks are a specific sort of TileFab that’s always square and of even dimensions (4x4, 8x8 … 64x64 etc.). It’s activated by the Chunk Snapping toggle in the Settings pane.
If you were to use Chunks of identical size, then you could define a virtual grid that’s a multiple of the Tilemap cell size. For example, assuming a Tilemap cell size of one unit and a 16 x 16 chunk of tiles, this virtual grid is 16 units x 16 units.
When Chunk Snapping is on via the corresponding toggle on the Painter Settings panel, only Paint and Erase can be used.
Chunk Snapping supports rapid placement of Chunks by presenting a Scene-view marquee the size of a Chunk. The marquee changes color when the mouse pointer is aligned with this virtual grid. If the Paint Tool is active, clicking anywhere in the Chunk area (highlighted with a solid marques) will paint the Chunk aligned with the virtual grid.
It's easier than it sounds. Please see the Advanced TileFab Use document for more information on Chunk Snapping and templates.
About The Warning In the Settings Pane
The Painter settings pane told you to look here before turning on Chunk Snapping. Good on you for looking here before clicking it on anyway!! There’s nothing bad: just know that when this checkbox is turned on you can only Paint and Erase TileFabs. Read more about this in the Advanced TileFab Use document.