TilePlus Painter
TilePlus Painter is a UiElements-based alternative Tilemap editor for Unity3D.
It has most features available in the Unity Tilemap Editor, and many that it doesn't have.
- Introduction
- Overview
- Nomenclature and Shortcuts
- Painter Window
- Basics
- Limitations
- Clipboard
- About The Icon
- Option Buttons and Status Display
- Tilemaps List
- Settings
- Paint Mode
- Paint Mode Basics
- Object Sources
- Favorites
- Palettes
- Painting Prefabs
- TileFabs, Bundles, and Chunk Snapping
- List of Objects from Selected Source
- Edit Mode
- Grid Mode
- Painting Workflow
- Fun With Prefabs, TileFabs, and Bundles
- Appendix and FAQ
- Technical Notes
Introduction
Introduction to Painter
Overview
Tile+Painter (Painter) is a different sort of Tilemap painting and editing tool.
Download the TilePlusPainter_QuickGuide.pdf and print it out if you like!
Just like the Unity Tilemap Editor (UTE) you can paint single tiles or groups of tiles from a Palette. Unlike the UTE, you can paint Prefabs, custom single- or multiple-Tilemap archives and perform complex transform modifications. There’s even a persistent Favorites list.
Painter is an UIElements-based editor window with three modes: Paint, Edit, and Grid.
Please see the FAQ and Known Issues pages if odd behaviour occurs.
Painting
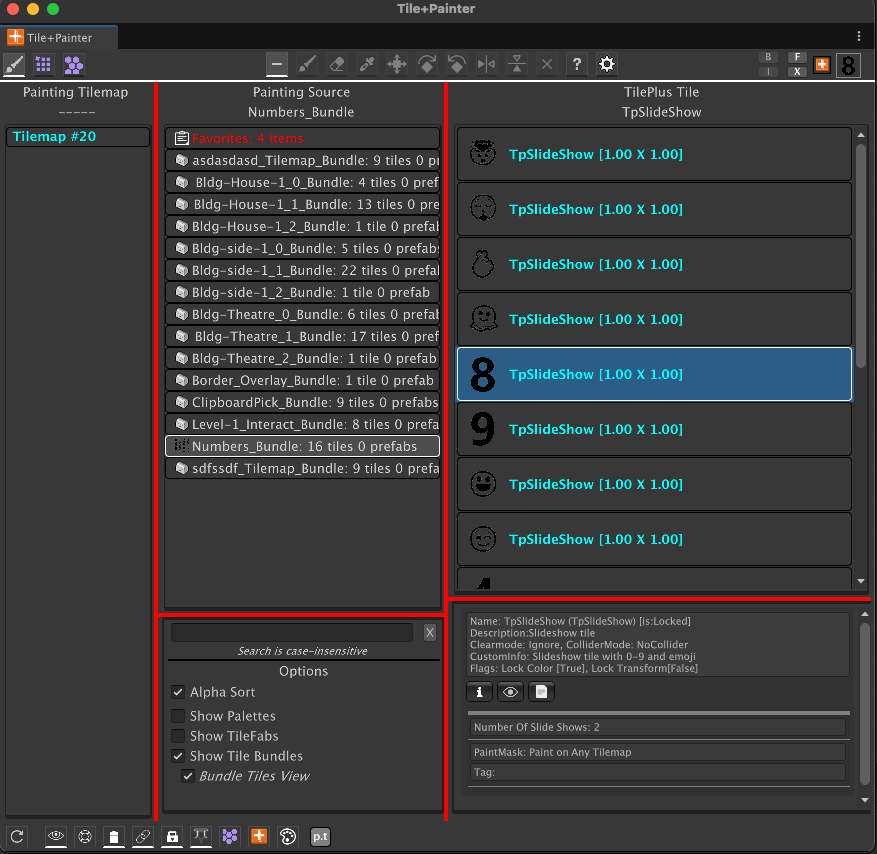
In Paint mode, Painter presents lists of Tilemaps, and lists of Sources (including Unity Palettes, archived Tilemaps, and a Favorites List) rather than a Palette and Brushes. Select a map in the left column’s list and a source in the center column’s list, then a third list in the rightmost column presents the Objects (as in UnityEngine.Object) available to paint. Paintable Objects include tiles, tile Bundles, TileFabs, Prefabs, and Multiple-Selection “Picks.”
For Unity Palettes, the rightmost column can show the same display as the UTE.
| Center Column Sources | What’s displayed | What’s painted on a Tilemap. |
|---|---|---|
| Unity Palette | A list of tiles or a standard Unity Tilemap Editor (UTE) view. | Single tiles or a selection from the Palette. |
| TileFab | Information about the TileFab | All the tiles and Prefabs from the TileFab on one or more Tilemaps. |
| Bundle | Information about the Bundle | All the tiles and Prefabs from the Bundle on one Tilemap. |
| A list of tiles and Prefabs contained in the Bundle | Individual tiles and Prefabs | |
| Favorites | A list of tiles, Prefabs, Picks or Bundles. | Individual tiles and Prefabs or groups of tiles from Picks or Bundles. |
Painter also supports selection of groups of tiles called “Picks” which are selections of tiles from within the Scene view or on a displayed Palette when the UTE is visible in Painter.
- Picks can be saved as Favorites or transformed into Bundles.
- Picks can be flipped and rotated as a group or as individual tiles (or both).
Edit
Edit mode is used to edit individual tiles.
- Click on a Tilemap in the leftmost list and the center list displays all the tiles on that Tilemap.
- Click on an individual tile, or Pick one from the scene, and you can edit it.
- Multiple-select several TilePlus tiles of the same Type from the center list.
- A special tool appears that lets you edit fields and overwrite those in the selected tiles.
Grid
Grid mode comprises utilities for creating, managing, viewing, and using Grid Selections in various ways.
Painting Sources
If you have existing Palettes, Painter can use those as sources of tiles to Paint, viewable as a list of tiles or as a Palette just like in the UTE.
You can also poke tiles, Prefabs, or Bundles into the Favorites List by context-clicking on a tile Asset, Prefab asset, or TpTileBundle asset in a Project Folder.
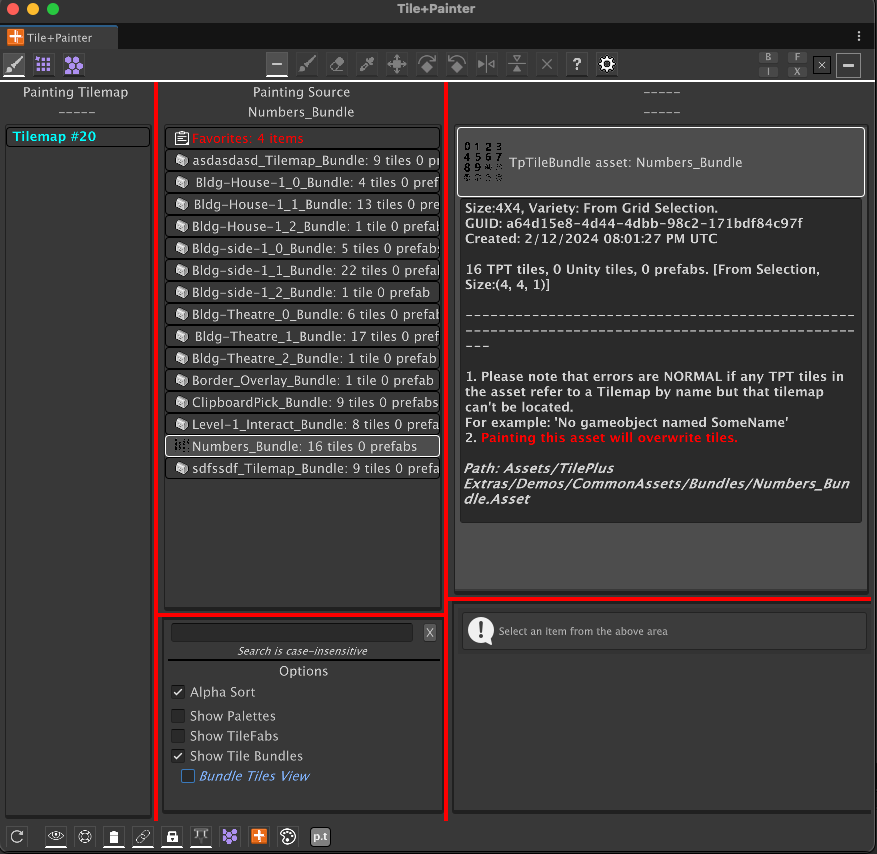
Since Painter is based on the Tile+Toolkit, you can paint ‘Tilemap Archives’ (formally known as TileFab and Bundle assets) just as easily as any single tile. Bundles’ archived tiles and Prefabs can be painted individually as well. The TilePlus User Guide explains how to create these special assets right within your scene, but you can also create Bundles in various ways using Painter.
Please read the FAQ at the end of this document, it may answer questions that you have.
Tile+Painter Tool
This appears in the Unity toolbar when a Tilemap is selected. If you click on the toolbar button the Painter window will open if it isn’t already open. It functions similarly to the Tile Palette toolbar button which will also appear when a Tilemap is selected. You don’t need to use it if you don’t want to.
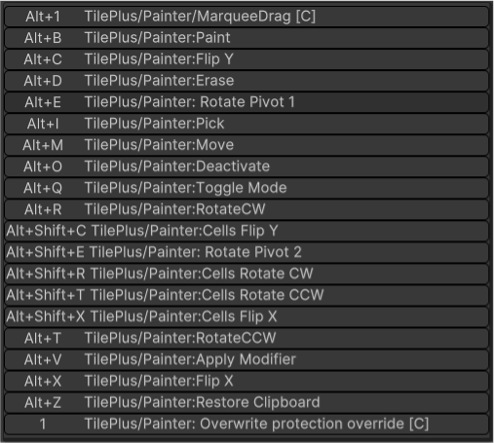
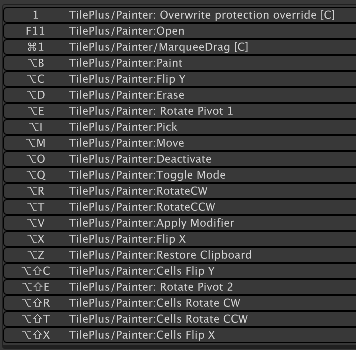
Nomenclature and Shortcuts
Nomenclature
- “T+P” or “Painter” refers to TilePlus Painter. TPT refers to TilePlus Toolkit.
- “Unity Tilemap Editor” (UTE) refers to the Unity Tile Palette window.
- “Unity Palette” or “Palette” refers to the Palette prefabs that you create and manage with the UTE.
- “Multiple-Selection” or Multiple-Selection Picks” refers to selecting or using groups of tiles. Painter has extensive functionality for handling groups of tiles in single operations.
- “Marquee Shortcut” refers to the clutch shortcut used for drawing area in the Scene view. The default is ALT+1.
Shortcut Viewer
The Tileplus/Shortcut Viewer menu item displays a dockable window containing the Painter shortcuts. It’s handy when learning.
Changing Shortcuts
If you use the Shortcut Manager to change any of the Painter shortcuts, use the Refresh button at the lower-left corner of the Painter window to refresh the Action button shortcut hints seen when viewing their Tooltips.
Painter Modifiers
The TilePlus/Tile+Painter Modifiers menu item displays a window where you can create and edit custom transforms to be applied to single tiles or to groups of tiles both before and after placing the tiles on a Tilemap. See “Custom Modifiers.”
Default Shortcuts
PC
MAC
Painter Window
Mode Buttons
Painter has three modes: PAINT, EDIT, and GRID. These correspond to the Paintbrush, Tilemap, and Grid toolbar buttons at the top-left of the window. Notice that active Mode, Action, and Option buttons are highlighted with a line at the bottom of the button.
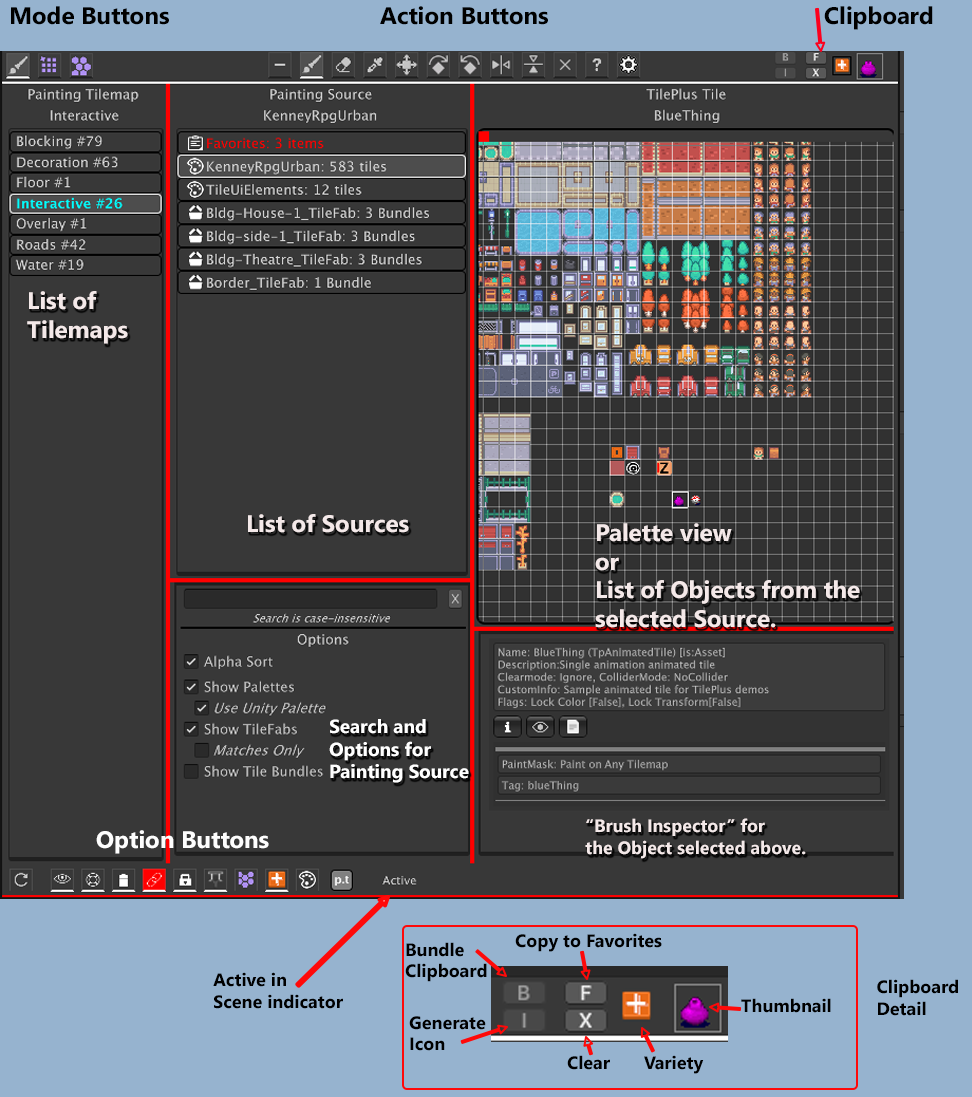
In PAINT mode you select a Tilemap in the left column, a source of Objects in the center column, then choose a single Object from the right column.
In EDIT mode you select a Tilemap in the left column and select a tile from a list of all the tiles for that Tilemap. The rightmost column displays the selected tile’s fields for TilePlus tiles or generic information for other tile types.
GRID mode is used to manage Grid Selections.
The red splitter bars can be used to arrange the different panels in any way that you like.
Basics
Action Buttons
These toggles are all active in Paint mode (as shown on the preceding page).
In Edit mode, only None, Pick, Help, and Settings are available. In Grid Selection mode only Help and Settings are available.
| Button | Use | Default Shortcut (Win) |
|---|---|---|
| Off | Disengage Painter, cancels Move operation. | ALT+O |
| Paint | Paint the tile in the Clipboard. | ALT+B |
| Erase | Erase a tile | ALT+D |
| Pick | Paint: Copy a single tile or drag a multiple selection from the Scene to the Clipboard or Favorites List. Edit: Select a single tile in the Scene for editing | ALT+I |
| Move | Move a tile on the same Tilemap or to another Tilemap. | ALT+M |
| Rotate CW | Rotate the sprite of a tile CW. | ALT+R |
| Rotate CCW | Rotate the sprite of a tile CCW. | ALT+T |
| Flip X | Flip the sprite of a tile on the Y axis. | ALT+X |
| Flip Y | Flip the sprite of a tile on the X axis. | ALT+C |
| Reset Transform | Reset the transform of a tile (remove rotation/flip, restore size) | ALT+Z |
| Help | Displays some basic information. | None |
| Settings | Tile+Toolkit and Tile+Painter settings. | None |
The default shortcut to change modes is ALT+Q.
When operating on multiple-tile selections, hold down SHIFT when Rotating or Flipping to rotate or flip the entire group of tiles. Alt-E or Shift-Alt-E will rotate the pivot of the multiple selection.
When using the Paint, Erase, Pick, or Move tools in Paint mode you can use the Marquee Shortcut (default is ALT+1) to draw out a boundary in the scene view. This lets you Paint, Erase, Pick, and Move areas of tiles.
Mouse Cursor
When the mouse cursor is over the Scene view window, it’s accompanied by a marquee highlighting the selected position. The Grid Position of the cursor is also displayed, along with textural hints about the operation.
Certain actions have optional functions controlled by the CTRL, SHIFT, or ALT keys.
The Settings panel’s Chunk Snapping settings also affect the display.
Previews and most of the text drawn in the scene only appear in 2D mode.
A ‘D’ appears when you hold down the Marquee shortcut and vanishes when you begin to drag out an area with the mouse.
Special Action Buttons
The Rotate, Flip, and Reset Transform actions have two uses:
It’s important to recognize the difference: the first live-edits tiles in the Tilemap after they’re placed. The second changes the transform of an Object (tiles/Prefabs/etc.) while being previewed prior to clicking on the Tilemap location where you want to place it.
When in Paint mode and previewing a multiple tile pick you can control what Rotate and Flip do with special shortcuts.
- Rotate or Flip shortcuts: the individual tiles in the pick will rotate independently.
- Alternate Rotate/Flip: (the defaults are the same keys with SHIFT held down) the entire Pick is affected.
- ALT+E or SHIFT+ALT+E rotates the Pivot of the Pick. This is something unique to Painter: the UTE doesn’t do this.
- ALT+Z will restore the original Pick.
UTE deals with Rotations and Flip only during preview. Painter also lets you change the transform of a tile without having to use an Inspector. For example, select the Rotate CW action button. If you click on a Tile while that Action button is selected the Tile’s sprite will rotate CW.
For tiles, these transform-modifying actions only work on tiles that are, or derive from, Unity Tiles (this includes all Tile+Toolkit tiles). Any tiles that derive from TileBase do not have a transform property. For example, these actions can’t work on Rule tiles or 2D Tilemap Extras’ AnimatedTiles since they derive from TileBase rather than Tile.
Modifying a transform during preview changes the small icon next to the clipboard to the Transform icon as an indicator.
Coders may be interested to know that rotations and flips of multiple-selection picks are done using a hidden GridBrush instance maintained in Painter. It’s not used for anything else, but this feature ensures that these operations will work in the same way as in the UTE.
Modifiers
Be sure to check out the “Modifiers” section. Custom transforms can be used to affect a tile or Prefab during preview: Position, Rotation, and Scale can all be affected. You can also set default transforms that apply to all tile and Prefab painting when appropriate. The Grid mode view has a button that can be used to apply modifiers to Grid Selections.
Limitations
Changing the transform or color of a tile requires the TileFlags to be set properly. If not, rotations, flips, and custom modifiers won’t work properly or may seem to work but placed tiles revert to their original state.
This is because even if you change the color or transform of a tile in the Tilemap (that’s how these changes on Color or transform work) if the Lock Color or Lock Transform flag bits are set then the next time that the Tilemap at that position is refreshed the color or transform of the Tilemap at that position will be restored to the data provided by the tile when its GetTileData method is called.
Depending on the situation, Painter may warn you of the problem. See the FAQ “I Can’t Paint Modified Tiles” in this document and read about the Utilities/Change Tile Flags menu command in TilePlus User Guide.
Examples:
- You paint a tile with the Lock Transform flag set and then use the Rotate action to rotate the placed tile on the Tilemap. It’ll appear to not work, or it may appear to work but revert at the next Tilemap refresh.
- You select a tile in Painter or multiple-select tiles from a Palette in Painter, then apply a modification but one or more of the tiles has the flags set improperly. Painter will present a dialog and won’t paint the tile(s).
Note : this limitation is due to the nature of Tilemaps and has nothing to do with Painter itself.
Clipboard
The Clipboard is in the upper-right corner of the Painter window and is only available in PAINT mode. It shows what sort of Object (as in UnityEngine.Object) is currently ready to Paint on a Tilemap.
Clipboard items are always UnityEngine.Object instances and thumbnail previews are shown if possible.
Clipboard items can be tiles, Prefabs, Bundles, TileFabs, or multiple-selection picks; but never GameObjects from the Scene hierarchy.
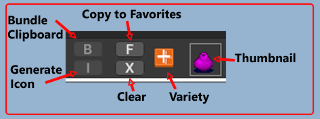
The Clipboard comprises several elements:
-
The “B” or Bundle Clipboard button creates a Bundle asset from the Clipboard content when the Clipboard contains a multiple-selection Pick. It’s disabled otherwise (as in the image above)
-
The “I” or Generate Icon button creates an Icon for a multiple-selection Pick. It’s disabled otherwise.
-
The “F” or Copy to Favorites button copies the Clipboard Object to Favorites. It’s disabled for TileFabs.
-
The “X” or Clear button clears the Clipboard.
-
Variety: X = empty, TilePlus Icon = TPT tiles, Tile Icon = normal Unity Tiles, eyedropper Icon = Picks, Prefabs Icon = Prefab; and TileFabs and Bundles use their custom asset class Icons.
- Any modifications to the Clipboard Object: Unity Transform Icon.
-
Thumbnail: An image representing the Object in the Clipboard.
- Tiles: The tile’s sprite or an alternative sprite (for tiles with Sprite properties).
- Prefabs: A Unity Asset Preview if possible, or a Prefab icon.
- TileFabs and Bundles: The asset’s embedded Icon or the class Icons for these Types.
- Multiple-selection Picks: an eyedropper or a pre-generated icon (see “About the Icon.”).
Click on the X to clear the Clipboard.
Use with Favorites List
An Icon is generated for the Pick. If you re-select this same Pick when viewing the Favorites list, then that icon will be shown in the Content box rather than an eyedropper. See “About the Icon” in the next section.
If you want to generate the Icon manually, click the I button. Note that the Icon is discarded if the Clipboard Content isn’t copied to Favorites.
Create Bundle from Pick
If a Multiple-selection Pick is in the clipboard, you can copy it into a Bundle by using the Tools/TilePlus/Bundle Clipboard menu command rather than the B button.
Cloned Tiles in Clipboard
If the Object in the Clipboard is a TilePlus tile picked from a Scene, then it must be a clone. Because of that, if you pick a clone tile from a Tilemap and repaint it anywhere that tile will be automatically re-cloned. This ensures that all TilePlus tiles are independent instances.
Similarly, if a Multiple-selection Pick is painted on a Tilemap and any TilePlus tiles are in the group of tiles which comprise the Pick, such TilePlus tiles will be automatically re-cloned.
Icon Warning
Please be aware that creating an Icon with the F or I button, can cause lengthy import activity depending on the state of the Unity Editor, the size of any textures or atlases, the readable status of any textures or atlases, how many sprites have been created from a sprite sheet, and whether ‘generate physics shape’ is ON, among other things. Usually, it takes less than a second.
About The Icon
(Yes this is repeated)
Please be aware that creating an Icon with the F or I button, can cause lengthy import activity depending on the state of the Unity Editor, the size of any textures or atlases, the readable status of any textures or atlases, how many sprites have been created from a sprite sheet, and whether ‘generate physics shape’ is ON, among other things. Usually, it takes less than a second.
About the Icon
Painter will try to create an icon for you when the Clipboard contains a multiple-selection Pick and you choose to create a Bundle or add the Pick to Favorites. A customized sprite packer is used to create a representative Icon (aka sprite) for the TpBundleTile.
This sprite packer scales all the selected tiles’ sprite textures to be the same size and packs them into a Texture in the same relative positions as the Grid Selection. It’s not a general-purpose sprite packer; the idea is to create something that gives you a visual cue for what will be painted.
- The output size ranges from 64 x 64 through 256 x 256 and may or may not be square.
- The packer takes a few seconds to operate due to importing activity. In some cases the delay can be significantly longer, depending on the state of the Unity Editor. See the FAQ for more information.
Note that if the source and/or sprite sheet texture isn’t set to readable then Painter will temporarily set the texture to readable. If there’s a code Exception (that is, a C# error appears in the console) then that texture might remain readable – there’s no way to be sure without looking.
You can always screenshot one of these Bundles after you paint it on a Tilemap and create a sprite to be used as an Icon using an image editor.
Notes:
- Tiles that are not based on Tile are not packed: no AnimatedTiles or Rule Tiles. This might change in the future. Null tiles or tiles without Sprites show as “?”.
- If there are greater than 512 usable sprites to pack, then packing is not performed and “?” is used instead.
Option Buttons and Status Display
| Button | Effect |
|---|---|
| Refresh | Rescan all Tilemaps, delete and rebuild window contents. |
| Update in Play | When ON, inspectors update in Play mode. |
| AutoSave | When ON, auto-save the scene if TPT tiles are modified. |
| Confirm Deletions | When ON, deleting tiles requires confirmation. |
| Editor Selection Sync | When ON, selecting a Tilemap in the hierarchy selects it in the Painter window, and vice versa. This is backlit RED when the Painter ‘tool’ is activated. See below. |
| Overwrite Protection | When ON, TilePlus tiles cannot be overwritten when Painting. Ignored in certain situations. |
| Pick-to-Paint option | When ON in PAINT mode, a PICK will automatically change to PAINT. |
| Show SGrid | When ON in PAINT mode, shows a marquee related to Chunk Size setting. |
| Painter Exclusive | Mirrors the TilePlus Configuration Dialog’s “Painter Exclusive” setting. |
| Palette | Opens the Unity Tilemap Editor |
| P.T | Modifier window state. Click to open the Modifiers editor |
| Activity Indicator | Status Information |
Painter Exclusive
If true then Painter has exclusive control in the Scene and using the Palette won't switch Editor Tools nor show on-screen text normally displayed by the Tile+Brush. Default is TRUE. This is a personal preference item.
P.T
The area to the right of the buttons contains the Default Transform and Activity indicators. The Default Transform indicator is clickable and will open the Painter Modifiers window if clicked. If a default transform for tiles is active, the lower-case p will change to an upper-case P. Similarly, if a default transform for Prefabs is active, the lower-case t will change to an upper-case T.
Activity Indicator
The Activity indicator shows the word “Active” when Painter is active, that is, ready to Paint or some other action in the Scene. When the mouse cursor is actually present in the Scene view window, the bottom edge of Painter’s window changes color to red.
If Drag-lock is ON (Ctrl is held down when Painting or Erasing or dragging out a marquee using the Marquee Shortcut) then that’s also shown here.
Customization
Note that the size of these and other UI buttons can be controlled with some of the sliders in Painter’s Settings pane.
Tilemaps List
The list of Tilemaps in the left column updates automatically when you add or delete Tilemaps in the editor or load/unload scenes.
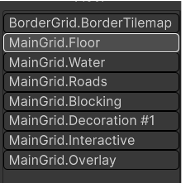
If there’s more than one Grid in a Scene then the Grids’ names are prepended to the Tilemap names as shown here.
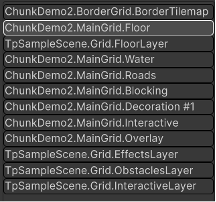
If there’s more than one scene in the hierarchy then the Tilemaps list prepends the name of the scene to the name of the Tilemap as shown here (the image also shows multiple Grids). Each groups of grids and Tilemaps is grouped by Scene to make this list easier to read.
The list is sorted alphanumerically or by Sorting layer and order in layer. When sorting by layer/order is active you can choose to reverse the displayed order (see Settings).
If a Tilemap has any TPT tiles its name is bolded and the color is changed to cyan (or blue if not in Dark mode). If the Tilemap is in a Prefab, then the Prefab icon appears on the same line. If the Tilemap isn’t empty, the number of different types of tiles is shown on the same line.
All Actions which affect a Tilemap require a Tilemap selection.
- Except for Off, Help, and Settings, the function buttons are disabled if there’s no Tilemap selection.
- Off, Help, and Settings are always active.
- The center and right columns change depending on the selected Mode.
Hovering the mouse pointer over a Tilemap name will show the Sorting Layer name and the Order within layer. If the Z-position of the Tilemap’s GameObject is not zero, then that label will also display “+NZ”.
Help
At the top of this panel, you’ll find a button which opens the Shortcuts Viewer editor window. This dockable window displays all the Painter shortcuts that you’d see if you opened the Unity Editor shortcut configuration.
Settings
This displays settings for the Painter editor window, some of which are duplicated by the Option buttons at the bottom of the window.
Hide Info Messages: When checked, Painter won't show informational messages even if the Toolkit’s Configuration Dialog’s “Informational” messages checkbox is checked. Painter can generate a waterfall of info messages, most of which you don't care about.
Overwrite Protection: prevents you from overwriting already-painted TilePlus tiles.
Tilemap Sorting / Reverse Tilemap Sorting: controls how the Tilemaps are displayed in the left column.
- If both checkboxes are unchecked, then the Tilemaps are sorted in ascending alphanumeric order.
- If Tilemap Sorting is checked, then the list is sorted by Renderer sorting layer and then sorting order; in ascending order.
- Reversing the result can more accurately reflect the display of Tilemaps in the hierarchy window, if you prefer to arrange them in a certain order, so some tiles appear ‘in front of’ others.
Sync Selection: This option synchronizes changes in Tilemap selection between the Painter and the Hierarchy window. When ON, clicking on a Tilemap in the Hierarchy selects the same Tilemap in Painter, and vice versa. This is usually desirable, but if not, use the option button to turn this off.
The following only applies pre-Unity6 but included for historical reasons
If Sync Palettes is checked then the system forces synchronization of palettes between Painter and the UTE when both are open. Additionally, if this sync is active when the Painter window opens, Painter will use the current- or last-selected Palette from the UTE. When “Use Unity Palette” is checked in Paint mode, the “Sync Palettes” configuration setting is internally forced active (the configuration setting isn’t changed). If you use the UTE brush-select dropdown menu to select a brush that does not inherit from GridBrush (e.g., GameObject brush) the brush selection will revert to the Tile+Brush or the standard GridBrush. Note that when using Unity 6 the Sync Palettes option doesn’t appear in the Settings panel; it’s always ON.
Aggressive Selection: If checked, Painter looks for this situation: User changes the Editor’s selection from a Tilemap to something else then returns to a Tilemap: in that case, given proper conditions (i.e., valid Tilemap and if the previously selected Action (Paint, Erase, etc.) would affect a Tilemap), reactivate the Paint Tool.
If the Unity Tilemap Editor is open and has an active tool aggressive selection is automatically disabled.
See the Technical Note at the end of this document.
Scene Marquee and Scene Text Color: change the color of the Marquees and text drawn in the Scene view.
Show SGrid and SGrid Color display the SGrid: the higher-order grid whose size is determined by the Chunk Size setting in the Chunk-snapping section.
- When checked the 'SGrid' (the super-grid using the 'Chunk Size For Snapping' setting) is visible in the scene as a box around the cursor location.
- It's handy when using the layout system.
- The SGrid Color field can be used to customize the color.
- There's a new MiniButton at the bottom of the window that mirrors the setting.
- The SGrid isn’t shown if the Settings Panel Chunk Snapping toggle is on.
Highlight Time: How long tiles will be highlighted upon selection. This setting also controls the fadeout time for notifications that appear in the Scene view panel.
Update In Play: should be checked if you want Painter’s inspectors to update in Play mode.
- When unchecked, most of Painter (but not all) is inactive when the Editor is in Play mode. However, if you want to ensure that the operation of your app in Editor-Play mode is completely unaffected by Painter you should close the Painter window.
Validate Tilemaps in Play only appears when “Update in Play” is checked.
- Painter’s Hierarchy Change event tests to see if any Tilemaps have been added or deleted during play mode when this checkbox is ON.
- The checks are only needed if you are adding or deleting Tilemaps in Play mode.
- Note that if this is OFF and you add or delete Tilemaps in Play mode then:
- Deleted Tilemaps: when something on that map is being inspected in EDIT mode's right-hand column may cause null-ref errors.
- Similarly, if you are examining a Tile in the right-hand column but the map has been deleted then you can also get null-ref errors.
- See the “Updating In Play” topic for more information.
UI Size, Palette Sprite Size, List Font Size, and Toolbars relative size are used together to adjust the appearance of the Painter window UI.
- UI Size: adjusts the size of UI elements in Lists.
- Palette Sprite Size: adjusts the size of the sprite displayed in the rightmost column when a palette's contents are being displayed.
- List Font Size: adjusts the font size in lists. You can make the display look awful as the resultant display is also affected by the UI size and sprite size configuration settings.
- Toolbar Relative Size: adjusts the relative size of the top and bottom toolbars and the Clipboard. Click the Refresh button at the bottom of the Painter window to update the GUI.
Max #tiles to display: this value is used to limit the number of objects to display in a list; the default is 400 and the range is 50 through 9999.
- If the number of tiles in a Palette is > "Max # Tiles to Display" then the list is truncated and highlighted with a yellow border.
- Purpose: to avoid slowing down the Editor when huge palettes are encountered. Your author has encountered palettes with over 7000 tiles!
Chunk-Style TileFab Snapping
There are three settings related to Chunk Snapping. Please see the “Advanced TileFab Use” document for more information. Please note that if the Chunk Snapping toggle is on then the only Tools that can be activated are Paint and Erase. Also, the Painting Source List only shows the Favorites List and TileFabs that are:
- Chunks – and
- Match the Chunk Size choice that you made in Settings.
Note that when the Chunk Snapping toggle is on, TileFabs will always show in the center column even if the Show TileFabs checkbox is off in the center column’s Options subpanel.
When you toggle Chunk Snapping off, the Settings pane will close. This is by design as a refresh needs to occur.
Convenience Features
Reset Painter Settings: This unsurprisingly reset all settings to defaults. The window is rebuilt.
Open TilePlus Config dialog: This is the same as using Tools/TilePlus/Configuration Editor.
Reload: Perform a scripting reload after a short delay.
Paint Mode
Paint Mode Basics
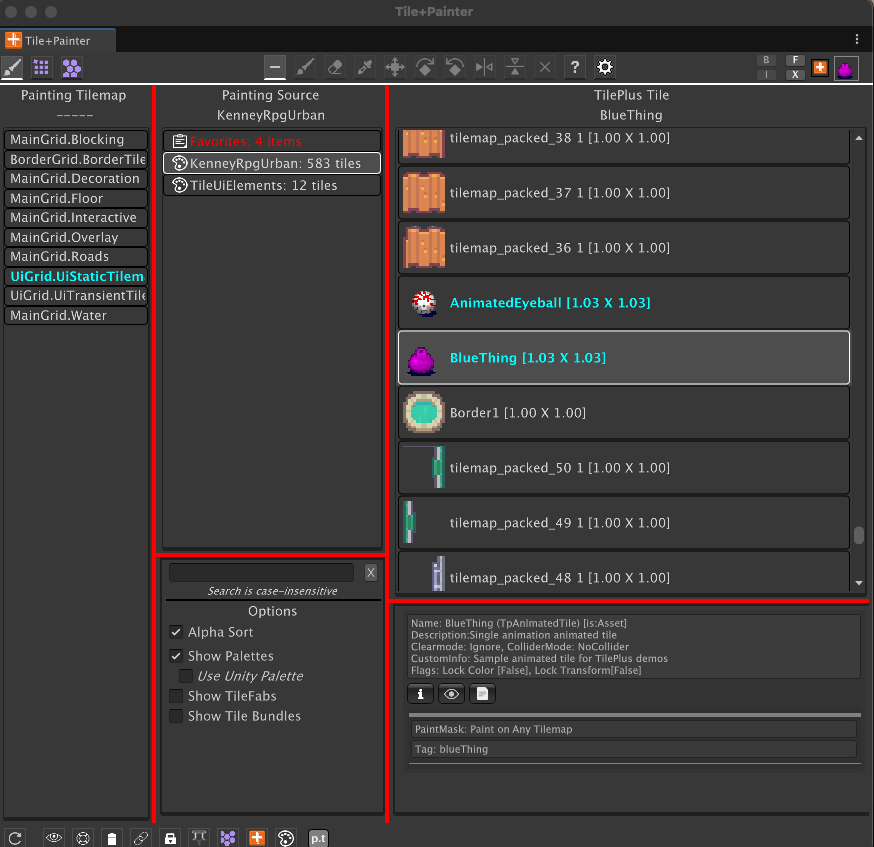
The left column always displays a list of Tilemaps. Select which Tilemap that you want to operate on.
The center column displays sources of Objects to paint. Select the source of Objects.
Then the right column displays the contents of the selected source as a list (shown here) or a UTE display. Select an Object to paint from the right column.
Then the Paint tool will become enabled. The system normally tries to automatically activate the Paint tool but if that isn’t possible just click on the Paint tool button.
When a Unity Palette prefab is selected in the Source column and the Use Unity Palette option is ON in the center column options section as seen here, then the Unity Tilemap Editor’s Palette view is displayed in the right column rather than a list.
Click on tiles to select a single tile or drag a marquee to multiple-select.
While you can drag-drop tiles from a project folder on to the grid display to add tiles to the Palette prefab, editing the Palette itself isn’t possible in this window for safety reasons.
Use the Unity Tilemap Editor if you need to modify the Palette or create new Palettes.
Please see the FAQ entry about using Painter and the UTE at the same time.
Note:
Please note that on rare occasions the palette display may be blank and the console will have the following message:
Assertion failed on expression: 'math::all(math::isfinite(size))'
This is an error deep within the UiElements Palette component. Click on a different Palette item in the center column and switch back to the Palette that you want to use.
Object Sources
The center column is a resizable split view. The top part displays all possible sources for painting Objects. Sources can be any Palettes that you’ve created with the Unity Tilemap Editor, TileFabs, Bundles, and Favorites. Painting on a Tilemap requires a selection from this list of sources.
The bottom part of the split is a search field and option toggles. These let you easily shrink or expand the number of sources in the Painting Source column.
Object List Options
Search field: text in this field is used to filter the sources by name.
The toggles in the bottom portion of the center column control what Object sources appear in the top portion of the center column. The Favorites list is always available.
- Show Palettes: Show Palettes
- Use Unity Palette: Show Tiles in a grid (when ShowPalettes checked)
- Show TileFabs: Show TileFabs
- Matches Only: Show TileFabs that match existing Tilemaps (when Show TileFabs checked)
- Show Tile Bundles: Show Tile Bundles
- Bundle Tiles View: Show Bundle contents in a list (when Show Tile Bundles checked)
Favorites
The Favorites List operates in conjunction with the Clipboard and the Pick tool.
New items are always added to the top of the Favorites list.
You can use the Favorites List just like any other Tile Source. Tiles, Prefabs, Bundles, or Multiple-selection Picks are never modified: a copy of the selected Favorites item is placed in the Clipboard. This ensures that applied modifiers (See Custom Modifiers) never affect the selected Favorites item.
New items are always inserted at the beginning of the list. The Favorites List can be cleared with the Tools/TilePlus/Clear Painter Favorites.
When viewing Favorites, each entry displays a small ‘X’ that you can use to delete individual items. The maximum size of the list is limited to 32 items. It’s truncated when the limit is exceeded if one or more new items are added. The list is saved in the filesystem; at various times the list is pruned (see below).
Cloned tiles (e.g., TilePlus tiles) cannot be added to Favorites when picked from a scene as a single tile. However, multiple-selection scene Picks which contains clone-state TilePlus tiles can be added to Favorites and will have new GUIDs when painted on a Tilemap.
Prefabs as Favorites
You can add Project folder Prefabs to the Favorites List. Note that specific prefabs may do weird things or cause exceptions.
- For example, you can add a Palette prefab to the Favorites List and paint it. Surprisingly, this works.
- Adding a prefab with scripts which, when painted, execute out of context (e.g., have ExecuteAlways or ExecuteInEditMode attributes) may cause exceptions when painted.
- A preview icon can’t be generated for certain circumstances. Unity’s GetAssetPreview functions are used, and the result depends on GetAssetPreview’s return value. In some cases, it will generate a solid one-color texture when it can’t create a preview.
Multiple Selections as Favorites
Favorites holds three types of items in two Lists:
- Tiles, Prefabs, or Bundles
- Multiple Selection picks
These two lists aren’t visible to you: they are needed because multiple selection picks are Scriptable Objects which can’t be easily serialized to the filesystem. Hence, internally the two types of Objects are handled differently.
Multiple Selection Picks are identified as such and highlighted with a yellow text color. The sprite shown on the item is the first non-null tile in the pick or a generated icon.
Multiple Selections include area picks from the scene (when you use the Marquee Shortcut) and area picks from the Palette display (Palette picks) seen when ‘Use Unity Palette’ is checked.
Multiple-Selection scene picks are placed in the Clipboard (unless you hold down CTRL when picking from a scene, which requires some dexterity); Use the “F” button to add the pick to Favorites. Adding a pick to Favorites generates the icon for the pick. Note that this can take several seconds, depending on how many tiles are in the pick, the size of the tile sprites, whether they’re in a texture atlas, and whether or not they are marked readable.
Palette picks are always put in the Clipboard. Again, use “F” to add the picks to Favorites.
When you have a combination of the two types of items, and you exit, and restart Unity the Multiple Selection items are always displayed at the top of the Favorites list.
Bundle Multiple Selection Picks
If a Multiple Selection Pick is in the clipboard, you can copy it into a Bundle by using the Tools/TilePlus/Bundle Clipboard menu command or click the B button. An Icon will be automatically generated and added to the Bundle.
Conversely, when inspecting a Bundle in Paint mode, the small eyedropper button near the bottom of the right column can be used to convert it into a Multiple-selection Pick. Note that Prefabs in the Bundle are ignored.
Favorites Pruning
Duplicate, null (deleted) Prefab assets, or null (deleted) tile assets, or null multiple-selection picks found in the Favorites List are ignored and are deleted from the list. For example, if you select a tile or Prefab from the Favorites List and CTRL-Click the Clipboard (the thumbnail icon at the top right of the Painter window) the item won’t be added to the Favorites List a second time.
Duplicates are more difficult to detect for Multiple Selection picks. To simplify and avoid lengthy operations, comparisons don’t include all the tiles within the Selection. However, if there are any null tiles within such a pick the entire pick is deleted. This can occur if you delete an asset (Prefab, tile, Bundle) that was referenced in the Favorites list.
Palettes
If you want to omit a certain Palette from the list, change its GameObject’s layer to anything other than default. To omit a TileFab or Bundle, set its IgnoreInPainter field to true in an Inspector.
When Show Palettes is checked, the Use Unity Palette checkbox appears. Unity Palette refers to the UTE palette display, that is, the view of tiles which is and looks like a Tilemap.
When a Unity Palette is selected in the Painting Source (center) column and “Use Unity Palette” is checked, the Palette view is displayed rather than a list of tiles.
This functionality is currently deemed “experimental”. However, this display is the exact UI Toolkit element that’s used in the UTE window. Palette editing is not supported, however, you can drag-drop tiles into any existing Palettes.
You can paint single tiles or draw a marquee to select multiple tiles and paint them, just like a normal palette. However, since Painter does not use brushes, the Brush dropdown is omitted.
Different revisions of the Unity Tilemap Editor use this same component, which has several oddities when drawing marquees (selection rectangles) in the display.
When “Use Unity Palette” is checked, the “Sync Palettes” configuration setting is internally forced active (the configuration setting isn’t changed). If you use the UTE brush-select dropdown menu to select a brush that does not inherit from GridBrush (e.g., GameObject brush) the brush selection will revert to the Tile+Brush or the standard GridBrush. Note that when using Unity 6 the Sync Palettes option doesn’t appear in the Settings panel.
Note that if you have both Painter and the UTE windows open at the same time it can be confusing since they both draw marquees in the Scene view. If you need to use both Painter and Palette, try changing the Scene Marquee and Text colors in Painter’s setting panel. Also check out “Painter Exclusive Mode.” See the technical note at the end of this document for more information.
It is possible to have a tile that appears in the UTE display but does not appear when the same palette is viewed as a list due to differing behaviours for null or missing sprite references in the tile asset.
Painting Prefabs
Instantiated Prefabs are always parented to the selected Tilemap and set to the same layer.
You can use transform modification shortcuts like ALT+V, ALT+R/T/X/C/Z when previewing Prefabs. This does not affect the Prefab asset at all: when you release the mouse button, a copy of it is instantiated, has its transform modified (if only to set the position) and then painted. If you need to affect the Z-position of a Prefab prior to painting it, use the Custom Modifiers from the Painter Modifiers editor window.
It’s important to note that the preview you see when painting a prefab is an “asset preview,” like the preview seen in an inspector. It’s entirely possible and fairly easy to use the various shortcuts to create a transform that’ll place the prefab at a position and/or rotation that’d be invisible when the Scene view is in 2D mode. If it appears that your prefab disappears when you paint it, that’s probably what happened.
If the preview cannot be obtained, a ‘?’ or ‘X’ icon is displayed.
Painting Prefabs from a Bundle
When previewing a Bundle (including previewing a TileFab, which is just a collection of Bundles) up to 128 prefabs can be previewed in total, per preview cycle (which happens several times per second depending on how fast you move the mouse). So, if you have a TileFab with several Bundles and the total number of Prefabs in all the Bundles is greater than 128 then some of the bundled Prefabs won’t preview.
Aside from that, you can preview and paint Bundles (when the Bundle Tiles View option is unchecked) and TileFabs with embedded Prefabs. The preview works the same as described above: they’re asset previews. The only difference is that transform modifications are inoperative on groups of prefabs, Bundles, and TileFabs.
One advantage of using Bundles for prefabs is that any transform changes such as rotation and scale are preserved and then restored when the Bundle’s prefabs are painted via Painter or calls to the TileFabLib library.
Transform changes don’t show in the preview, and the positioning during preview may be slightly incorrect due to integer math issues.
TileFabs, Bundles, and Chunk Snapping
Recall that a Bundle (TpTileBundle) asset is an archive of a single Tilemap and a TileFab (TpTileFab) asset is a collection of Bundle assets.
To exclude a TileFab or Bundle from Painter, inspect the project asset and set the IgnoreInPainter field to true in an Inspector.
A Bundle asset can be painted like any other tile asset, and you can see the preview as you move the mouse pointer. Painting one of these will overwrite any tiles on whatever map is selected in Painter.
Additionally, if the Bundle Tiles View option is checked, the Bundle’s tiles and Prefabs are displayed in a list, and you can paint any of these objects individually. For other interesting things that you can do with Bundles in Painter, see “Fun With Prefabs and Bundles.”
Using a TileFab is a bit trickier: if you examine one you’ll see that each Tilemap in the collection has a specification for the name of a Tilemap or a tag: these are taken from the GameObject parent of the Tilemap component when the TileFab is created.
The idea is that when you paint a TileFab you’re really painting on at least one, but more likely several Tilemaps at the same time with each Bundle referenced by a TileFab corresponding to a particular Tilemap.
However, the Painter has no way of knowing which Bundle is for a particular map in your scene. And you probably don’t want it to guess! Furthermore, the TileFab may have four Bundles, but your scene may have more or fewer than that.
If you select a TileFab in the center column when the window is in Paint mode, you’ll be presented with the names and tags specified in the TileFab. It’s up to you to ensure that they exist. Mismatches are just omitted from previews and Painting.
For example, if you have Scene Tilemaps named A and B but your TileFab has a collection of four Bundle assets with Tilemaps A, B, C, and D then only A and B will be previewed or painted. C and D will be ignored and neither previewed nor painted. If your scene only has Tilemaps named X and Y, then nothing will be previewed or painted.
So, the names or tags must match.
Note that when “Show TileFabs” is checked another toggle becomes visible: “Matches Only.” If that’s checked then only TileFabs which match named Tilemaps/Tags in the scene are shown in the center column list.
“Matches Only” isn’t perfect: if you have multiple scenes loaded with similar Tilemap names and tags you can end up painting a TileFab’s embedded Bundles into different scenes. Be careful.
If you’re using Chunk-Style TileFabs for painting, Chunk Snapping can be really useful: read on...
Chunk Snapping
The Painter Settings panel has three settings that enable Chunk Snapping.
Chunk snapping allows you to easily paint and erase equal-sized Chunks on a virtual grid, with snapping.
The Chunk Snapping checkbox enables the mode and locks the fields just below.
- Set the Chunk Size for Snapping field to the fixed size of the TileFabs that you want to paint (4,6,8…).
- Set the Chunk Snapping World Origin field to the Origin position for TileFab painting. Usually 0,0,0 is what you want.
The center column will show only Chunks (TileFabs) whose bounds are the correct size.
The only active Tools are Paint and Erase.
Two marquees appear while using those tools when Snapping is on:
- At the nearest Chunk location on the virtual grid.
- At the Mouse Position
Both are the same size as the Chunk dimensions. If this doesn’t match the Chunk dimensions then Chunk Size for Snapping doesn't really match the size of the Chunk (which must be square and of even dimensions e.g., 4x4, 6x6 etc.). If the positioning seems off, check that the World Origin is set properly.
When the mouse position is on the virtual grid defined by the Chunk Size and the World Origin:
- The two Marquees merge.
- The color of the Marquee will change.
- <G> appears at the beginning of the informational text string and the font becomes italicized.
When the mouse cursor isn’t on the virtual grid and you click, the Painter paints the Chunk in that nearest virtual grid location. The mouse cursor won’t move.
If you paint the same chunk at the same virtual grid location, then the area is erased first.
When using the Erase tool when Snapping is on, a TileFab that uses the same Tilemaps must be selected in the center column so that Erase knows which maps to erase. If that’s not the case, nothing happens, and a reminder dialog box will appear.
Erase deletes all tiles in the highlighted region. Any children of the Tilemaps’ GameObjects in that area are also deleted.
Erase requires that the mouse position be aligned with the virtual grid; watch the marquees and the <G>.
Show SGrid option
Show SGrid can be activated by a mini-toolbar button at the bottom of the window or from the Configuration panel (Gear icon).
- When checked the 'SGrid' (the super-grid using the 'Chunk Size For Snapping' setting) is visible in the scene as a box around the cursor location.
- It's handy when creating Tile Scenes using the layout system.
- There's a Color field just above the checkbox to customize the color.
- It's not shown if the Settings Panel Chunk Snapping toggle is on.
List of Objects from Selected Source
The right column is also a resizable split view. The top part of the split lists the Objects from the Source that is selected in the center column or the optional UTE palette view when the Source is a palette.
When you click on an Object in the List or Palette view, that Object is placed in the Clipboard and information about the Object is displayed in the bottom part of the view along with some UI buttons (the exact appearance depends on what is in the Clipboard).
The Clipboard content is ALWAYS what will be painted when using the Paint tool and its internal data is what’s modified when you use any functions that modify the content, e.g., rotating or flipping a tile during preview.
The bottom part of the view is called the Brush Inspector since it’s essentially the same as the Brush Inspector seen in the bottom part of the UTE when using the Tile+Brush. This shows information about whatever Object is selected in the top part of this right-hand column.
The Brush Inspector may have several buttons, depending on the context. When the Object is a Tile or a Prefab, you generally can open a Unity Inspector on the asset or focus the Project window on the asset.
If the Object is a or TilePlus Tile you can also open your IDE (VS, Rider, etc.) to view the script.
If the Source is a TileFab or Bundle (assuming Bundle Tiles View is unchecked), then there’s only one choice since these are assets and not lists of tiles. Hence, this single item is pre-selected in the right column and pre-placed in the Clipboard.
If the Object in the Clipboard is a TilePlus tile picked from the Scene:
- Such a tile is a clone.
- These are re-cloned when painted on a Tilemap.
Edit Mode
Editing in Painter
Basics
The left column still displays a list of Tilemaps. When you select a Tilemap in the left column then the center column will display the tiles in that map along with thumbnail images of tile sprites and their positions, followed optionally by the tile’s Instance Id. If the tile is a TilePlus tile, then the color of the label is bolded and changed to the cyan color (or blue if not in Dark mode).
When you select a tile in the center column, the right column shows an appropriate selection inspector, and the tile in the scene will be highlighted for a time determined by the “Highlight Time” setting. The highlighting does not occur if any Action button is selected and that action type affects the scene (anything aside from Off, Help, or Setup).
Use Ctrl+click on a tile to open its script in your IDE.
Use Alt+click on a TilePlus tile to open the instance in a new window.
- This is experimental.
- Only applies to TilePlus tiles.
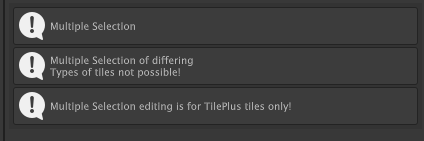
Multiple-select two or more TilePlus tiles of the same Type and you can edit the tiles' fields in a special multiple-selection inspector.
- This is NOT the same as a Unity Inspector's multi-object editing.
- Internally, the first TilePlus tile in the selection is cloned.
- You're editing this 'mock' tile.
- After you make any changes, an Apply button appears.
- When Apply is clicked, ALL of the mock tiles' fields are copied to the selected TilePlus tiles.
- Only public fields which are decorated with the
[TptShowField],[TptShowEnum], and[TpTShowObjectField]attribute are affected. - The tile's GUID isn't affected nor are any other private fields or tiles without the attribute.
- The mock tile is discarded.
- Only public fields which are decorated with the
The only fields that can be edited are those which are 'decorated' with certain attributes as mentioned above. The TilePlusBase section and Customized IMGUI inspectors added to specific TPT tile classes with the TptShowCustomGUI are not shown because they can cause exceptions in this isolated editing environment.
Note: any fields decorated with TptShowObjectField attribues which have been set up to allow Scene objects OR have been set up to handle 'sub-objects' (don't worry about it) won't be shown.
ALL tiles in the multiple-selection must be of the same Type and they all have to be TilePlus tiles.
Different Types:
Mixing of TilePlus and Normal Unity tiles:
Tilemap List Options
The bottom part of the center column has display, sorting, and filtering options.
Show IDs: if checked, tile Instance IDs are shown next to their position. For TilePlus tiles this is the ID of the clone instance in the scene. For all others, this is the ID of the Asset in a Project folder.
Sorting: Choose None, by Type, X or Y, or by Instance ID.
Filtering
- Filter by Type: Choose TileBase for ALL tiles. Choose Tiles for all tiles derived from Tile (most normal Unity tiles and all TilePlus tiles; but NOT Rule Tiles, AnimatedTiles or other Tiles deriving directly from TileBase rather than Tile).
- TPT tile types are added to this list automatically. Those deriving directly from TileBase require a simple plug-in. Plugins are already provided for Rule tiles and AnimatedTiles.
- Filtering by Tag: this is only used for TPT tiles (since others don’t have tags).
The filters are not persistent and automatically reset when appropriate. The filters are ANDed, that is, both the Type filter and the Tag filter are used. Internally, the Tag filter runs first (only for TPT tiles).
When the number of tiles in the list is greater than the Settings value: Max # Tiles to display then the list is truncated, the labels change color, and filtering isn’t used.
Selection Inspector Variants
For TPT tiles you’ll see Selection Inspector shown in various images in these docs.
Tile tiles (normal Unity Tiles) are assets so you can only open an Inspector on the asset.
Listing all the positions for a Tile might make the list thousands of items long, which would be useless. However, you can edit a particular Tile position on a Tilemap: use the Pick tool in Edit mode.
The Selection Inspector will look like this:
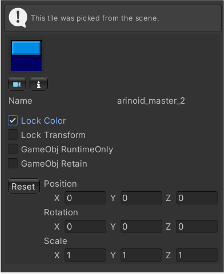
This inspector has the following features:
- See a preview of the Tile’s Sprite.
- Focus on the selected Tile.
- Inspect the selected Tile.
- This action opens a Unity Inspector on the Tile ASSET.
- This is the Tile asset in the Project, so be careful!
- Change the Lock Color or Lock Transform flags.
- Change the two GameObject-related flags.
- Change the Color if Lock Color is unchecked.
- Change the Transform if Lock Transform is unchecked.
If you change the flags, Color, or Transform: The Asset is not affected since these changes only affect the Tilemap at the Tile’s position.
To reiterate: changes in this inspector do not affect the original Tile asset in your Project folder. The only time that that could happen is if you open the asset in a Unity Inspector as mentioned above.
The two GameObject flags are not visible if the Tile doesn’t have a GameObject.
TileBase tiles (i.e., Rule tiles, AnimatedTiles, and the like) just show the tile sprite (from the plugin) and allow you to open an inspector on the TileBase tile asset (again, this is in the Project). If you want to edit the values at the Tilemap position, use the Pick tool at that position. However, results may not be what you expect when using Rule tiles.
Grid Mode
Painter's Grid Mode
Working with Painter's Grid Mode
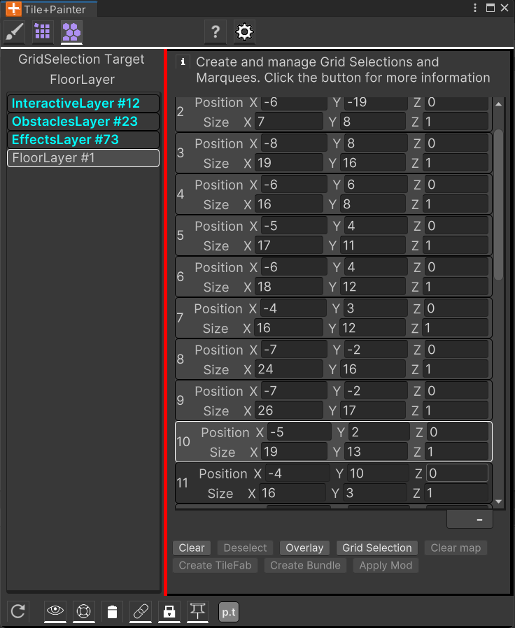
This pane is used to organize Grid Selections. When this panel is open you can capture Grid Selections with the UTE or from within Painter.
What you see in the list are BoundsInts from Grid Selections. The BoundsInt is all that’s needed to create a new Grid Selection on demand.
To capture a Grid Selection from the Painter, first select a reference Tilemap in the left column. This selection determines the GridLayout used when composing the visible Marquee. Then hold down the Marquee Shortcut key, click and hold the mouse button, and drag out the size that you want. When you release the mouse button a new Grid Selection is created and added to the list.
If you don’t like the Grid Selection just release the shortcut key before you release the mouse button, and the Grid Selection is discarded. The Grid Selection will also be discarded if the size of the Grid Selection evaluates to 0. Please see the “Known Issues” section at the end of this document for a note about how Tilemaps whose world origin isn’t (0,0,0) can affect the Grid Selection tools.
- The items in the list are intentionally not editable.
To use one of the items in the list, click on it to select it. When a selection exists and there’s a valid Tilemap selection in the left column, then the Overlay and Grid Selection buttons become enabled.
- Only one overlay can be shown at a time.
The Grid Selection causes the selected list item to become the current Grid Selection.
- This is shown in the Scene View.
The selection will remain visible until the active tool changes (e.g., you change to the Palette or some other Tool like the Unity Move or Rotate tools) or a new Selection or Grid Selection is created. Since setting a Grid Selection in the Editor deselects the target Tilemaps visually, the active map name appears above the buttons when a Grid Selection is active.
Some of the more obvious uses of this feature include using the same Grid Selection repeatedly when creating TileFabs or Bundles, applying “Mods” to a group of tiles, Tools/TilePlus/Clear Selected Tilemaps utility function.
One ends up using the Palette over and over just to create the same selection, so this can become a very handy workflow shortcut.
Clear map uses the active Grid Selection to invoke the Clear Selected Tilemaps menu function.
Create TileFab uses the active Grid Selection to invoke the Bundle Tilemaps menu function.
- If the SHIFT key is held down when you click Create TileFab many of the prompts are omitted.
- This is a special feature you can use when creating TileFabs for the Layout system.
- If the target output folder does not have a "Chunk Grid Selector" asset then one is created.
- The Chunk Grid Selector asset is initialized with a reference to the created TileFab.
- If a single Chunk Grid Selector asset exists a confirmation dialog box appears, if you agree, the Selector is updated with the new reference.
- These are just QOL features that make iterative level design a bit easier.
- Note that even if the Selector is updated any existing assets in that folder are not deleted or changed.
Create Bundle uses the active Grid Selection to Bundle a single Tilemap and all Prefabs parented to that Tilemap.
Apply Mod is used to apply a mod from the Painter Modifiers selection to the area within the Grid Selection.
-
When there’s an active Grid Selection, a selected Tilemap, and an active Mod (at least one Apply item is selected) then the Apply Mod button is enabled. If you click the button the Mod is applied to all tiles within the Grid Selection. Prefabs are not affected.
-
Just like when Painting and using mods, only the Tilemap is affected; the tile assets aren’t modified.
-
This is handy when you want to, say, change the sprite color for a block of tiles. You can use the Apply field to select Color mods and use the Color picker to set the color.
-
Unlike using ALT+V to apply a mod to a tile or group of tiles during Paint preview, here you’re changing already-placed tiles.
-
Undo is supported for this operation.
-
Note that as mentioned elsewhere, the result of using a mod depends on the Lock flags of the tiles. Painter is usually able to warn you that the mod won’t work properly when there’s a conflict; that is, if any tile in the selection has the Lock Color flag and the mod changes color or the Lock Transform flag is set, and the mod changes the transform of a tile.
Painting Workflow
Step by Step ...
Painting
Getting Started
Enable Painting objects by clicking on the Paintbrush icon in Paint mode.
- Select a Tilemap to paint on in the left column.
- Select a source of Objects from the center column: a Palette, the Favorites List, a TileFab, or a Bundle.
- Select a specific Object in the right column (usually not needed for TileFabs or Bundles).
- Select the Paint action button if it isn’t automatically selected.
- Move the mouse to the painting position.
- Click to Paint.
Overwrite Protection: this prevents you from accidentally replacing a TilePlus tile. This is controlled in the Settings panel, or you can toggle this on/off with an option button at the bottom of the window.
- Active: “Protected” is displayed when a tile is under the cursor position. Hold the ‘1’ key to temporarily unprotect.
- Inactive “Will Overwrite” is displayed when a tile is under the cursor position. Hold the ‘1’ key to temporarily protect.
TPT tiles also have inclusion and exclusion lists that specify which Tilemap or Tilemaps are allowable to paint on for specific tile assets. See the TilePlus Toolkit documentation for more information.
- Overwrite protection is ignored when painting TileFabs, Bundles, Multiple-selection Picks, or Prefabs. Normal Unity tiles do not use overwrite protection.
Click on the mouse to paint a single Object. Shift-Dragging will repeatedly paint the same Object. Ctrl-dragging repeatedly paints on a single row or column. You can use the six transform-modifying shortcuts prior to clicking.
- Transform modifications and Shift/Ctrl-dragging can’t be used with TileFabs or Bundles.
- Shift/Ctrl-dragging can be used with multiple-selection picks. The result can be a bit strange depending on the exact composition of the pick.
Paint Tool and Grid Selection
Recall from the Grid Selection Mode discussion that you can hold down the Marquee Drag shortcut key, click the mouse and drag a marquee to create a Grid Selection of a particular size.
This also works when using the Paint tool. If the selected Object for painting is a Prefab or any tile which is not a TPT clone tile, then dragging a Marquee will fill the resultant Grid Selection with the selected Object if the Marquee Drag Shortcut key is held down when the mouse button is released. Overwrite protection is not used.
This only works on single Objects such as tiles or Prefabs, and won’t work for multiple tile Picks, Bundles, or TileFabs. See Chunk Snapping for painting TileFabs on a grid.
If there’s an existing Grid Selection in the Scene View (including a Grid Selection that was made active from the Grid Selection pane) then clicking the mouse within the Grid Selection will fill that Selection area with the selected Prefab or non-clone tile.
The case of a TPT clone tile being unpaintable in this fashion will only occur if the selected tile (i.e., the one in the clipboard) is a ‘pick’ of a TPT clone tile in the scene.
A Grid Selection made while using the paint tool is added to the list of Grid Selections in the Grid Selection pane.
Erase
- Select a Tilemap in the left column.
- Click on a tile to delete.
- If Confirm-Delete is active, you’ll be prompted about the deletion. To Drag-Erase, hold down either Shift or Ctrl, but note that Confirm-Delete is ignored.
You can also drag a marquee using the Marquee Shortcut. When you release the mouse button, all tiles on the selected Tilemap within the area are deleted. Again, Confirm-delete is ignored.
Pick
The Pick tool is used differently in Paint and Edit modes.
Picking in Paint Mode
In Paint mode, Pick is used to copy one or more tiles from a Tilemap to the Clipboard or Favorites List. The Shift and Ctrl buttons act as options, as does the “Pick to Paint” option button at the bottom of the window (Pin icon).
- Select a Tilemap in the left column.
- Click on a tile to select a single tile or drag a marquee while holding down the Marquee Shortcut.
This creates a “Pick” or a “Multiple-tile Pick”.
Hold Ctrl to place the Pick in the Favorites List rather than the Clipboard. If you hold Ctrl and Shift together the pick operation does not occur. Text at the cursor position shows the various pick options as you select them. Also read “Picking, the Favorites List, and TPT tile cloning” elsewhere in this document.
Make a Multiple-Selection by dragging a marquee while holding down the Marquee Shortcut key. When you release the mouse button, all tiles on the selected Tilemap within the area are picked to the Clipboard. This is called a Multiple Selection or Multiple-tile selection.
To add a pick to Favorites, click the F button in the Clipboard area. An Icon will be added to the Pick. See “About the Icon” elsewhere in this document.
Pick-to-Paint Mode
If the Pick-To-Paint option button is active, then the active tool will change to Paint right after you Pick. If you just want to copy to the Clipboard, then hold down Shift when you click.
If the Pick-To-Paint option button is inactive, then the active tool will not change. If you want to change to Paint right after you pick, hold down Shift when you click.
Note: Pick-to-Paint is only available in PAINT mode.
Picking in Edit Mode
This is much simpler:
- Select a Tilemap in the left column.
- Click on a tile to select a single tile to inspect in the rightmost column.
Move
Moves a single tile or a group of tiles from one position to another, on the same or a different Tilemap.
This action has four sequential steps:
- Click the Move tool button or use the shortcut key.
- Select a Tilemap in the left column (Can be skipped if a Tilemap is already selected).
- Picking step:
- Select the tile to move (you don’t have to use the Pick tool, this is automatic).
- Multiple-select a region by dragging the Mouse while the Marquee Shortcut key is held down.
- Move: Repaint the tile or selection.
After the first Move, you can continue to Pick/Move repeatedly.
To reset the step to Pick just click the Move button again.
To cancel Move when Picking either click the button again or click the OFF button.
Note that neither Shift nor Ctrl affects the Pick operation when within a Move sequence. If the tile is a TilePlus tile, the Tilemap exclusions operate as usual when you repaint the tile.
For all tiles, Overwrite Protection for TilePlus tiles is active as well except for multiple-selections. You can use any of the transform-modifying shortcuts prior to clicking during the Move phase (which is basically Painting).
Text at the cursor position shows “Move-Pick” during the Pick step.
The center and right columns of the Painter window are disabled during all steps of the Move process to avoid inadvertent selections in those areas.
You can also drag a marquee during the Pick phase by using the Marquee Shortcut. When you release the mouse button, all tiles on the selected Tilemap within the area are copied to the Clipboard and will paint in the Paint phase of the move.
Note that during the Paint phase of the move you can use the Rotate/Flip shortcuts for single tiles or groups of tiles as well applying selected modifiers with ALT+V.
Changing Tilemap After Move-Picking
If you change the Tilemap after the Pick, then you can move the tile or selection to the new map.
If a tile has a GameObject or is a “Rule” tile, then the results might be unexpected.
Rotate, Flip, and Reset Transform
You must select a Tilemap in the left column prior to using these actions.
Text at the cursor position reminds you which action is currently available.
Note that these actions affect the Tilemap when you select a tile with the mouse, but they affect the transform of the tile or group of tiles (Picks) when applied using shortcut keys during preview (while painting, which includes the Paint phase of a Move).
Reset Transform is also handy if you’ve modified the transform of a tile at a position in a Selection Inspector and you need a quick way to reset it.
It’s important to note that if a tile asset’s Lock flags are set to Lock Transform then none of the shortcuts will work, which is what should happen but the lack of any visual feedback can be unexpected.
Modifiers
Custom Modifiers are “presets” and are applied with a shortcut key, defaulting to ALT+V (Win) or Option-V (Mac). This works in conjunction with an Editor window cleverly named “Painter Modifiers,” available from the Tools/TilePlus menu or by clicking on the P.T button at the bottom of the Painter window.
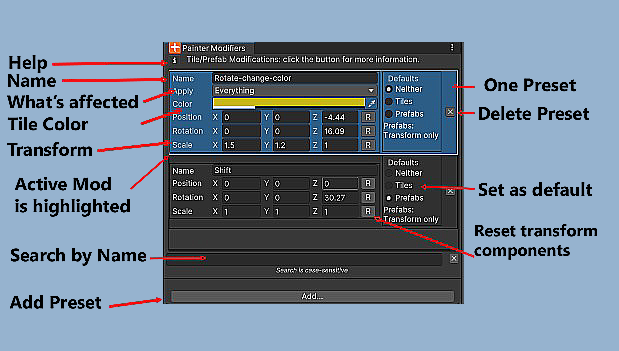
Looks confusing? It’s a really powerful feature but there’s a learning curve.
Each preset shown in the image has several components:
- A name field: used in conjunction with the Search box right above the Add button.
- A dropdown field “Apply” that has selections for how the preset is applied.
- A Color picker
- A three-element Position, Rotation, and Scale section (transform) with reset buttons for each element.
- A Defaults selection.
You use the Apply field to determine what this Modification does when activated. For example, you can modify just the color or just the transform for a single tile or all the tiles within a Multiple-Selection during preview.
You can also use Painter’s Grid Selection mode to apply the preset to an area of tiles on a Tilemap but within a Grid Selection.
Use the Color picker and transform fields to set up the modification.
The Defaults section of each preset is used to select a particular preset as the default for tiles or Prefabs. You might notice that the bottom preset is set as a default for Prefabs – in that case the Color picker is hidden since it doesn’t apply. That’s also true when a non-default preset is used to modify a Prefab.
What do the defaults do and what are they good for?
A good example is when you want to paint one or more tiles but always want the scale changed and you don’t want to fiddle with the keyboard shortcuts each time. Once a preset is set as a default, it is applied immediately each time that you choose a Tile or Prefab to paint, including when you Pick a tile from a Scene Tilemap during the Pick phase of a Move (that is, when you’re using the Move action).
Tip: You can use a default Tile modifier to emulate the UTE’s Z position field.
Just set the transform position Z as you like and use that modifier as the default for tiles. You can have several modifiers with different Z offsets, and it’s easier to select different modifiers than typing in UTE’s Z position field repeatedly.
Similarly, you might want to paint a Prefab several times but need it scaled the same way each time.
P.T Button
When a default tile or Prefab preset is active the Default Transform Indicator P.T at the bottom of the Painter window indicates that state.
- p.t No active default presets
- P.t Prefab default active but tile default inactive
- P.T Both defaults active
You can click P.T to open the Painter Modifiers window at any time.
How to Apply Modifiers
Non-default Modifiers are applied during the preview seen when moving the pointer over the Scene view while painting by using the ALT+V shortcut. This also applies during the Paint phase of a Move action.
When applied, the item selected (or previously selected if the Modifiers Editor window is closed) is used to change the transform of the tile or Prefab about to be painted to the one specified in the Modifiers Editor window selection.
The modification is applied to the current tile or Prefab in the Clipboard and persists until you select another object to paint.
The Reset Transform action or shortcut key (Default is ALT+Z) can also be used to reset the transform within the Clipboard.
The Clipboard’s icon shows the Transform icon when the current tile’s transform has been changed.
When using a preset on a Prefab keep in mind the same warning applied to using the Flip and Rotate shortcuts with Prefabs: it is easy to change the transform of the GameObject in such a way that it’ll be invisible to you when in 2D mode.
Search
The search field scrolls the list to the entry with a matching Name field, if any.
Tips
Tip: Dock the Modifiers Editor
- If you use it frequently, dock the Modifiers Editor to the left or right of Painter.
Tip: Copy transform and Color from Clipboard
-
If Painter has a modified single tile in the Clipboard, the Modifier editor’s "Add..." button changes to "Add from Clipboard". A click would copy the color and transform from the modified Clipboard Object to the new preset.
-
This only works with single tiles but is a nice shortcut to copy transform/color changes from a tile that you modified during preview.
Tip: Persisting Changes to Multiple Selections
- If you find that in a particular instance you can’t apply a default Modifiers to a Multiple-Selection Pick, you can use ALT-V to modify the tiles in the selection and click the F button to save that modified group of tiles as a Favorite or click the B button to save the selection as a Bundle.
Tip: Save and Load modifiers to a file.
Limitations
When changing Color or transform on tiles, the existing state of tile Flags for the tile asset will affect whether a Color or transform change is actually applied; for example, if the Lock Color flag is set at a position, then you can’t change the Color.
The system tries to check if modifications will work. For example, if you try to paint a tile after applying a Color modification but the tile asset has the Lock Color flag set, you’ll get a warning message, and the tile won’t paint.
If you were to paint the tile, the fact that the Lock Color flag is Set means that the color change will revert when the Tilemap is refreshed.
See the FAQ item: I Can’t Paint Modified Tiles
It's important to note that these modifications ONLY affect the Tilemap and never affect the tile assets themselves.
How Different Tile Types are Handled
Painter expects to encounter one of two basic tile varieties: Tile and TileBase. There’s actually a big difference between the two.
A Tile has a sprite, a transform, and a Color. All tiles derived (subclassed) from Tile have these characteristics. However, a TileBase has none of those. Any tile that isn’t derived from Tile needs special handling for accessing these properties so that icons and previews of the Sprite can be created.
For example, a Rule tile has a m_DefaultSprite field rather than a Sprite property. 2D Tilemap Extras’ AnimatedTile is also derived from TileBase and has only a list of sprites but no Sprite property.
Plugins for TileBase types
Plugins for TileBase types are easy to create, and examples can be found in the Plugins/TilePlus/Editor/Painter/TpPainterPlugins Assets folder.
Basically, a plugin is a Scriptable Object asset which you place in an Editor folder (outside of the TilePlus plugin folder). It provides access to the missing properties (sprite, transform, Color).
Please create only ONE asset for each Type (C# Type). It does not have to be in an Editor/Resources folder, just in an Editor folder (so it doesn’t become part of your build).
Plugins for basic Rule tiles and for the Unity AnimatedTile are already installed. The Rule Tile plugin works with the basic Rule tiles from Unity’s 2D Tilemap Extras package.
If there’s no plugin for a Type, then that Type of tile will not have any paint previews nor thumbnails in lists and inspectors. Hence, the plugins are a workflow convenience only.
If you add a plugin yourself, you might need to perform a scripting reload for the plugin to be recognized. This can be done in Painter via the Setup panel’s Reload button (at the bottom of the panel).
If done correctly, the plugin’s name should appear in the System Info window.
- Ensure that
Show Painter/Selection Infois checked; plugins are listed near the end of that group's information.
Picking, the Favorites List, and TPT tile Cloning
TPT tiles require special handling when picking a tile from the scene and painting it, or if a TPT tile is picked from the scene, poked into the Favorites List, and subsequently painted on a Tilemap.
Why is this? TPT tiles are cloned from the original TPT tile asset located in a Project folder somewhere. This allows each TPT tile to be its own instance in the Scene. When picked, the clone tile is what’s picked.
If that clone tile were to be repainted, any tile positions with that clone would have the same instance as the original clone. Changes to any of the clones’ fields would affect all of them. Hence, we re-clone the TPT tile, creating a fresh copy. This is all handled transparently, but you will see messages such as 'Picked tile is a clone' or similar in Painter’s Edit-mode inspector.
None of what’s mentioned in this paragraph affects any Tile or TileBase tiles; they’re never cloned.
Chunk Snapping
This is a special mode that’s useful for painting TileFab “Chunks” aligned to a grid equivalent to the size of the Chunk. Chunks are a specific sort of TileFab that’s always square and of even dimensions (4x4, 8x8 … 64x64 etc.). It’s activated by the Chunk Snapping toggle in the Settings pane.
If you were to use Chunks of identical size, then you could define a virtual grid that’s a multiple of the Tilemap cell size. For example, assuming a Tilemap cell size of one unit and a 16 x 16 chunk of tiles, this virtual grid is 16 units x 16 units.
When Chunk Snapping is on via the corresponding toggle on the Painter Settings panel, only Paint and Erase can be used.
Chunk Snapping supports rapid placement of Chunks by presenting a Scene-view marquee the size of a Chunk. The marquee changes color when the mouse pointer is aligned with this virtual grid. If the Paint Tool is active, clicking anywhere in the Chunk area (highlighted with a solid marques) will paint the Chunk aligned with the virtual grid.
It's easier than it sounds. Please see the Advanced TileFab Use document for more information on Chunk Snapping and templates.
About The Warning In the Settings Pane
The Painter settings pane told you to look here before turning on Chunk Snapping. Good on you for looking here before clicking it on anyway!! There’s nothing bad: just know that when this checkbox is turned on you can only Paint and Erase TileFabs. Read more about this in the Advanced TileFab Use document.
Fun With Prefabs, TileFabs, and Bundles
Interesting ways to use this system which are non-obvious.
Prefabs
In Paint mode, the center column has an option checkbox called: Bundle Tiles View. This checkbox only appears if the “Show Tile Bundles” checkbox is checked.
When unchecked, the Bundle is painted as a single item as usual.
When Bundle Tiles View is checked, the tiles and prefabs from a Bundle are displayed in a list and can be painted individually. When showing Bundles as a list, prefabs in the Bundle can be painted as if you were viewing a Palette of Prefabs.
You can use transform modification shortcuts like ALT+V, ALT+R/T/X/C/Z when previewing Prefabs.
You can also use the presets in the Painter Modifications editor window individually or as a default preset, as discussed in that section.
These changes do not affect Project folder Prefabs asset at all: when you release the mouse button, a copy of the asset is instantiated, has its transform modified (if only to set the position) and then painted.
The only way to affect the Z-position of a Prefab prior to painting it with a Painter Modification preset.
It’s important to note that the preview you see when painting a prefab is an “asset preview,” like the preview seen in an inspector. It’s entirely possible to use the ALT key shortcuts or a Painter Modification preset to create a transform that’ll place the prefab at a position and/or rotation that’d be invisible when the Scene view is in 2D mode. If it appears that your prefab disappears when you paint it, that’s probably what happened.
The Modifications Editor presets allow you to modify the offset from the mouse position, modify the scale, and/or modify the rotation by selecting one of the listed transforms and clicking ALT+V to modify the transform during Preview.
An unmodified transform will paint at the center of the tile cell.
Here’s an example of how to use this productively by creating a Prefabs palette:
- Create a new 2D Scene and add a Tilemap.
- Add all the Prefabs that you want to paint as children of that Tilemap.
- Ensure that they are parented to that single Tilemap.
- Change Painter’s mode to Grid Selection (the third mode button), select the Tilemap with the child prefabs in Painter’s left column, and use the Marquee Shortcut key to draw a marquee around the area that you want to save, click the Grid Selection button, then click the Create Bundle button.
- This will guide you to create a Tile Bundle. The Bundle won’t have any tiles (unless you have painted some) but will have the Prefab references.
If you view this new Bundle in Painter with Bundle Tiles View checked, you can select and paint the prefabs as if this were a Palette of prefabs or you can paint the Bundle all at once, as usual, as sort of a mega-prefab.
Here's the list-view of a (trivial) bundle quickly created using the above process.
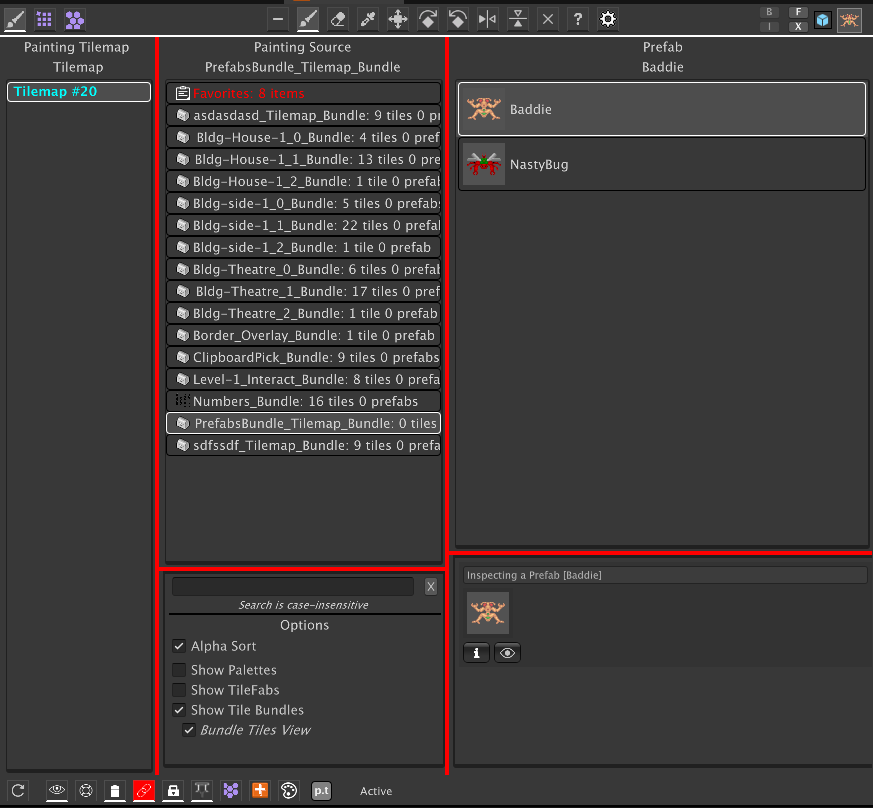
For quick Prefab painting, just select one or more Prefabs in a Project folder and use the TilePlus/Add To Painter Favorites context menu item.
An easier approach is to multiple-select Prefabs in a Project folder and use the TilePlus/Bundle Project Prefabs context menu item. This will create a Bundle that you can view in Painter with the Bundle Tiles View toggle set ON and allow you to paint the Prefabs individually. Note that this bundle has fixed positioning of the Prefabs and hence it has limited use: it won’t make sense to paint the entire Bundle. Bundles captured from the scene preserve the transform settings of the Prefab as set in the scene.
Previewing Prefabs
When previewing a Bundle (including previewing a TileFab, which is just a collection of Bundles) up to 128 prefabs can be previewed in total, per preview cycle (which happens several times per second depending on how fast you move the mouse). So, if you have a TileFab with several Bundles and the total number of Prefabs in all the Bundles is greater than 128 then some of the bundled Prefabs won’t preview.
Aside from that, you can preview and paint Bundles (when the Bundle Tiles View option is unchecked) and TileFabs with embedded Prefabs. The preview works the same as described above: they’re asset previews. The only difference is that the transform modification shortcuts are inoperative on groups of prefabs.
One advantage of using Bundles for prefabs is that any transform changes such as rotation and scale are preserved and then restored when the Bundle’s prefabs are painted via Painter or calls to the TileFabLib library. Transform changes don’t show in the preview, and the positioning during preview may be slightly incorrect due to integer math issues.
Prefabs and GridSelection
If there’s a Grid Selection when using the Paint tool and the current Object is a Prefab AND you click into the Grid Selection then the entire selection will be filled with the Prefab, with transform modifications applied if done during preview (when moving the mouse) via a shortcut key.
Additionally, an area fill of Prefabs occurs if you drag out a marquee using the Marquee Shortcut key.
These actions mimic what’s done with tiles.
Erasing or Modifying Prefabs
The Erase tool can’t be used to delete Prefabs in a scene, nor can the Rotate and Flip tools be used on Prefabs in a scene. Once placed in a scene, all further editing must be performed using normal Unity tools for GameObjects.
The only exception is when using the “TilePlus Clear Tilemaps” function from the Tools menu, from the context menu, or via the Clear Tilemaps button in the Grid Selection panel as that function erases all tiles and parented GameObjects in the entire Tilemap or group of Tilemaps.
Decomposing a TileSet
Perhaps you have a TileSet that you bought on the Asset Store, Itch.io or somewhere like that. Often you need to paint more than one tile from such a set to create a complete visual object in the scene: a building might comprise a dozen or more tiles or something smaller like a sign might take two or three tiles.
If you’ve used the TileSet to create a Unity Palette, you can use the UTE or Painter’s Palette display to select a group in the palette and paint it – but you must recreate this selection every time (although 2023.X / Unity 6 versions include a “brush picks” overlay which improves the situation somewhat).
When you use the Painter’s built-in Palette display and select a group of tiles from a Palette, they comprise what’s called a “Multiple-Selection” and that’s shown as an eyedropper icon in the Clipboard.
It might not be obvious, but the Palette display is actually a Tilemap, so a Multiple Selection from a Palette is the same as a Multiple Selection from a Tilemap in the Scene View.
If you have a Multiple Selection, you might only need it for a short while. In Painter, you can save the Multiple Selection to Favorites, make a Bundle of the selection, or even create a single tile that will load the bundle when it is painted on a Tilemap.
Here’s a simple workflow to create Picks and save them in Bundles.
- Examine a Palette in Painter with the Use Unity Palette option checkbox ON.
- Drag-select a group of tiles.
- The eyedropper image appears in the Clipboard.
- Click the B button and follow the prompts.
If you don’t want to create a Bundle, you can always click F instead. That will preserve the Pick in Favorites, which is persistent between Unity Editor sessions. Pro tip: if you select the Pick from Favorites you can click B to Bundle it later!
In either case, an Icon is generated. (see: About the Icon).
The Bundle will be initially set up to be visible to Painter so that it appears in the list of Sources.
See “What’s a TpBundleTile?” to find out how to create a tile proxy for the Bundle.
TileFabs as Snippets
You can use TileFabs to create 'snippets' of tiles which can be painted using Painter.
In the Layout demo's DesignTileFabs folder you can see a few prebuilt buildings that can be dropped into any tilemap with matching Tilemap names.
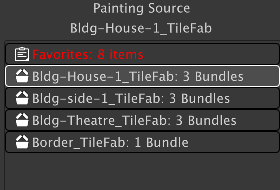
These were created directly from the Scene View using a Grid Selection. Note that all tilemap layers with any tiles or (parented) prefabs are archived. You'll notice that the three TileFabs in this folder all have three bundles.
Think of it as a template or a sort-of-prefab.
Appendix and FAQ
Appendix 1: About the Icon
Painter will try to create an icon for you when the Clipboard contains a multiple-selection Pick and you choose to create a Bundle or add the Pick to Favorites. A customized sprite packer is used to create a representative Icon (aka sprite) for the TpBundleTile.
This sprite packer scales all the selected tiles’ sprite textures to be the same size and packs them into a Texture in the same relative positions as the Grid Selection. It’s not a general-purpose sprite packer; the idea is to create something that gives you a visual cue for what will be painted.
- The output size ranges from 64 x 64 through 256 x 256 and may or may not be square.
- The packer takes a few seconds to operate due to importing activity. In some cases the delay can be significantly longer, depending on the state of the Unity Editor. See the FAQ for more information.
Note that if the source and/or sprite sheet texture isn’t set to readable then Painter will temporarily set the texture to readable. If there’s a code Exception (that is, a C# error appears in the console) then that texture might remain readable – there’s no way to be sure without looking.
You can always screenshot one of these Bundles after you paint it on a Tilemap and create a sprite to be used as an Icon using an image editor. Notes:
- Tiles that are not based on Tile are not packed: no AnimatedTiles or Rule Tiles. This might change in the future. Null tiles or tiles without Sprites show as “?”.
- If there are greater than 512 usable sprites to pack, then packing is not performed and “?” is used instead.
Appendix 2: TpBundleTiles
TpBundleTile is a standard Unity tile with an added reference to a Bundle.
When you paint this tile, the tile loads the bundle and deletes itself. It’s essentially a proxy.
You can add this type of tile to a normal Unity Palette or to Painter’s Favorites List. These can be automatically created when you use Painter’s Grid Mode and click the Create Bundle button, or you can create one within the Editor’s asset creation menu.
If you add an Icon to the Bundle later or want to change the Bundle’s Icon, examine the TpBundleTile asset in an inspector: there will be a button that can be used to copy the Icon from the bundle to the TpBundleTile asset.
In Painter, when a TpBundleTile is being painted, the preview shows the Bundle rather than the tile’s sprite. The Tile+Brush does not have this capability, and you’ll see the tile’s sprite until the Bundle is painted when you click the mouse button.
Please note that applying Custom Modifiers using the (default) shortcut ALT-V won’t affect bundle tiles. However, if you examine a TpBundleTile asset you’ll note that you can use a custom transform on every tile in the Bundle. This provides another good example of how to use filtering when loading Tile Bundles.
Appendix 3: Known Issues
Grid Snapping
Grid Snapping may not work correctly if your Tilemap’s position isn’t (0,0,0).
If you offset that by integers, e.g., (1,2,0) the system can usually compensate.
However, if you use fractional offsets from zero the forced use of integer math may round up or down unexpectedly.
When making Chunks or clearing Tilemap regions using the Grid Selection mode the best results are obtained with Tilemaps whose origin is (0,0,0).
Internal Palette math errors
Please note that on rare occasions the palette display may be blank and the console will have the following message:
Assertion failed on expression: 'math::all(math::isfinite(size))'
This is an error deep within the UiElements Palette component. Click on a different Palette item in the center column and switch back to the Palette that you want to use.
Edit Mode Multiple Selection error
When using Painter in Edit mode you can use multiple selection in the center column. When you do so, a special custom editor appears. If you use SHIFT to multiple-select, the multiple selection will occasionally appear and then be discarded about 1/2 second later. Oddly, this doesn't happen when CTRL is used to multiple select.
Sherlock Holmes is arriving next week along with Hercule Poirot, hopefully they can troubleshoot this problem!
FAQ
Can I use the Unity Tilemap Editor and TilePlus Painter at the same time?
In general, yes. It can be confusing to use them both at the same time though.
- The selection made in either window can be lost when you use the alternate window. Simply: when you switch windows you may have to re-select the individual tile or group of tiles again. (Pre-Unity6)
- It’s possible to have drawing marquees and/or text in the Scene view for both windows which can be confusing. The system tries to avoid this but it might occur from time to time. Try using Painter’s settings pane to change the Marquee color.
- Note that Painter won’t draw in the Scene view if the “NONE” action button is selected.
- In Unity 6 a change was made to the UTE which increased the coupling between all instances of the Palette UI Toolkit component. Selections made on one will reflect on all other instances.
- If you change the brush on the UTE to the GameObject brush, or any custom brush that derives from GridBrushBase rather than GridBrush then when a selection is made on the UTE-style display in Painter you’ll see this message in the console, and the Scene and Painter windows: Palette brush changed: try again!
There’s no “Z Position” setting!
The functionality provided by the UTE’s Z position setting can easily be duplicated by using a default modifier. See the “Custom Modifiers” section.
What does “Palette brush changed: try again!” mean?
This occurs when you try to use the UTE-style tile display in Painter, and you have an improper brush selected in the Unity Tilemap Editor. See above for more information. Just try again. It’s no biggie!
I used the Reset menu item on the Tilemap component, and the Painter didn’t refresh properly.
This is because the Reset menu item doesn’t trigger any editor callbacks. Use the Refresh button in the lower left corner of the Painter window.
The Scene view shows “Locked/Prefab” when I’m trying to do anything to a prefab.
-or-
I see the following warnings about locked Tilemaps and Prefabs at the top of the rightmost column in EDIT mode.
- Please don't modify this locked tilemap in a Prefab editing context.
- This Tilemap is in a prefab. No editing possible!!
TilePlus tiles can’t be edited inside a prefab.
If you use the Make Prefab menu command and then try to examine or edit tiles in prefabs after dragging the new prefab into a scene or instantiating it programmatically, then that prefab and everything in it is not editable. This is for reasons outlined in the User Guide and Programmer’s Guide.
If this is hindering you, open the Settings tab and check “Allow Prefab Editing.” Please read the warnings about this in the TilePlus Toolkit User Guide before you do so.
Tile Filtering doesn’t really seem to work properly.
If the total number of TilePlus tiles to be shown in the center column exceeds the value set in the Settings Panel “Max # Tiles to Display” then the list is truncated, and filtering is disabled for performance reasons. You can just change the value.
Marquee Drawing Doesn’t Work Properly
In 2023.X at some point Unity added a shortcut that conflicts with the default Painter shortcut: Marquee Shortcut (the default is ALT+1). You can change the Painter Shortcuts in the Unity Shortcut editor or open the Unity shortcut editor, click the ALT button in the display, and right-click the 1 and 2 buttons in the keyboard picture to remove the Unity shortcuts.
I can only use Paint and Erase!
Un-check the “Chunk Snapping” toggle in the Settings pane.
When Tilemap sorting by Sorting Layer and Order is used, changing the values in the Renderer component doesn’t always re-sort the Tilemaps list.
This is because the Renderer does not always cause the Hierarchy Changed editor callback to be issued and Painter doesn’t know that anything occurred.
What does “!2D” mean when I see it in the Scene View?
This means that the Editor isn’t in 2D mode, and if so, text isn’t drawn in the scene.
The Transform modifier shortcuts don’t work.
This can occur if the tile asset (or placed TilePlus tile instance) has its Lock Transform setting ON. This is expected behaviour. Also see: I Can’t Paint Modified Tiles.
When first opening Painter or when clicking “Use Unity Palette” Unity appears to freeze.
- Clicking I or F in the Clipboard area makes Unity appear to freeze
- Clicking on a Palette in the center column makes Unity appear to freeze
- You might get a popup window talking about “Importing” or how some module is causing a wait. This is normal. Similarly, when creating an Icon by clicking either the F or the I button in the Clipboard can cause lengthy import activity.
In both cases, what happens depends on the state of the Unity Editor, the size of any textures or atlases, the readable status of any textures or atlases, how many sprites have been created from a sprite sheet, and whether ‘generate physics shape’ is ON, among other things.
The worst offender is ‘readable’. If the source texture isn’t readable then a texture importer is used to make it readable, then later the same texture importer is used to make it unreadable again. This occurs only once per texture but for large textures with many divisions and/or sprites the process can take a while.
If appropriate, change the texture to readable to avoid the wait (this has implications for your project though).
If ‘Informational’ messages are set on in TilePlus’ configuration then you’ll see messages in the console about which assets had their readable flags set true and then restored to false. Usually those won’t appear until the entire process is complete.
Another cause of ‘freeze’ is when very large palettes are examined using Tilemap.GetUsedTilesCount. This occurs when a palette item is displayed in the center column; the number of tiles shown on the list item is provided by that method. This can cause a problem with very large palettes since that method blocks execution.
The solution is crude: place the TpNoPaint component on the palette prefab’s GameObject. The palette will not be queried for the number of used tiles and the issue vanishes.
I Can’t Paint Modified Tiles
You used a transform-modifying action button or used the Painter Modifiers to change the transform or Color of a tile, but it can’t be applied because the tile’s Lock flags are set inappropriately. You would have seen a dialog box and/or console messages and/or editor window overlay messages like this (there are a few variations):
Modified tile can't be painted
This tile has the LockColor or LockTransform flags set but modifications to the transform or color were made. This is incompatible. Please see the FAQ: ‘I Can’t Paint Modified Tiles’ in the Painter User Guide.
What’s going on?
When you paint a tile on a Tilemap with either the Lock Transform or Lock Color flag bits set then any changes to the transform and/or color of a position in a Tilemap revert when the tilemap refreshes. Various Painter functions and actions can affect the value of color or transform at one or more positions on the Tilemap, but the tile asset itself isn’t modified. Hence, when the Tilemap refreshes (a scene loads, a scripting reload occurs) the values for color and/or transform will revert your changes.
When can this occur?
Before these actions occur, the system checks to see if the tile flags will allow the modification. In other words, you can’t modify the transform if the Lock Transform flag is set, and you can’t modify the color if the Lock Color flag is set.
If you want to reset these flags, see the TilePlus User Guide section “Modifying Tile Flags” which shows how to use a menu command to change the Tile Flags on one or more tile assets. Very handy when you must make more than a few changes. You can use the “Focus on Asset” buttons in the bottom section of the right column to quickly select the asset when it’s being inspected in Painter.
Note that placed TilePlus tiles are independent instances that are independent of the tile asset in the Project folder. If you get this warning message when trying to affect a TilePlus tile already painted on a Tilemap, you can change the flags by inspecting that tile in Painter’s Edit mode.
Warning: Lock Color flags set!
May also be a warning about Lock Transform flags or mentioning Flipping/Rotating.
These are warnings that although Painter will perform the operation, the Lock Transform or Lock Color flags will thwart the changes. You’ll see these warnings for single tiles or for a multiple selection where at least one tile has Lock Transform or Lock Color flags set.
Also see the FAQ I Can’t Paint Modified Tiles.
Refresh button doesn’t work
This is normal: The refresh button at the lower-left corner of the Painter window and the Painter window’s context menu item “Refresh Tp System” have a short lockout and won't respond to a second click for a few seconds.
Technical Notes
Favorites
Painter’s Favorites list is a visual representation of data stored in a Scriptable Singleton instance. When the instance is saved, the data is serialized to the file system.
The serialization is performed like any other Unity serialization: references to scene Objects are lost. This creates a problem because TilePlus tiles found in Multiple-selection picks from a Scene in the hierarchy are scene objects: saved with the scene but they do not have corresponding Project assets.
Instead, these tiles are serialized to JSON using EditorJsonUtility.ToJson, and the output string from that method is what’s stored. When the Scriptable Singleton’s instance is loaded, this string is used to create and populate a new TilePlus tile which can now be painted.
This approach removes the need to create many new asset files for the TilePlus tiles, which makes little sense for a transient storage container such as Favorites.
The downside is that every time that a new Favorite item is added to the list, the entire list is serialized and saved. Each Multiple-selection Pick in Favorites has two potentially large items:
- The generated Icon for the Pick.
- The JSON for a TPT tile.
The Icon is saved as a PNG and is compressed. The JSON data are strings in a condensed format.
Keeping response times short is the main reason that Favorites is limited to 32 entries.
If the process fails in any way and null tiles end up in reconstituted Multiple-selection Picks, then the entire Pick is discarded.
The list of Favorites will be automatically truncated if the number of Favorites exceeds 32 entries when the Favorites data is saved to the file system.
Agressive Mode
Aggressive Mode is controlled by a Settings panel toggle. It’s a workflow accelerator that you’ll either love or hate. What does it do?
Painter monitors what’s currently selected. In Unity Editor-land, the selection is what you see in an inspector. Usually, it’s something from the Project or Hierarchy windows.
If you’re using Painter with an active Action(Paint, Erase, etc.) and a Tilemap is selected in the Hierarchy window and change the selection to anything else, for example, something in a Project folder, then when you return to selecting a Tilemap again and wish to continue using Painter you normally must at least click an Action button such as Paint or Erase in order to work in the Scene view again.
Aggressive Mode detects these sort of selection changes, and in most cases will change the Editor tool to TilePlus Painter and reactivate the previously used Action button.
Aggressive mode tries to detect if the UTE is active at the same time as Painter. If so, and if the one of the UTE’s own tools is active (various things determine that) then Aggressive Mode is automatically inhibited.
If you find this accelerator annoying just shut it off.
Updating in Play
Painter usually is mostly dormant in Play mode.
If you’re concerned about eliminating ALL effects that Painter may have in Play mode, just close the Painter window. When the window is open there are internal events that aren’t intercepted during Play.
If you want to be able to examine the fields of a TilePlus tile during play mode, ensure that Update In Play is active in the Settings panel by clicking its checkbox on (note that this is the default state).
Doing so will allow inspectors to update in Play mode.
Validate Tilemaps in Play appears when Update In Play is checked. Its default state is ON.
Updating inspectors can run into the situation where a Tilemap is deleted in Play mode. This would cause a null reference exception since Painter would still be trying to examine that tile. Hence, when Update in Play is checked, Unity’s Hierarchy Changed callback is used to test for adding/removing Tilemaps.
These tests do take time and if you don’t need these tests, uncheck Validate Tilemaps in Play but be aware that null reference exceptions can occur and cannot be considered an error or bug.
Painter Exclusive Mode
The TilePlus Configuration dialog has a checkbox for “Painter Exclusive” and there’s a corresponding option button at the bottom of the Painter window.
Side note: The convention in the TilePlus system is that a configuration item is in the TilePlus configuration if it at all affects that system even if the configuration item involves Painter.
This option controls certain issues that can occur when both Tile+Painter and the UTE are both open at the same time:
- Both the TilePlus Brush and Painter will try to draw text into the Scene View.
- The UTE can grab focus and/or being the active “Tool” away from Painter when you don’t want it to.
Setting this option ON means that Painter will have exclusive control in the Scene and using the Palette won't switch Editor Tools.