TilePlus System User Guide
Read Me First.
- What is this ... THING
- Features
- Where to Get Started
- New Tiles!
- Basic Architecture
- More Tiles!
- What Can I Do With It?
- Unboxing, Setup, and Reinstalling
- Menu Items
- ShortCuts
- Configuration
- Tile+Brush
- Custom Inspectors
- Selection Inspector for TilePlus tiles
- Selection Inspector Toolbar
- Tile+Brush's 'Brush Inspector'
- Notes
- Moar Tiles
- Best Practices
- FAQ and Notes
What is this ... THING
User Guide Introduction
Features
TilePlus Toolkit (TPT) is a unique way to work with Unity Tilemaps. It’s a Unity extension that can change the way you think about Tilemaps and how you use them.
VERSION 6 REQUIRES UNITY 6.5 OR NEWER
Main Features:
- New Tile class which allows private instance data on a per-tile basis.
- New Brush for the Unity Tilemap Editor which supports editing these tiles’ data.
- New Brushless Painting/Editing tool: Tile+Painter.
Other Capabilities:
-
High-level ‘Tile Scene’ subsystem.
-
Archiving of single or multiple Tilemaps for fast loading and chunking.
-
Fine-grained tile animation control including rewinding, looping and ping-pong looping.
-
Tiles can control the animator component of a spawned prefab.
-
Runtime
Service Managerfor Scriptable Object plugins- You can easily add your own.
-
Bundled Services
- Customized Tweener for tile sprites, including limited GameObject support.
- Tween the tile sprite’s transform position, rotation, scale, matrix, or color.
- Tween GameObject position, rotation, scale, or color
- Tween GameObject position along a Bezier curve.
- Sequences are supported
- Convert Tweens and Sequences into Awaitables.
- Custom tweens: tween anything.
- Pooled Prefab and Tile spawner.
- Position Database: collider alternative.
- Customized Tweener for tile sprites, including limited GameObject support.
-
Typed Messaging:
- Tiles can message other tiles or send events to Monobehaviours.
- Monobehaviours or static classes can message tiles.
-
Simple save/restore systems for tiles’ data.
-
Built-in Zone creation for setting trigger zones.
-
Layout System for top-down or side-scroll orthographic views.
-
Internal late-update-based scheduler you can use for timers inside tile code or elsewhere.
-
Assortment of utility methods for Tilemaps.
-
Several pre-created Tiles for common uses
-
Use Tiles as UI.
- Animated and static buttons
- Ascii characters and strings (no editing)
- Hover zones for tooltips.
- Radio buttons
- Toggle buttons
And importantly, there is no interference with your existing project. No special dependencies, no special GameObject tags, no changes in how Tilemaps work: just a lot of C# code – and the source is included.
Where to Get Started
If you’re not into coding and want to play with some feature demos, head over to the TilePlus Extras folder. Each demo has its own documentation in text or markdown format.
The demo program doc files can also be found here.
If you want to use Tile+Painter: it has a short “Quick Guide” in the TilePlusExtras/Documentation folder. Clicking the ‘?’ button in Painter displays a quick summary right in same window.
All of the other documentation is online. The menu item ‘Tools/TilePlus/Docs’ opens a browser at the documentation website.
New Tiles!
New Tile Class?
The key component of TPT is a new Tile base class cleverly dubbed “TilePlusBase” (TPB). This tile clones itself when placed on a Tilemap in a scene.
Why would anyone care?
The One With No Instance Data
One of the issues that developers run into with Unity Tilemaps is that there’s no way to add fields (variables) to tiles and have the data serialized and saved in the scene just like the serialized fields of scripts used for components. This is because the Tilemap’s serialization is hard-wired to save data from the basic fields present in a Tile class.
For many (including your TPT developer) this is annoying, to say the least. Perhaps you want a configurable waypoint. Maybe you want to be able to paint a tile and set it up as a spawn zone. And you want to be able to edit fields as you usually do.
Using TilePlusBase and the supporting libraries you can have any sort of code and/or data in a tile. Since the tile is cloned, it is no longer connected to the asset in the project folder: it exists in the Scene, and its data is saved with the scene.
If you’ve used the Unity Tilemap Editor (UTE) you’ve used its Selection Inspector. That inspector is very different from the normal Unity inspector panel: the UTE Selection Inspector is hard-wired to support the fields of the Tile-class tile and that’s it.
The support libraries for TPT have an alternative Selection Inspector that’s available in the UTE as the “Tile+Brush” or by using the TPT’s Tilemap painting and editing tool: Tile+Painter (T+P).
Decorate your TPB-derived tiles with TPT’s custom attributes and this alternative Selection Inspector lets you view and edit those fields or display property values. See the Online Documentation for more information.
Basic Architecture
Libraries
TPT libraries are divided into Editor support and Runtime support, with separate assembly definitions.
The Editor Library
This includes support for the custom Selection Inspector, the Tile+Brush, several custom editor windows, diagnostic tools, and Tile+Painter. Painter is a Painting / Editing tool with separate documentation for you to read. It’s UI-Elements based and does away with the concept of brushes completely.
The Runtime library
The most important part of the Runtime library is generically called TpLib and comprises several different subsystems. Much of what you use it for can be loosely thought of as a “Tilemap Database” or TMDB.
By using the TMDB you generally don’t have to keep track of what Tilemap a tile is placed on nor its position. For example, you can query TpLib for all TPT tiles with a particular tag and send them all a message to activate animation with ONE method call.
Keeping track of tiles in this fashion is much easier and becomes very important when chunks of tiles are dynamically added and removed from Tilemaps as part of TPT’s Layout system. For more details see the online documentation.
Example: a Waypoint. Your player reaches the waypoint. You preserve its GUID in a save file so you can easily locate it again without knowing its position or even which Tilemap it’s on.
Organization
TPT is divided into two types of code: Static libraries and Scriptable Runtime Services (SRS).
Static Libraries
TpLib: The main enabling library for this system.
TileFabLib: This library handles loading Tilemap archives. It’s also the underlying basis of the Layout subsystem.
TpMessages: Typed messaging system for sending messages to tiles, Monobehaviours or static class instances.
TpEvents: Tiles can post events. A MonoBehaviour or other code can interpret these, or scriptable objects called “Actions” can be used to automatically handle the events.
TpTileUtils: A library of utilities related to Tilemaps and tiles.
TpServiceManager: Managers Scriptable Runtime Services (see below).
SRS
SRS is short for “Scriptable Runtime Service.” These are Scriptable Objects which can be dynamically loaded at runtime (only) and have special features such as being able to receive Update events.
TPT uses SRS instead of static classes when possible.
- Faster Domain reloading.
- If you don’t need certain SRS then they aren’t in memory.
- SRS can be unloaded from memory when not needed.
One loads and destroys Services with the TpServiceManager.
These basic SRS are provided with TilePlus Toolkit:
- TpSpawner
- TpTweener
- TpTilePositionDb
You can easily create SRS for your own use, see the online documentation. The Layout demo uses custom SRS for game state, file access, and the customized layout controller for the Layout system.
Using a SRS for game state is something that one shouldn’t normally do as it’s using the service like a Singleton which is generally frowned upon. Although a SRS makes a great singleton, there’s no ‘Instance’ property, the only access is via the service locator.
More Tiles!
You’ll also find some easy-to-use TPT tiles:
TpAnimatedTile: similar to Unity’s AnimatedTile, but with looping support including Ping-Pong.
FlexAnimatedTile: animated tile where you can choose what to animate from an asset that contains a list of sprite animations. Looping, Ping-Pong, Start/Stop animation and changing animation sequence at runtime all supported. Animation preview in-editor when not in Editor-Play mode.
AnimatedSpawner: derived from FlexAnimatedTile, spawns a prefab or a tile when triggered.
SlideShow: Single-step animation though a list of sprites.
The TilePlusBase base-class tile has the data and UI for demarking a rectangular region of tiles. This is used in ‘Zone’ tiles:
AnimatedZoneLoader: Load a Tilemap archive when triggered.
AnimatedZoneSpawner: Similar to AnimatedSpawner, but uses a Zone.
ZoneAnimator: Control Animation of a Unity prefab when triggered.
“Triggered” refers to an action that’s taken because of an inter-tile or Monobehaviour-to-tile communication. This may sound weird but it’s very powerful.
Tweening is supported with some example tiles:
- TpTweenerTile
- TpTweenSpecTile
- TpTweenSpecSequenceTile
Read about these in the separate Tweener documentation.
Aaaand just for fun, how about Tilemap UI:
You can read about these in the separate TilemapUi documentation. It’s not a replacement for UiElements, IMGUI, or UnityUi.
What Can I Do With It?
If all you were interested in was Tile+Painter, you’ll find it can do 90% of that the Unity Tilemap Editor (UTE) can do and many things that it can’t or doesn’t do. Read all about it in Tile+Painter User Guide.
Let’s talk about the new types of tiles.
One of the big limitations of Unity Tiles is that they’re basically templates and can’t store any data other than what’s already set up in the Tile class: generally, just Color, transform, Collider, GameObject, and so on. Not that there’s anything wrong with that! But there’s no possibility of instance data: data specifically related to just one tile. There’s no Update method and no simple way to have timed functions like delays.
This means that actual functionality – doing something – can’t be done in a tile, or at least it’s more difficult than it needs to be.
TPT tiles work differently: but simply, TPT tiles are promoted from Project assets to Scene objects. When you save the Scene, the TPT tiles are saved along with everything else in the Scene, along with any data in the tile.
TPT is based on new Tile asset classes and a support library. Unlike normal tiles, modifying fields after painting does not alter the original tile asset. This opens new possibilities for working with tiles and requires no changes to the standard Tilemap system. No modifying Scene files; none of that. Just code.
The sample tiles included with TPT add much more flexible animation capabilities, tiles with trigger zones for spawning prefabs (built-in pooling) or tiles, tiles with trigger zones that work with custom coding to load new sections of your tilemap, and more.
These tiles can have references to GameObjects, components, asset files, and so on.
At a higher level, TPT can bundle portions of, or entire Tilemaps into custom Assets and Prefabs. These can be painted directly on Tilemaps, dynamically loaded at runtime, and much more.
Caveat
As you may already know, UnityEngine.Objects in Unity Scenes can’t be referred to by a Prefab. So, if you drag one or more Tilemaps into a prefab then TPT tiles will, in technical terms, get all messed up.
No worries though, if you try to create a prefab by dragging a Grid with child Tilemaps into your Project folder the system will warn you and Undo the change so that you don't lose any work.
You might also explore the TileFab archiving system: save Tilemaps in an asset and load whenever and wherever you want.
Check out the Workflow section for more information.
The FAQs section at the end of this document may have answers to some of your questions.
Required Unity Version
Unity 6.5 or newer is required. Earlier versions are no longer supported.
Unboxing, Setup, and Reinstalling
What’s in the Box?
Installing the TilePlus Toolkit UnityPackage will add a few folders to your Assets folder:
- Assets/Gizmos/TilePlus
- Assets/Plugins/TilePlus
- Assets/TilePlus Extras
The Assets/Gizmos/TilePlus folder should never be removed unless you’re deleting the entire TPT package: the image files within are used to provide custom icons for tiles and scripts.
Assets/Plugins/TilePlus contains Editor and Runtime code, Tile+Painter, a Chunking subsystem, a new Palette Brush called the “Tile+Brush,” and several new Tiles that you can use or add features to if you’re into Unity programming. This folder should not be moved.
The Assets/TilePlus Extras folder is optional, and you can remove it with no effect. Here you’ll find documentation and demo projects. Demo projects are discussed in the Online Documentation. Documentation includes an API reference in zipped-website format.
Setup
Dependencies: 2D Tilemap Editor and 2D Tilemap Extras are required, the latter for Rule tile support.
- Splines is required for one of the demo programs.
Assemblies: There are two assemblies – TilePlus.Editor and TilePlus, neither of which should be deleted or modified.
Palette Brush: After installation, the Tile+Brush replaces the default Brush that comes with the 2D Tilemap Editor package.
If you want to keep the default brush available in the Palette window, you need to make a minor change to a file. Unfortunately, there’s no other way to do this.
In the Project window, navigate to Plugins/TilePlus/Editor/Brush/TilePlusBrush.cs and open that file in your code editor. Right near the beginning of the file, just above the [CustomGridBrush] attribute, there are instructions on how to do this. It’s easy, just comment out one line and uncomment the other.
The Tile+Brush remains available; it just won’t be the default anymore.
Important: The Plugins/TilePlus folder should not be relocated.
Compiler #defines
The TpLog and TpLogWarning methods don’t emit messages to the console in a build unless the Player Settings have TPT_DEBUG added as a scripting define symbol.
Reinstalling
It’s best to totally delete the TilePlus folder prior to upgrading to a new release.
Please note that if you’ve changed any of the shortcuts (see Menu Items, below) then the original shortcuts may be reapplied, and you might need to manage any resulting conflicts in the Shortcuts manager.
Builds
Menu Items
After installation, there’s a new “Tools/TilePlus” menu.
- Online Docs, Version 6 notes.
- Online Docs
- Tile+Painter
- Tile+Painter Modifiers
- Archiving
- Archiving/Bundle Tilemaps
- Archiving/Unlocked Tiles test
- Configuration Editor
- Refresh System
- Refresh Tilemaps
- Utilities
- Utilities/Update TileFab Asset GUIDs
- Utilities/Delete Null Tiles
- Utilities/Update Tile+ GUIDs
- Utilities/Change Tile+ tile State
- Utilities/Change Tile Flags
- Utilities/Create Tile Anim Clip
- Utilities/Dump Position DB
- Shortcut Viewer
- Clear Selected Tilemaps
- Bundle Clipboard
- Clear Painter Favorites
- System Info
- Tween Monitor
- Services Inspector
You can use the search box to search for information about any of these topics
Online Docs brings you to this website.
Tile+Painter is a multipurpose single-tile Painter and Editor. See the Tile+Painter documentation.
Archiving/Bundle Tilemaps makes a TileFab (Tilemap archove). Also available in the GameObject menu and the Hierarchy context menu as TilePlus Bundler. A Grid or Tilemap must be selected to proceed.
Archiving/Unlocked Tiles test can be used to check a Locked Tilemap for UnLocked TPT tiles. One cannot have unlocked TPT tiles on a Locked Tilemap. Select a single Tilemap, then use this command. Output is to the console.
Configuration Editor is used to customize the TilePlus system. See the Configuration Editor section, below.
Refresh TpLib clears the data structures in TpLib and rescans all Tilemaps in all loaded scenes. You shouldn’t have to use this.
Refresh Tilemaps refreshes all Tilemaps in all loaded scenes.
Shortcut Viewer displays a dockable window containing the Tile+Painter shortcuts.
Utilities/Update TileFab Asset GUIDs provides a way to update the GUIDs that are part of certain assets. See the Notes section for more information.
Utilities/Update Tile+ GUIDs lets you update the GUID of an individual TPT tile asset.
Utilities/Delete Null Tiles: select a single Tilemap. This handy function scans the map for null tile references with non-null sprites and deletes them.
Utilities/Change Tile+ tile State: Select a Tile+ tile asset in the Project folder and change its state from Asset to Locked or from Locked to Asset. This can have strange consequences so only use it if necessary: primarily useful for debugging.
Utilities/Change Tile Flags: Select a Tile asset or multiple-select Tile assets in the project folder, then use this function to modify the Lock Color and Lock Transform flags for a single tile or multiple tiles. This is mostly used with Tile+Painter. See the FAQ in that document: I Can’t Paint Modified Tiles.
Note: the dialog which appears displays the current state of a single tile’s flags.

When multiple tiles are selected both flags are shown as cleared, which may not
be indicative of the tiles in the selection.
Utilities/Create Tile Anim Clip: Select one or more Unity Animation Clips and this option becomes available. You'll be asked for a destination folder. A TpSpriteAnimationClipSet asset is created and the sprite asset references are copied to this new asset.
- Note that the TpSpriteAnimationClipset's custom inspector allows you to drag in a single Unity Animation Clip asset into a field and then add that asset's sprites.
Utilities/Dump PositionDb: Dump the contents of the PositionDB Service’s data to a file and open an editor window on that file.
Clear Selected Tilemaps: select a single Tilemap or a Grid with child Tilemaps, then use this menu item. All the tiles will be cleared and all GameObjects parented to these Tilemaps are deleted. Undo is used but be careful. If there’s a Grid Selection (made using the Palette or Tile+Painter or the Tile+Painter GridSelection panel) then the clearing is restricted to the Grid Selection region.
Bundle Clipboard: If the Painter Clipboard contains a multiple-selection set of tiles this menu item can be used to convert the set of tiles into a TpTileBundle. See the Painter documentation. Note that the “B” button in the Clipboard does the same thing and may be easier to use.
Clear Painter Favorites: Clear Painter’s Favorites list.
Tile+Painter Modifiers: is a simple utility that allows you to preset custom tile modifications for transform and/or color, for use when Painting tiles. See the Tile+Painter documentation for more information.
Read about the next three menu items here.
System Info opens an Editor window with TilePlus system information. Please note that this window constantly refreshes even when the Editor is in Play mode.
Tween Monitor: View the state of running Tweens.
Services Inspector: Shows running services. Click on a service to see whatever information that service provides.
ShortCuts
Two shortcuts are provided for your convenience:
- Hold down the ‘1’ key to allow painting over an existing tile. See “Brush Inspector,” below.
- Hold down Alt+1 (CMD+1 on Mac) to drag a Grid Selection when Painter is active.
These can be modified in the Unity Shortcut manager (Edit/Shortcuts) in the TilePlus category.
Tile+Painter has numerous shortcuts of its own, largely emulating those of the Unity Palette editor window but with ALT (Option on Mac) added.
Configuration
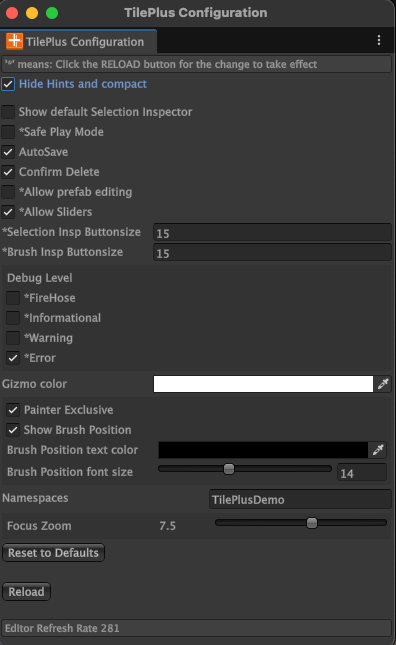
The Configuration Editor is used to customize TilePlus. These are saved on a per-project basis.
Hide Hints and compact: When checked, hides all the hint sections so that the display is less cluttered.
Show default Selection Inspector: When checked, shows the default selection inspector in a foldout at the top of the Tile+Brush Selection Inspector. Please click Reload after changing this.
Allow BackSpace/Delete: Available when Show default Selection Inspector is checked, can be used to control the behavior of the Tile+Brush Selection Inspector regarding the use of Backspace and Delete keys.
The default Selection Inspector’s behavior for the Delete or Backspace keys (deleting the tile) makes it impossible to properly edit fields in the remaining part of the Inspector. For this reason, the Tile+Brush intercepts those two keys when the default inspector foldout is open.
This doesn’t affect Selection Inspectors associated with other brushes. If Allow BackSpace/Delete is checked, be careful editing custom data fields such as text fields or Vector-type fields: if you use the Backspace or Delete key to edit, the tile that you are inspecting will be deleted. Best to leave this unchecked, and use a different brush if you want to delete tiles with BKSP or DEL.
Safe Play Mode: Disables the Selection Inspector and Tile+Painter display of tile fields and properties during Play mode. This eliminates most of the overhead of examining and evaluating TPT tiles which might happen to be visible in an Inspector during Play.
- Normally, editable fields will display in a read-only mode while the Editor is in Play mode but there’s still some overhead.
AutoSave: If checked, open Scenes are saved after editing a TPT in the Selection Inspector or Tile+Painter.
Confirm Delete: If checked, deleting tiles via the Tile+Painter or the Tile+Brush’s Selection Inspector pop up a confirmation dialog box.
Allow Prefab Editing: If checked, you can open prefabs created by Tools/TilePlus/Prefabs/Bundle Tilemaps. Note that modifications to such prefabs may result in prefab corruption.
Allow Sliders: If this is checked, TPT fields set up for using slider controls are permitted.
Selection Inspector and Brush Inspector fields can be used to adjust the size of buttons in the respective inspectors.
FireHose, Informational, Warning, and Error Messages control which types of messages appear in the console.
- Note that in a built application, these settings are irrelevant, and only error messages are logged.
- Please click the Reload button after changing any of these.
- If FireHose is checked then there will be many console messages that you don’t normally need to see (runtime performance can be affected).
Gizmo Color: Change the color used for Gizmos.
Painter Exclusive If true then Painter has exclusive control in the Scene and using the Palette won't switch Editor Tools nor show on-screen text normally displayed by the Tile+Brush. Default is TRUE. This is a personal preference item.
Show Brush Position: When checked, the Tilemap grid position is displayed next to the painting cursor, using the text color and font size specified below the checkbox. If the grid selection is greater than one unit then the size of the selection is also displayed. The text color and text size fields can be used to adjust the appearance.
Namespaces: This expanding text field controls which C# namespaces the GUI formatter recognizes. Any and ALL custom tile code (tiles you make which derived from the TilePlus system's base class tile TilePlusBase) must be part of a namespace and that namespace needs to be added to this field. The entry for 'TilePlusDemo' cannot be removed.
Focus Zoom: Sets the zoom factor used by the Selection Inspector toolbar Focus button. Smaller numbers zoom closer to the tile.
Reset to Defaults resets all the configuration settings to their defaults.
- This will remove any added namespaces from the NameSpaces field and you have to re-add them.
Reload forces a scripting reload and a Garbage Collector pass. Click this if you change the setting of certain fields in the Configuration editor. Note that the tooltips for a number of these settings mention that you need to click Reload for the change to take effect:
Show default Selection Inspector, Namespaces, Allow Sliders, Safe Play, Inspector Button Size values, Allow Prefab Editing, and Informational, Warning, and Error messages.
Tile+Brush
Custom brush for the Unity Tilemap Editor
Custom Inspectors
The Tile+Brush has enhanced Brush and Selection Inspectors. The default brush is replaced with the Tile+Brush, but you can restore the default brush as explained in Setup.
Unity Tiles Selection Inspector
When displaying a normal Unity tile, the Selection Inspector will look something like this:
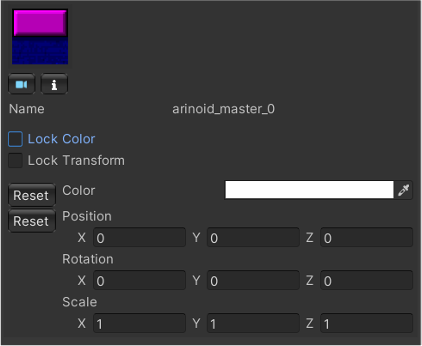
The other fields can be used to change the Color or the transform of the Tilemap’s sprite at the selected position as well as the Lock Color and Lock Transform tile flags at that position. The tile asset in the project folder isn’t touched.
Occasionally the asset preview will be blank for a short time. This is because asset previews are loaded asynchronously.
Selection Inspector for TilePlus tiles
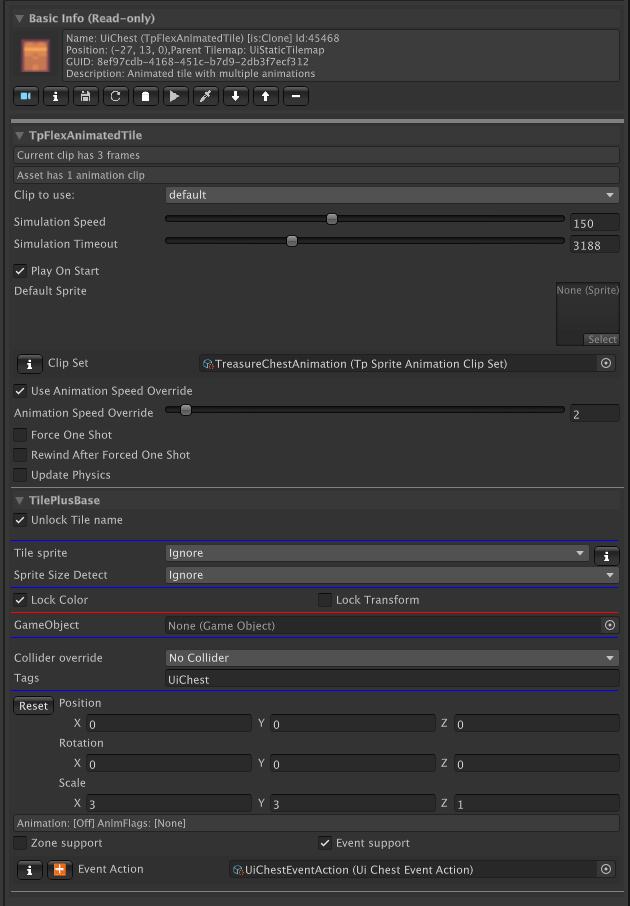
Here’s an example of a Selection Inspector when displaying a TilePlus tile. This is used in Tile+Painter and as the Selection Inspector for the Tile+Brush.
The Basic Info section displays read-only information from the tile. This area changes depending on what type of tile is being inspected. The last two items on the first line are the state of the tile and the Instance ID.
The Toolbar is followed by fields and properties from the inspected tile, ordered by the tile’s class hierarchy. Each section is in a foldout.
The TilePlusBase foldout is always the bottom element and has some special functionality.
- Unlock Tile name: When unchecked, the tile’s name can be edited.
- Tile Sprite: controls visibility of the Tile’s sprite. This is handy if you just want to use the GameObject of the Tile and don’t want the sprite to appear on the Tilemap, but you want to see it in the Palette or Painter.
- If this is set to ClearOnStart or ClearInSceneViewAndOnStart then the Tile’s sprite will be invisible when painted. You can still find it using Painter and change the setting directly.
- Lock Color and Lock Transform flags: change the flags setting on the Tilemap and the tile instance’s flags value.
- If you add a GameObject to the tile, the GameObject Runtime-only and Retain flags become visible.
- Collider override can be set to No Override, which means that the setting from the tile asset in the project folder is used. The other settings can be used to set the collider type on a per-tile basis. This action occurs during the execution of the tile’s GetTileData method.
- Tags: one or more comma-delimited tags. TpLib methods can be used to look for tagged tiles.
- Color: change the sprite color on the Tilemap and tile instance’s color value.
- Not shown in this image since the LockColor flag is checked.
- The Position, Rotation, and Scale fields can be used to affect the transform of the sprite on the Tilemap and the tile instance’s transform value.
- Zone and Event support are advanced features that you can read about here.
Certain tiles use a built-in capability to inhibit the visibility of the Name, Collider, Tags, Color, and/or Transform sections of the foldout. For example, tiles such as TpAnimZoneLoader and TpAnimZoneSpawner modify the sprite transform as you adjust the zone size. These tiles hide the transform fields since the transform shouldn’t be modified by humans.
To be clear, when acting on TilePlus tiles, the actions of modifying flags, transform, or color in the Selection Inspector or Tile+Painter changes the corresponding value in the tile instance and on the parent Tilemap of the tile. When you save the scene, the changes in the tile are preserved. The original tile asset in the project folder is not affected. When acting on Unity tiles, only the Tilemap is affected.
In Tile+Painter, it’s easy to pick tiles from the scene and perform Color or transform modifications. Again, the only thing affected is the Tilemap. The asset in the project folder is not affected.
Tile+Painter also has a bulk modification feature: you can select an area of a Tilemap and apply changes to Color, transform, and tile Flags for all tiles in the selection.
Some tiles will display ► buttons in the inspected tile’s fields area. These invoke methods in the tile and are useful for testing your tiles, especially for TilePlus’ animated tiles.
When the Editor is in Play mode the display will change somewhat, as most of the information becomes read-only, and some additional data appears showing the state of the animation flags (introduced in 2022.2).
When looking at a TilePlus Tile asset in the Editor, you can change the Description and Info fields. These appear in the Basic Info section as shown above, and in the Brush Inspector. You may find these fields useful: one use would be prompts to remind you what the tile does before you paint it.
Selection Inspector Toolbar
The Selection Inspector for TilePlus tiles has a toolbar:
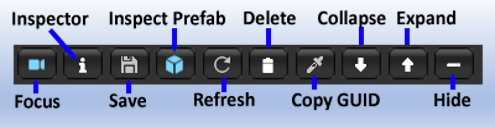
| Name | Usage |
|---|---|
| Focus | Focus scene view on selected tile. |
| Inspector | Open an inspector for the tile. |
| Save | Save the tile as a new asset. |
| Inspect Prefab | If the tile has a GameObject then this button appears: open an inspector for the prefab. |
| Refresh | Refresh the tile. |
| Delete | Delete the tile. |
| Copy GUID | Copy the GUID of a tile to the clipboard. |
| Collapse | Collapse all the tile sections. |
| Expand | Expand all the tile sections. |
| Hide | Hide all details of the sections. |
The example Selection Inspector as seen in the previous section has an additional Toolbar button only seen with certain tiles: this is the Simulate ► button.
Simulate is an editor-only function that, well, simulates what the tile will do at runtime.
For example, with TpAnimatedTile or TpFlexAnimatedTile the simulate function will cycle through the animation sequence so that you can preview it.
For TpSlideShow, simulate displays the slide show tiles.
It’s a convenient way to preview what your tile will do at runtime and is especially handy when you’re editing tiles in the scene and want to see if the changes make sense. It’s a simulation and won’t be exact.
About the Focus button
About the Inspect Prefab button
- Instantiate-Runtime-Only is ON: Prefab asset in the Project folder.
- Instantiate-Runtime-Only is OFF: GameObject instance of the Prefab in the Scene.
This can occasionally be confusing: if you did not have Instantiate-Runtime-Only ON when the Tile is painted then the Tile creates the scene GameObject immediately. If you later turn this flag OFF, the scene GameObject will not be removed! In this edge case the GameObject in the Scene is what will be inspected.
The instanced GameObject in the scene isn’t editable. Hence, the only way to remove the GameObject from the scene is to delete the Tile. This is a Unity effect, not a TilePlus effect.
Why Save a painted tile as a new asset?
You can save any painted TPT tile as a new asset file. This is an important feature, as you can create a TPT tile as a prototype, customize it in-editor and then save it as a new asset which can be dragged into a Palette.
Why copy the GUID?
For an example, see the Animation demo program (AnimatedTiles/Scenes/Animation-UnityUI) in the TilePlus Extras folder. There you’ll see UI buttons which can trigger Animation on/off in the animated tiles. The UI buttons send the GUID to a script that looks up the tile reference via TpLib.GetTilePlusBaseFromGuid.
The script then uses the MessagingService to send a message to the tile, affecting the animation.
GUIDs are used a lot in the TilePlus system as an alternative (i.e., not the primary) way to locate and/or communicate with TPT tiles. GUIDs have nothing to do with how the tiles actually work; rather, they’re present so that there’s a unique value to put in JSON (or other) save data files. You can locate a tile by its GUID without knowing what Tilemap it’s placed on.
Tile+Brush's 'Brush Inspector'

This is the Brush Inspector seen when using the Tile+Brush with the Unity Tile Editor. It looks a bit different in Tile+Painter.
The Help foldout at the top has some hints about how to use this inspector, followed by information about the tile. Note that the last item on the first line indicates the state of the tile. For this inspector, the state will be Asset or in rare situations, Locked.
The Toolbar allows you to open an inspector for the tile asset, focus the Project window on the asset, or open the asset script in your programming IDE.
The center area has information about the tile asset being inspected.
If there’s a GameObject associated with the tile (via the GameObject field in the asset) then a preview of the prefab is shown, if possible.
Like the Selection Inspector, the tile information is divided according to the class hierarchy, but there are no foldouts, just some thin lines to point out the division. None of the information is editable, but you can click the leftmost toolbar button to open an inspector.
The Brush Toggles foldout has a few options: Flood Fill preview, overwrite protection, and a toggle to hide the Toolbar.
Overwrite protection, available only when the Tile+Brush is the active brush, prevents painting over existing tiles.
You can override the Overwrite protection or the PaintMask by holding down a key defined in Unity’s shortcuts editor (Edit/Shortcuts). The default is ‘1’.
This makes it easy to paint over a tile (overwrite) without toggling the control in the Brush Toggles section, or to paint a tile on a tilemap that’s not in the PaintMask list without changing the Paintmask field in the tile asset.
A strike-through line inside the painting marquee is shown while the shortcut key is held down.
Notes
To force the Tile+Brush or the Tile+Painter to NEVER paint on a Tilemap, attach the TpNoPaint MonoBehaviour component to that Tilemap’s GameObject.
This has the same effect as the PaintMask but applies to any tile painting via the Tile+Brush or Tile+Painter.
Note that the hotkey override also applies if you want to paint on the tilemap anyway.
Modifying flags, collider, transform, or color in the Selection Inspector or Tile+Painter changes the corresponding value in the tile instance (for TilePlus tiles) and on the parent Tilemap of the tile. When you save the scene, the changes in the tile are preserved. The original tile asset in the project folder is not affected.
In Tile+Painter, modifications of this sort can be performed on picked locations which have Unity Tiles (i.e., not TilePlus tiles). In that case, the only thing affected is the Tilemap. The asset in the project folder is not affected.
Note that the Tilemap Renderer sometimes will cull sprites which you’ve enlarged via the transform size setting. See the FAQ at the end of this guide for more information.
Moar Tiles
Sorry for that!
TilePlus has a variety of new tiles for you to use or extend. Read about them in the system guide.
Best Practices
Discussion about how to use this system
Workflow
You probably work with Tiles which are included in a scene because they were painted using the Unity Tilemap Editor or TPT's Tile+Painter.
This is the easiest way to use TilePlus tiles: just paint and edit them to do what you want.
Tilemaps loaded via prefabs are no longer supported by TilePlus Toolkit. Use TileFabs and TileBundles instead.
Saved with a Scene
When you paint a TPT tile it’s saved with the scene and will be present in a build.
- The TPT tile in the scene is not affected by changes to the asset in the Project folder.
- The asset in the Project folder is not affected by changes to the tile in the scene.
If you paint over the TPT tile, it’s deleted from the scene and will no longer be saved. Essentially, the TPT tile becomes like any other Object in the scene.
Once you edit the painted TPT tile in-scene you can save it as a new tile asset, drag that into the palette or use a context-menu item to add it to Painter’s Favorites list, and paint it. This is especially useful when prototyping or for creating backups.
This is the easiest way to make the most of this new type of tile. Remaining in the scene, you can have references to Scene Objects like GameObjects, Components, etc. in your tile scripts. Once a tile is painted, you can select it with the Palette, edit it in the Tile+Brush Selection Inspector or Tile+Painter, and drag references such as GameObjects into the painted TPT tile fields. Think of it as a Tile promoted to a GameObject, just without a Transform component. That’s close enough for rock and roll.
Scene References
When a TPT tile is in the Scene, it can have references to other Objects in the Scene. For example, you can have a reference to a GameObject and access its components for scripting, right within the TPT tile’s code if you like.
If you want to load Tiles and GameObjects into a scene dynamically, use the TileFab and Layout systems provided in TPT. Tilefabs allow preserving one or more Tilemaps and any child prefabs into a position-independent archive format. The Layout system allows you to load and unload TileFabs as the camera moves.
TileFabs are the key technology component underlying the TilePlus layout system, which streams chunks of tiles in and out of the scene as the Camera moves.
Tilemaps saved in Prefabs
When you create a prefab by dragging a Grid with child Tilemaps to the Project folder, all references to Objects in the Scene are lost just like any other Prefab that you might create.
This includes all TPT tiles. If you were to open the Prefab, the locations where TPT tiles had been placed would be replaced with pink or other oddly colored tiles.
Because of this, if you mouse-drag a Tilemap or any GameObject that has Tilemaps as child GameObjects into a project folder to create a prefab, and there are any TPT tiles, the system will warn you in the console and will unlink the items you dragged from when you created this prefab so that the scene Tilemaps won’t be corrupted.
You may as well delete the prefab that you created as it isn’t useful.
Archiving Overview
To make a Tilemap archive:
- Select a Grid with child Tilemaps or a single Tilemap,
- Make a Grid Selection using the Tile Palette or Tile+Painter.
Then use the Hierarchy window’s TilePlus Bundler context-menu command or the main menu’s Tools/TilePlus/Prefabs/Bundle Tilemaps command.
If a Grid or a single Tilemap is selected, then all the tiles and child Prefabs of the Tilemaps are bundled.
If a Grid Selection is made, you’ll be prompted to confirm that you want to use the Grid Selection to limit which tiles and Prefabs are bundled. If so, ALL tiles and Prefabs in any Tilemap within the selection are archived.
This command archives Tilemap contents into one or more TpTileBundle assets (Bundles, from now on). But at this point its use is restricted to simple situations:
- Archive a single selected Tilemap into a Bundle asset along with a TileFab asset.
- Archive a single selected Grid and its child Tilemaps into multiple Bundle assets along with a TileFab asset, with optional prefab creation.
To be clear: Compatible archives can only comprise a Grid with child Tilemaps and any Prefabs parented to the Tilemaps. If you try to use a multiple selection, or any Grid or Tilemap are in or part of a prefab, then the process will complain and quit.
The bundler generally follows this process:
- Is the Grid or Tilemap in a prefab or are you editing in a preview scene? Start again.
- If the selection was not a grid, you’re asked if you want to continue. No: Start again
- If the selection isn’t a grid, then you can’t make a prefab, just archives.
- For each tilemap:
- Is the Tilemap part of a Prefab? Start again.
- Select destination folder. Advice: use a different folder each time!
- Is the folder the Assets folder? Start again.
- If the selection was a grid, you’re asked if you want to archive the Grid's child Tilemaps.
- Then you’re asked if you want to bundle any Prefabs which are children of the Tilemap GameObjects.
- If the selection was a single Tilemap, you’re asked if you want to add any Prefabs which are children of the Tilemap GameObject, and if those should be saved as new Prefabs or Variant Prefabs.
The archiver will bundle parented GameObjects which are Prefab instances and preserve references to the Prefab source assets. It will not bundle GameObjects or prefabs which have been decoupled from their source assets in the Project folder.
It’s simpler than that sounds! The choices are presented to you via several dialog boxes and file pickers.
With this information, the bundler creates the TpTileBundle assets: one for each Tilemap, then adds all the TPT tiles to the asset. For Unity tiles, it preserves the information in the Tilemap for each tile (color, transform matrix, and flags) as well as a reference to the original Unity tile asset.
If you elect to archive prefabs, please note that references to the prefab assets are archived; new copies of the prefabs aren’t created. This means that if you delete one of these prefabs then the reference is null, and the prefab won’t be available when the TpTileBundle asset is used.
Note that GameObjects that are instantiated because the Tiles’ GameObject field caused the Tile to instance a GameObject into the scene are not archived. When the TpTileBundle asset is painted (programmatically or via the Tile+Painter) the Tiles re-create the prefab in the scene for you.
A TileFab asset is also created in the same folder. This asset has references to all the new TpTileBundle assets and is used with the TpAnimZoneLoader tile or for loading using methods in the TileFabLib library.
The archived TilePlus tile instances are also “Locked.”
This locked status is a hint to Tile+Painter and the Tile+Brush to use particular care when it encounters TilePlus tiles that somehow end up in a Prefab. Essentially, you can’t edit TPT tiles in any sort of prefab in a Prefab editing context or “Stage” to avoid any chance of corruption, and you can’t edit the TPT tiles or the prefab itself.
Regardless of which brush you use, painting, erasing, or any other operation will either revert or just not occur.
Don't Use Prefabs for Tilemaps
You Probably Don’t Want Tilemap Prefabs
They’re not really that useful except in limited circumstances. Each time you drag in a Tilemap prefab, it instantiates an entirely new Grid with Tilemap children. This is true for any Tilemap prefab, even one created normally by dragging a Grid GameObject from a scene to a project folder.
What’s more useful is being able to load tiles in groups to existing Tilemaps. You may already do this with Tilemap block move methods and so on.
TilePlus’ TileFabs and Bundles handle all this for you and are easy to create.
TileFabs and Bundle assets are not Prefabs!
Please note that the TileFab and Bundle assets are NOT prefabs: you can’t drag either of these into a scene.
However, a TileFab archives the original source Tilemap names and/or tags and the TilePlus library functions for placing them in a scene expects to find these same names and/or tags to place the multiple archived Tilemaps correctly. That is, which Bundle assets referenced by a TileFab should be ‘painted’ on to which Tilemap. It can’t guess.
Other Uses for Bundled Tilemaps
When using Tile+Painter, Bundle assets and TileFabs appear in the Painting Source (center) column and behave as if they were a single tile: you can paint them onto Tilemaps.
This means that you can create chunks of tiles and paint them as if they were a single tile.
Bundles: you can paint the entire Bundle or view a list of all the tiles in the Bundle and paint them individually.
TileFabs When created from a Grid Selection a TileFab is like a layer cake, with the Tilemaps being the layers. Basically, you can paint N Bundles with one click.
TileFabs are also used in the Layout system.
For simpler uses, you can add the TpBundleLoader component to any Tilemap’s GameObject. This component loads a single Bundle. Place the component on any compatible Tilemap (same layout, etc.) and drag in the Bundle asset reference. Switch to Play mode and loading will happen automatically if the component’s LoadOnRun toggle is checked. Or you can click the Load button to make a quick test.
Similarly, you can add the TpFabLoader component to any Grid’s GameObject. It works in the same fashion as TpBundleLoader. However, it can’t work correctly if the Grid’s child Tilemaps do not match the names and/or tags of the Tilemaps embedded in the TileFab asset. That’s up to you.
Finally, you can use a TpBundleTile. This simple tile takes a Bundle reference as a parameter. You can copy it to a Unity Palette or to Painter’s Favorites list and paint it on a Tilemap. When you do, the tile loads the bundle and deletes itself.
Bundles and TileFab assets can be used in a running game to dynamically load tiles into Tilemaps using the TpBundleLoader or TpFabLoader components, a TpBundleTile, TpAnimZoneLoader tile, the TpZoneManager, or at the lowest level, the TileFabLib and TpZoneManager libraries.
One other note: When you make an archive, all Scene references are lost as usual. TPT tiles can have Scene references but if your tile doesn’t have any then this doesn’t matter.
FAQ and Notes
FAQ and various notes
FAQ
I Can’t Create Prefabs!
Please read the Workflow chapter.
What’s the asset version number?
It's available in the System Info editor window, available via a Tools/TilePlus menu item.
What does this error mean? Animation speed for ____ at (a position) has animation frame rate=0
A clip in an asset has animation speed set to zero. This can happen when adding new items to certain assets. Please check carefully!
Animated Tile isn’t animating even though PlayOnStart is set!
This can occur if you place an TpAnimatedTile or a TpFlexAnimatedTile (or subclass) via scripting, i.e., not with a brush but rather at runtime.
It’s because the script’s OnEnable doesn’t execute when the tile is cloned at runtime. You must manually start animation via ActivateAnimation.
I tried to paint a tile, but nothing happened.
-
Certain things can’t be painted: Locked tiles.
-
Certain positions can’t be painted.
Either the console or the legends around the cursor in the screen view should explain what happened.
I used attributes in my TilePlus class, but nothing appeared in the Selection or Brush Inspectors!
Use Tools/TilePlus/Configuration Editor and add your namespace to the Namespaces field. Then click the Reload button. Namespaces are required for derived TilePlus classes if you want to use the TilePlus inspectors.
My Tiles Are All In One Spot!
This occurs if you somehow create a tilemap without a grid and get it into the scene. Without a grid, there’s no positioning so all the tiles appear in one spot. This has nothing to do with TilePlus tiles.
Zone-based tiles or the Tile+Painter do not draw boxes around Zones or around tiles.
You probably have Gizmos turned off.
What are the 'T' symbols in my Hierarchy Window?
That indicates the presence of TilePlus tiles on that Tilemap.
Tile+Painter doesn’t highlight TPT tiles when a prefab is being edited.
This is normal. Gizmos only appear in the Scene view.
Boxes Drawn Around tiles are in the wrong place.
When drawing boxes around zones or tiles from the Selection Inspector or Tile+Painter the placement can be incorrect if the tilemap and/or grid origin is not zero.
Simulation speed unpredictable.
Simulation uses the Editor for timing and the update speed can vary widely, depending on the setting: Preferences/General/Interaction Mode.
For predictable simulation, set the interaction mode to Monitor Refresh Rate which is about 60 per second. You can see the refresh rate at the bottom of the Configuration Editor.
Animation Jerky when Playing in editor.
This can happen when the tilemap is selected while the editor is in Play mode. Seems to be the Unity inspector doing this (perhaps when the info foldout is open).
Missing Script/Null Reference.
Seeing messages like this when running your app in the Editor?

You often see this error when one or more of a GameObject’s components has a missing script.
For tiles, this happens when the tile class for a painted tile is deleted: it appears as if the error comes from the internal Tilemap startup code.
Unlike with GameObjects, there’s no simple way to uncover which tile is the culprit: tiles like this are returned from a Tilemap as null tiles, so they look like empty positions. If the issue is a tile, one or more Tilemaps will have an entry in the Info foldout that looks like this:

If the tile does have a sprite, you may be able to find it by poking around in the tilemap with the Palette select tool and trying to find the matching tile. When you do, the Selection Inspector will show something like this:

Note that there’s a sprite, but no script: the position is empty but there’s a sprite. Huh?
You can also ignore the warning message: it doesn’t (seem to) portend anything ominous. Note that this message has nothing to do with TilePlus tiles: in the example shown here, it was an ordinary Tile class that was the issue.
Tip: Try using the TilePlus/Delete Null Tiles menu command. It looks for this situation (null tiles with Sprite) and deletes them all.
Tiles Disappear When Camera Moves.
If you use one of the Zone tiles and change the zone size from 1 or use any TPT tile and change the sprite size or position (e.g., with the Tweener, or with the transform controls in the TilePlusBase section of the Selection Inspector, then you may find that moving the camera may make the sprite disappear.
This is due to the Tilemap Renderer miscalculating the Chunk Culling Bounds when tile sprites are larger than the size of a single tilemap unit; and to be clear, this has nothing to do with TilePlus tiles specifically.
In such a case you need to set the Tilemap Renderer’s detectChunkCullingBounds to Manual and enlarge the bounds manually.
The TilePlus System Information Window always shows zero for Cloning Queue Depth. Why?
This should always appear to be zero since the Queue is emptied more frequently than the window refreshes. It might be nonzero for a brief time when many TilePlus tiles are being cloned. Remaining nonzero for more time than that would be worth checking out.
Notes
Tile+Brush Toggles foldout.
In that foldout, the No Overwrites from Palette toggle solves what turns out to be an invisible problem with the Palette: there doesn’t seem to be any mouse debouncing (this may not be true in newer versions of the Unity Tile Editor which are coded using UiElements).
If you at all move the mouse while placing a tile it’ll paint it repeatedly. The Tile+Brush won’t let tiles be overwritten when the toggle is set ON. Another reason that this feature is important is that you don’t want to accidentally overwrite a TPT tile instance that you’ve customized.
It’s a good idea to save a copy of the tile as an asset. Think of it as something akin to a prefab: you place the prefab and customize it and if the variant is what you want, you can drag it to a folder to save it as a new prefab. Here, you can edit the tile while it’s in the Tilemap and then save it as a new tile asset.
That Pesky 'Move' function
Note that the Palette’s “Move” function works in a way that makes it impossible to ensure that TPT tiles won’t be overwritten, especially when a block of tiles is moved.
Standard (Unity's) Selection Inspector
(This is an old note: it may not be true anymore)
Since the Palette’s tile view is a Tilemap, you should also be aware that if you ‘pick’ a tile on the palette the default brush’s Selection Inspector will show that tile from the palette. If you click Delete or type the Delete or Backspace keys when the Selection Inspector is in the focused window, then that spot on the palette will be erased. Again, this behavior has nothing to do with TPT, but for safety, the Tile+Brush won’t display the Selection Inspector for a Palette. But the default brush will.
- Select one or more of these assets in the Project folder. You can have both types in a selection.
- Use the menu item and follow any prompts that may appear.
Please note that if you accept the final confirmation prompt: UNDO can’t undo the change. However, all that’s changed is the internal GUID value, which doesn’t affect any normal operation of the TilePlus system.