Tile+Brush
A different Brush for the Unity Tile Editor.
Selection and Brush Inspectors
Some information is repeated for clarity
- Selection Inspector for Unity tiles
- Selection Inspector for Tile+ tiles
- Selection Inspector Details
- Selection Inspector Toolbar
- Brush Inspector
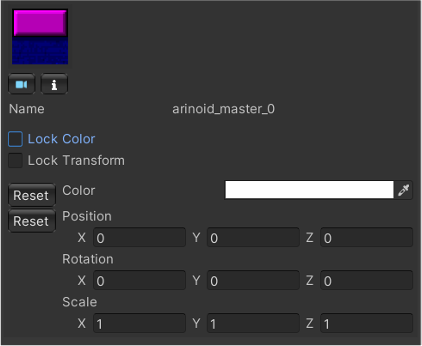
Selection Inspector for Unity tiles
Selection Inspector
When displaying a normal Unity tile, the Selection Inspector will look something like this:
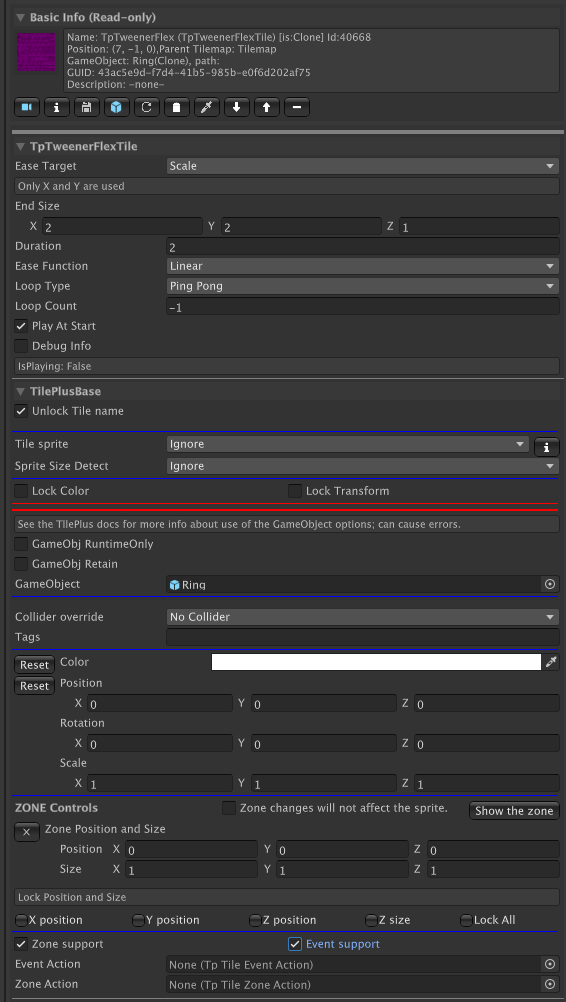
Selection Inspector for Tile+ tiles
Here’s an example of a Selection Inspector when displaying a TilePlus tile. This is used in Tile+Painter and as the Selection Inspector for the Tile+Brush.
Open this image in a new browser window then skip to the next page.
Selection Inspector Details
The Basic Info section displays read-only information from the tile. This area changes depending on what type of tile is being inspected. The last two items on the first line are the state of the tile and the Instance ID.
The Toolbar is followed by fields and properties from the inspected tile, ordered by the tile’s class hierarchy. Each section is in a foldout. See the Toolbar section on the next page for more information about changing the display.
The TilePlusBase foldout is always the bottom element and has some special functionality.
- Unlock Tile name. When unchecked, the tile’s name can be edited.
- Tile Sprite is used to control visibility of the Tile’s sprite. This is handy if you just want to use the GameObject of the Tile and don’t want the sprite to appear on the Tilemap, but you want to see it in the Palette or Painter.
- If this is set to ClearOnStart or ClearInSceneViewAndOnStart then the Tile’s sprite will be invisible when painted. You can still find it using Painter and change the setting directly.
- The Lock Color and Lock Transform flags can be used to change the flags setting on the Tilemap and the tile instance’s flags value.
- If you add a GameObject to the tile, the GameObject Runtime-only and Retain flags become visible. See the note below about how this setting affects the Inspect Prefab button.
- Collider override can be set to No Override, which means that the setting from the tile asset in the project folder is used. The other settings can be used to set the collider type on a per-tile basis. This action occurs during the execution of the tile’s GetTileData method.
- Tags is a field where you can place one or more comma-delimited tags. TpLib methods can be used to look for tagged tiles.
- Color is a field that’s used to change the sprite color on the Tilemap and tile instance’s color value.
- The Position, Rotation, and Scale fields can be used to affect the transform of the sprite on the Tilemap and the tile instance’s transform value.
- Zone and Event support are advanced features that you can read about here.
Effect on the Inspect Prefab button: The button appears only if the Tile has a GameObject. What is inspected when you click this button depends on a Tile flags setting:
- Instantiate-Runtime-Only is ON: Prefab asset in the Project folder.
- Instantiate-Runtime-Only is OFF: GameObject instance of the Prefab in the Scene.
This can occasionally be confusing: if you did not have Instantiate-Runtime-Only ON when the Tile is painted then the Tile creates the scene GameObject immediately.
If you later turn this flag OFF, the scene GameObject will not be removed! In this edge case the GameObject in the Scene is what will be inspected.
Notes
Certain tiles use a built-in capability to inhibit the visibility of the Name, Collider, Tags, Color, and/or Transform sections of the foldout.
For example, tiles such as TpAnimZoneLoader and TpAnimZoneSpawner modify the sprite transform as you adjust the zone size. These tiles hide the transform fields since the transform shouldn’t be modified by humans.
What's affected when changing flags, transform, or color
To be clear, when acting on TilePlus tiles, the actions of modifying flags, transform, or color in the Selection Inspector or Tile+Painter changes the corresponding value in the tile instance and on the parent Tilemap of the tile. When you save the scene, the changes in the tile are preserved. The original tile asset in the project folder is not affected. When acting on Unity tiles, only the Tilemap is affected.
In Tile+Painter, it’s easy to pick tiles from the scene and perform Color or transform modifications. Again, the only thing affected is the Tilemap. The asset in the project folder is not affected.
Tile+Painter also has a bulk modification feature: you can select an area of a Tilemap and apply changes to Color, transform, and tile Flags for all tiles in the selection.
Simulation
Some tiles will display ► buttons in the inspected tile’s fields area. These invoke methods in the tile and are useful for testing your tiles, especially for TilePlus’ animated tiles.
In PLAY mode
When the Editor is in Play mode the display will change somewhat, as most of the information becomes read-only, and some additional data appears showing the state of the animation flags (introduced in 2022.2).
Finally.... When looking at a TilePlus Tile asset in the Editor, you can change the Description and Info fields. These appear in the Basic Info section as shown above, and in the Brush Inspector. You may find these fields useful: one use would be prompts to remind you what the tile does before you paint it.
Selection Inspector Toolbar
The Selection Inspector shows this toolbar:
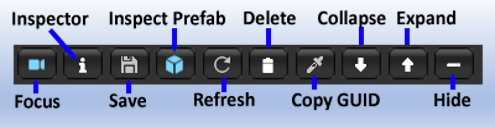
- Focus: Focus scene view on selected tile.
- Inspector: Open an inspector for the tile.
- Save: Save the tile as a new asset.
- Inspect Prefab: If the tile has a GameObject then this button appears: open an inspector for the prefab.
- Refresh: Refresh the tile.
- Delete: Delete the tile.
- Copy GUID: Copy the GUID of a tile to the clipboard.
- Collapse: Collapse all the tile sections.
- Expand: Expand all the tile sections.
- Hide: Hide all details of the sections.
Certain tiles have an additional button: the Simulate ► button. Simulate is an editor-only function that, well, simulates what the tile will do at runtime.
For example, with TpAnimatedTile or TpFlexAnimatedTile the simulate function will cycle through the animation sequence so that you can preview it.
For TpSlideShow, simulate displays the slide show tiles.
It’s a convenient way to preview what your tile will do at runtime and is especially handy when you’re editing tiles in the scene and want to see if the changes make sense. It’s a simulation and won’t be exact.
About the Focus button
About the Inspect Prefab button
- Instantiate-Runtime-Only is ON: Prefab asset in the Project folder.
- Instantiate-Runtime-Only is OFF: GameObject instance of the Prefab in the Scene.
This can occasionally be confusing: if you did not have Instantiate-Runtime-Only ON when the Tile is painted then the Tile creates the scene GameObject immediately. If you later turn this flag OFF, the scene GameObject will not be removed! In this edge case the GameObject in the Scene is what will be inspected.
The instanced GameObject in the scene isn’t editable. Hence, the only way to remove the GameObject from the scene is to delete the Tile. This is a Unity effect, not a TilePlus effect.
Why Save a painted tile as a new asset?
You can save any painted TPT tile as a new asset file. This is an important feature, as you can create a TPT tile as a prototype, customize it in-editor and then save it as a new asset which can be dragged into a Palette.
Why copy the GUID?
For an example, see the Animation demo program (AnimatedTiles/Scenes/Animation-UnityUI) in the TilePlus Extras folder. There you’ll see UI buttons which can trigger Animation on/off in the animated tiles. The UI buttons send the GUID to a script that looks up the tile reference via TpLib. GetTilePlusBaseFromGuid.
The script then uses the MessagingService to send a message to the tile, affecting the animation.
GUIDs are used a lot in the TilePlus system as an alternative (i.e., not the primary) way to locate and/or communicate with TPT tiles. GUIDs have nothing to do with how the tiles actually work; rather, they’re present so that there’s a unique value to put in JSON (or other) save data files. You can locate a tile by its GUID without knowing what Tilemap it’s placed on.
There are easier ways to do this as can be seen in the other Animated Tile demos: intercept New Input System actions and use the mouse position to locate a tile, then send it a message. See this.
Brush Inspector

This is the Brush Inspector seen when using the Tile+Brush with the Unity Tile Editor. It looks a bit different in Tile+Painter.
The Help foldout at the top has some hints about how to use this inspector, followed by information about the tile. Note that the last item on the first line indicates the state of the tile. For this inspector, the state will be [Asset] or in rare situations, [Locked].
The Toolbar allows you to open an inspector for the tile asset, focus the Project window on the asset, or open the asset script in your programming IDE.
The center area has information about the tile asset being inspected. If there’s a GameObject associated with the tile (via the GameObject field in the asset) then a preview of the prefab is shown, if possible. Like the Selection Inspector, the tile information is divided according to the class hierarchy, but there are no foldouts, just some thin lines to point out the division. None of the information is editable, but you can click the leftmost toolbar button to open an inspector.
The Brush Toggles foldout has a few options: Flood Fill preview, overwrite protection, and a toggle to hide the Toolbar.
Overwrite protection, available only when the Tile+Brush is the active brush, prevents painting over existing tiles.
You can override the Overwrite protection or the PaintMask by holding down a key defined in Unity’s shortcuts editor (Edit/Shortcuts). The default is ‘1’. This makes it easy to paint over a tile (overwrite) without toggling the control in the Brush Toggles section, or to paint a tile on a tilemap that’s not in the PaintMask list without changing the Paintmask field in the tile asset. A strike-through line inside the painting marquee is shown while the shortcut key is held down.