TileFabLib, ZoneManagers, and Layout
- Exposition
- Infrastructure
- TileFabLib
- Grid Selections
- TpZoneManager
- The Super-Grid
- Useful Methods, Camera Projection, Notes
- TpZoneLayout
- Layout System : Introduction
- Layout System Nomenclature
- Preparing a TScene
- Scene List Editor
- Relationships: Chunksize, Padding, Selector
- At Runtime...
- Layout System Block Diagram
- TSceneList
- TpZoneLayout
- Using Multiple ZoneLayouts
- Zones and LoadFlags
- Selectors
- TSceneInitializer
- About the Layout Demo
- Using PositionDb Service with Layout
Exposition
A TileFab can encompass all the tiles and Prefabs contained within a Tilemap hierarchy (Grid with child Tilemaps). The simplest use for this sort of a TileFab is to just load the whole thing at once to populate an area of a scene with tiles in one operation.
However, when you create a TileFab from a Grid Selection they’re more like rectangular pieces of layer cake, as seen in this crude illustration:

Rather than repeat “TileFab from a Grid Selection” let’s just call this a Chunk. This section is mostly about ways to use Chunks.
A Chunk is a TileFab, but there are several important differences regarding how position data is stored.
TileFab
- The CellBounds (a BoundsInt) of each Tilemap are used to limit what is stored in each Bundle.
- The stored BoundsInt for each Bundle is the CellBounds of each Tilemap.
- The stored positions of tiles and Prefabs in the Bundles are the raw positions from the Tilemaps.
- The m_FromGridSelection field is false.
Chunk
- The Grid Selection defines the limiting area.
- The stored BoundsInt for the Chunk always has a zero-based origin. The size is that of the Grid Selection.
- The stored positions of tiles and Prefabs are adjusted to have a zero-based origin relative to the lower-left corner of the Chunk.
- The m_FromGridSelection field is true.
This means that a Chunk’s size is always defined by its BoundsInt’s size. All stored positions in a Chunk are relative to the position of its BoundsInt, i.e., all positions are relative to the lower-left corner (the Position property) of the Chunk.
Or you can think of it as “relative addressing” since you can paint a Chunk anywhere but the tiles within the chunk retain the same relative positions.
Conversely, a TileFab’s stored positions are the raw positions directly from the Tilemap. If you paint a Tilefab with the Painter, all objects’ (tiles and Prefabs) positions are added to the mouse pointer position.
TileFabs are good for saving and loading entire Tilemaps. In real life, Chunks are more useful.
If you paint a Chunk or one of its Bundles using Tile+Painter, you’ll notice that the mouse pointer position is always at the bottom-left of the group of tiles in the Chunk.

This is because Chunks are organized in the scene using RectInts, and a RectInt’s position is the lower-left corner. This is important to remember, as you’ll see later.
Ways To Use Them
- Load a Chunk (or any TileFab) anywhere you want.
- Paint TileFabs, Chunks, or Bundles using Tile+Painter.
- Load automatically as the camera moves.
Loading
The easiest way is to use a TpAnimZoneLoader Tile. One can paint one of those Tiles on a Tilemap, view its fields using Tile+Brush or Tile+Painter, and set up a trigger zone. Your program periodically sends the position of your Player (or something else) to this Tile using the TpMessaging library. The Tile posts a Trigger event when that position is within the trigger zone. Your code observes this and calls a method in TileFabLib to load some TileFab.
Please note that this is a 'legacy' tile from earlier releases: it may not work properly with the layout system.
You can also call the LoadTileFab method in TileFabLib. This provides fine-grained control over the process, including optional filtering during the load process.
Painting: See the Tile+Painter documentation.
Automatically: Monitor the position of your camera and add/delete chunks as they move in and out of the camera view. This feature is used in the Layout demo programs.
Infrastructure
Review
Bundle: an archive of all the tiles and Prefabs for a single Tilemap. TileFab: references a group of Bundles.
Let’s review what type of data are in a Bundle asset:
- A List of TilePlus Tiles.
- A List of Unity Tiles.
- A List of Prefabs.
- Indexed Lists of Tile Flags, transforms, and Colors.
- The BoundsInt for the group of tiles as calculated for TileFabs or Chunks.
It’s not difficult at all to take all this information and populate a Tilemap with the tiles in the Bundle. Even a caveman could do it! There’s a method in the Bundle asset called TileSet which unpacks the various Lists in the asset and returns a List of data items, each with the tile reference and Flags, transforms, and Color for each tile. Methods in TileFabLib and TpZoneManager provide higher-level APIs for both TileFab and Chunk use.
Caching
Bundle assets cache all non-TilePlus tiles the first time that the TileSet method is used. This increases performance when the same Bundle is used repeatedly and most of the tiles are ‘normal’ Unity tiles (basically, anything that isn’t a TilePlus tile). There is a method that clears the cache if you need to.
Chunkifying
Bundle assets can also subdivide themselves into square chunks of arbitrary size. For example, a 1024 x 1024 Bundle can be divided into smaller chunks ranging from 4 x 4 (64K smaller chunks) to 256 x 256 (4 smaller chunks). After this operation, the Bundle turns this information into data ready to be loaded to Tilemaps using their block move methods. This cache can also be released when no longer needed.
This is the method used by the Layout system, and provides a way to set the loading chunk size at runtime. In other words, you can optimize the system at runtime based on the capabilities of the target system.
Essentially, this process creates a cache of TileChangeData for each subdivision. That's the format used by Tilemaps for fast block loads of tiles.
For example, if a bundle's size is 256x256 then:
- If a bundle was completely filled with tiles (all positions filled) that would be 64K tiles.
- If the chunk size is 4 tiles then there are 4096 chunks of 4x4 (16) tiles in each chunk.
- And Chunkifying will create a set of 4096 precached sets of TileChangeData.
Precaching does take a litle time, but not that much. A completely-filled bundle of size 256x256 chunkifies to 8x8 chunks in about 30 milliseconds (processor dependent, of course). If 'Firehose' messages are allowed via the TilePlus Configuration dialog then the elapsed time for this process is printed to the console.
Prefab Caching
Prefabs are never cached since they must be instantiated each time they are placed.
HOWEVER if a prefab has a TpSpawnLink component (or a derived component) then the Spawner Service is used. If the same prefab is used again, it's pooled and not repeatedly instantiated.
Software Components
Support for TileFabs comprises TileFabLib, TpZoneManager, and TpZoneLayout. Each of the three components present successively higher-level APIs for using TileFabs.
TileFabLib is a static library which provides the basic functions for loading TileFabs and Bundles to Tilemaps in a scene, during Editor sessions and at runtime. For example, if you’d created a TileFab from a complex scene with 10 layers of Tilemaps comprising thousands of tiles, you can paint that TileFab to a Scene using Tile+Painter, or load it to a Scene in a running app. It’s also used to create TpZoneManager instances at runtime.
TpZoneManager is a Chunk Manager. Instances of TpZoneManager Scriptable Objects are created at runtime. It has an API for chunk management, and loading/unloading chunks.
TpZoneLayout is a MonoBehaviour component that queries a single TpZoneManager instance: it’s a base-class for loading and unloading chunks as they move in and out of the Camera range. This is a basic implementation, and TpZoneLayout can be subclassed or rewritten by you to work differently if you want.
See the Side-Scroll layout demo for an example of how to use the ZoneLayout component directly: it's pretty easy.
At a higher level, ChunkedZoneSelectors, TpSceneManager, and TpSceneList assets can be used to organize TileFabs into TileScenes which can be loaded and unloaded in their entirety without loading or additively loading a Unity scene.
TileFabLib
TileFabLib.LoadTileFab loads the Bundles referenced by a TileFab asset. The TileFab asset has references to one or more Bundle assets, which include all the information required to recreate the tiles. There are both Async and non-Async overloads for this method.
TileFabLib.LoadBundle loads the tiles from a single TpTileBundle asset. You normally don’t need to use this, although you can if you just want to load tiles from a single Bundle (this is how Tile+Painter paints single Bundles). Otherwise, use LoadTileFab: a TileFab is created even if you only bundle one Tilemap and LoadTileFab is easier to use.
If you were only loading one Bundle to a Tilemap you’d intrinsically know which Tilemap to use as a target for placing the tiles extracted from a Bundle. This is why you can use the Tile+Painter to paint a Bundle anywhere you want to.
However, the normal use case, and the one supported by TpZoneManager, is to use a TileFab. That asset is a wrapper for any number of Bundles, along with the tags and/or names for the source Tilemaps that the Bundles were created from.
Why archive these two items? Because that information tells you what the Tilemap is for each Bundle; that is – where do you paint a Bundle that’s part of a TileFab?
Using the original Bundle assets’ names and tags, LoadTileFab tries to locate the target tilemap; first with its tag, then by name. For faster performance, a mapping between stored Tilemap names and specific Tilemap instances can be passed to LoadTileFab. This avoids searching for GameObject tags or names.
Each TpTileBundle asset is evaluated and the destination Tilemap must be found. The search is performed in the following order:
- Provided by the name-to-Tilemap instance mapping. (fastest)
- Provided by using the Tag to Find the parent GameObject of the Tilemap.
- Provided by using the Name to Find the parent GameObject of the Tilemap. (slowest)
- If a TPT tile reference is passed-in to LoadTileFab then the parent Grid of the tile is found, and the Tilemaps which are children of that Grid are examined for matching names (variable speed but faster than using Find).
If all those methods fail, then LoadTilefab silently fails, nothing happens, and no tiles are loaded from that TpTileBundle asset.
You can see this in action if you try to paint a TileFab containing multiple Bundle assets and one of the named Tilemaps isn’t present. If no Tilemap is located, then there’s no way to load the tiles and that Bundle asset is ignored: no preview or painting. If no Tilemaps are located for any of the Bundles, then nothing is painted at all, and no previews are possible.
If you’re using Tile+Painter to paint a single Bundle’s tiles, the destination Tilemap had already been selected in the leftmost column. Hence, you can paint a Bundle on any Tilemap quite easily.
If you want to ensure that loading TileFabs or Bundles recreate what you’re expecting, bear in mind that the Tilemap Component and Tilemap Renderer Component settings matter too:
- Tilemap: Frame rate, Color, Anchor, Orientation
- Tilemap Renderer: Sort Order, Sorting Layer and Order in Layer
If any of these are different than the setup when you originally archived the tiles, then the resulting visual appearance after the loading will be different.
Using LoadTileFab
LoadTileFab has several overloads for both synchronous and async use.
Let’s examine the method parameters for LoadTilefab:
- tileParent: The parent of the calling object (Only needed if calling from a TPT tile, otherwise ignored and can be null)
- tileFab: a TpTileFab asset reference
- offset: The Offset from tiles' stored positions – you use this to set the location where you want the tiles placed. For example, if you used Vector3Int(100,200,0) then the tiles will be placed relative to that location.
- rotation: optional rotation – unimplemented
- fabOrBundleLoadFlags: A set of control flags for LoadTileFab. See below.
- filter: a Func returning a bool. If non-null, this Func is used to filter out tiles that you don’t want.
- targetMap: A dictionary mapping tilemap names as found in the TileFab to actual Tilemap instances. Used to override the names from the Tilefab.
- zoneManagerInstance If using a ZoneManager, pass its instance.
the async version adds this parameter:
- intervalBetweenBundles For the Async version, a wait time between bundles.
Returns: Instance of TilefabLoadResults class. If null is returned, then there was an error of some kind.
fabOrBundleLoadFlags is a value from the FabOrBundleLoadFlags enumeration. These are Flag enums so they can be ORed. The combined value ‘Normal’ is the common case.
- None: usually not used
- Load Prefabs: Normally true
- Clear Prefabs: Normally false
- Clear Tilemap: Normally false
- Force Refresh: Normally false.
- New GUIDs for TPT tiles: Normally true
- FilterOnlyTilePlusTiles: Normally true
- NoClone: Normally false.
- MarkZoneRegAsImmortal: Normally false
- Chunkified: Normally false
- NormalWithFilter: LoadPrefabs | NewGuids | FilterOnlyTilePlusTiles
- Normal: LoadPrefabs | NewGuids
- ChunkifiedDefault: LoadPrefabs | Chunkified | FilterOnlyTilePlusTiles
The meanings:
- forceRefresh: Executes Tilemap.RefreshAllTiles after the tiles are loaded.
- loadPrefabs: Load any prefabs found in the TileFab
- clearPrefabs: Delete all prefabs attached to the target Tilemap’s GameObject.
- clearTilemap: Clear all tiles on a target Tilemap prior to loading new tiles.
- newGuids: Provide new GUIDs for all TilePlus tiles. Use when placing these assets at runtime to avoid duplicate GUIDs. There’s a discussion about this a bit farther down.
- filterOnlyTilePlusTiles: If the filter is provided then the filter is only applied to TilePlus tiles, which is often sufficient and saves much time.
- NoClone: Do not clone TilePlus tiles within the Bundle. The TPT tiles will clone themselves.
- MarkZoneRegAsImmortal: Used with the Chunking/Layout system. See Immortalizer tile
- Chunkified: The TileFab and its bundles are already Chunkified: See Chunkifying
Most of these are easy to understand and the Normal value for fabOrBundleLoadFlags is usually a good choice. You use the offset to set the origin for placement.
What happens is different depending on whether or not the TileFab is a square 'Chunk' as described earlier:
- Chunk: the 'offset' or placement position is the lower-left corner of where the TileFab's Bundles are placed.
- Not Chunk: the 'offset' is the lower-left corner of the bounds of the entire Archive.
This is automatic, and is mostly handled internally. You can see what happens differently for the two varieties with Painter: the tiles in a TileFab or Bundle assets are placed using LoadTileFab. The offset value is the mouse position converted into Tilemap (Grid) positions. You can see how that’s done by examining the code in TpPainterSceneView.
When you paint a Chunk the lower-left corner of the Chunk will start at the mouse position.
When you paint a TileFab that isn't a Chunk (not captured with a Grid Selection) then the entire Tilemap had been archived. The mouse pointer position is the lower-left corner of the bounds of the Tilemap.
It sounds confusing but you can try this out for yourself to see the difference. In any case: if you do not want to load an entire archived set of Tiles you use Chunks. In practice they're way more useful.
TileParent is null unless this is being called from within a TPT tile, such as the TpAnimZoneLoader. It’s used when trying to find the painting Tilemap, as mentioned in the preceding section.
ZoneManagerInstance can be left null (the default) if you’re not using it. If not null, the results of the loading operation are archived in the TpZoneManager instance that you provided.
NewGuids: A new GUID is created for each TilePlus Tile in the Bundle. When the Bundle is created, the GUIDs of the TilePlus tiles are saved in the Bundle, and when the Bundle is painted by Tile+Painter or via code, the GUID of the painted TilePlus tiles are the same as when the tile was archived. But this isn’t always desirable. For example, if you wanted to use a TileFab repeatedly in a game you’d end up with the same GUID for multiple tiles.
That’s an issue because the GUIDs are supposed to be unique: the TilePlus system rejects TilePlus tiles with duplicate GUIDs and an error message is issued. If NewGuids is false, GUIDs are unchanged.
Filtering
What’s the filter for? There are several uses for this feature: limiting the number of tiles loaded to those within a certain area, extracting information from the loaded tiles, eliminating certain tiles, changing the Color or transform for a tile, or for replacing a tile with different one (like for seasonal events). You can also adjust the position of a Prefab.
As input, the filter is provided with:
- An object containing information about the Unity tile, TilePlus Tile, or the prefab asset with position information.
- A value from the FabOrBundleFilterType enum. This tells you what the object is.
- The BoundInt for the Bundle.
Note that for Prefab assets or Unity tiles: these are the actual project assets so don’t modify the asset. Changing to a different tile (not TPT) asset can be OK if it contextually makes sense.
When the filter receives a TPT tile it’s a clone so you can change its fields if you want to. Each of these objects has different types of information:
- Unity tiles: TileSetItem: a tile reference (as TileBase), position, color, transform, and tile flags Again, note that the tiles are assets.
- TilePlus tile: the TPT Tile reference and the position.
- Prefab: the prefab asset reference and the placement position.
If you want to change values for the actual objects such as the Unity Tile or the TPT tile, please be aware that:
- Don’t change from a TilePlus tile to a non-TilePlus tile or vice versa.
- Prefabs and Unity tiles are project assets and should not be altered.
- TilePlus tiles should be clones. If they are not, they auto-clone when painted on the Tilemap, which depends on the settings of TpLib.MaxNumClonesPerUpdate. To clone a TilePlus tile, call its Cloner method with the newGuid parameter = true.
- Since there are so many possibilities, this sort of use is unsupported aside from (our) bugs.
Loading from a List
Another way to load TileFabs is by providing a list of loading parameters and using LoadTileFabsAsync. The Layout system uses this approach. This method allows specifying the delay between loading TileFabs and a delay between loading each Bundle in each individual TileFab.
The delays allow you to spread out the loading over time. Since the loading happens outside the camera view this can be advantageous.
Grid Selections
One might recall from the User Guide that you can create TileFabs and Bundles using a Grid Selection. A Grid Selection is when you use the Palette or Tile+Painter to make an area selection in a Tilemap. If the Bundler tool sees an active Grid Selection, it will ask if you want to use it. If you agree, the selection is used to limit what is archived. Normally, the Archiver grabs every tile on a Tilemap, and every Prefab parented to the Tilemap’s GameObject.
One of the things that’s stored in a Bundle is the BoundsInt for what was archived. When archiving a GridSelection, that selection supplies the BoundsInt.
Say that you want to paint (load via TileFabLib) a Chunk at Vector3Int.Zero. All the tiles in the bundle will be painted relative to Vector3Int.Zero as shown below. In other words, the stored locations of the tiles in the bundle are pure Tilemap “grid” coordinates regardless of where the Tilemap’s origin was placed.
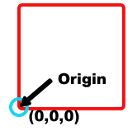
Note that all the tiles and Prefabs are placed relative to the position of the Chunk at the lower left corner, i.e., to the upper-right of the placement position for the Chunk.
Having a good understanding of this concept is important if you don’t want to get confused by what’s next.
TpZoneManager
TpZoneManager is a chunk management subsystem. Your code interacts with instances of the TpZoneManager class, which are Scriptable Object instances created at runtime by using TileFabLib. The Layout demo programs illustrate how to use the system.
TileFabLib implements some simple management features for creating, locating, and destroying TpZoneManager instances. Let’s call them ZMs to avoid me having to type TpZoneManager over and over.
To save memory, the data structures used for management are not initialized until you enable the subsystem by setting the TileFabLib.EnableZoneManagers property to true. This enables the subsystem and allocates memory to manage the ZMs, which you create with TileFabLib.CreateZoneManagerInstance.
For efficiency, the GUID remapping data tables discussed earlier are also maintained within TileFabLib.
public static bool CreateZoneManagerInstance(
  out TpZoneManager? instance,
  string iName,
  Dictionary<string, Tilemap> targetMap)
TileFabLib.CreateZoneManagerInstance requires that you provide a string as a unique identifier, and a mapping between Tilemap names and Tilemap instances. The ZM instance is placed in the out-parameter instance.
Don’t use the same Tilemaps with different ZMs.
Once created you can always get this specific ZM instance by using TileFabLib.GetNamedInstance.
Delete a named ZM with TileFabLib.DeleteNamedInstance. If you delete a named instance and there are no more, TileFabLib disables the subsystem and releases memory subject to GC.
Once you have a ZM, you initialize it with ZM.Initialize, providing the chunk size, the world origin coordinates (in the Tilemap address space), and an initial number of chunks expected.
For a single ZM instance, restrictions apply:
- Chunks (TileFabs) all need to be all the same size: square, with even-number dimensions such as 64 x 64.
- The smallest chunk size is 4x4.
- Chunks are always aligned to the super-grid defined by the chunk size.
- A Tilemap should not be used with more than one ZM. A ZM is unaware of Tilemap positions that may have had Zones filled or deleted by another ZM, and conflicting chunk sizes between different ZMs would naturally be problematic.
Each ZM can be set up completely differently. Just don’t cross the streams…. uh, share Tilemaps between ZMs.
When you provide a ZM instance to TileFabLib.LoadTileFab it sends the results of the load to the ZM, which creates a ZoneRegistration.
Why are Chunks Square?
Chunks must be even dimensioned due to integer math. If a Chunk had an odd size, division could introduce a positioning error. They don’t have to be square (they could be rectangles), but for this implementation they must be square with even dimensions because it makes the logic and math easier and much faster. It’s also more intuitive.
The Super-Grid
When you initialize a ZM with a chunk size and world origin you’re defining a higher-dimension or super-grid (sGrid) virtually layered on top of the normal Tilemap Grid.
In the illustration below, one Chunk is any number of Tilemap locations, from 4x4 to 128x128 or any reasonable value. If the chunk size is 4x4 then this 5x4 super-grid below actually comprises 20x16 tile positions. The position of a chunk is its origin, the lower-left corner.
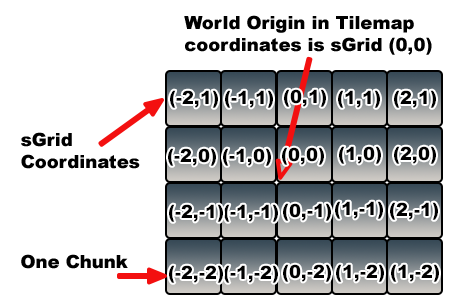
The sGrid coordinate system’s origin is the same as the world origin provided when the ZM instance is created. It’s also important to understand that each sGrid only applies to one ZM, even those created with the same chunk size and world origin. ZMs are completely unaware of each other, by design.
The array of Chunks is a sGrid virtually layered on top of the Tilemap’s grid. Array elements are called Zones and are addressable using Locators. Each Zone comprises one Chunk.
Locators are RectInts, which are a 2D version of a BoundsInt: a RectInt is also a struct and its position is also in the lower-left corner. They’re used throughout ZMs to define Zones, and to access and/or query data from a ZM instance.
Each Locator must be aligned to the sGrid of the ZM. This means that its position must be divisible by the chunk size, e.g., a chunk size of 4 means the sGrid addresses must be divisible by 4. The size of each locator is usually the size of a chunk, but doesn’t have to be, as we’ll see later.
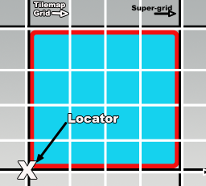
Here’s a detail of one Zone, outlined in red. Each Zone is aligned with the sGrid. The size of each Zone is the size of a Chunk. In this example, the size of a Chunk and of Zones is 4 x 4 Grid locations. Hence, the sGrid is 4x the Tilemap Grid.
The Locator of a Chunk can be used to locate a particular chunk on the sGrid just like a Tilemap position addresses a specific location on a Tilemap.
There are several ZM instance methods to convert between Tilemap Grid address space and sGrid address space.
- GetLocatorForGridPosition takes a Tilemap Grid position and returns a Locator.
- GetLocatorForWorldPosition takes a world coordinate position and returns a Locator. There are also instance methods to check for and convert to sGrid alignment.
- IsAlignedToGrid takes a Tilemap Grid position and returns true if it’s aligned to the sGrid.
- AlignToGrid takes a Tilemap Grid position and returns one that’s aligned to the sGrid.
- GetLocatorForSgridPosition takes a sGrid position and returns a Locator.
- GetGridPositionForSgridPosition takes a sGrid position and returns a Tilemap Grid Position.
You don’t need to use the sGrid, just be aware of it. But if you do need the conversions offered by the last two methods above, they’re available for your use. Note that the conversions will produce different results on ZMs with different chunk sizes and/or world origins. In a way, a chunk is like a giant tile and the sGrid is like the Tilemap grid with bigger element sizes.
The GetLocator for GridPosition and WorldPosition methods have an align parameter which if true (the default value) will automatically use the AlignToGrid method on the Tilemap Grid position.
Referring to the above illustration, any Tilemap grid coordinate within the Zone will return the Locator for the Zone when AlignToGrid is used. IsAlignedToGrid will only return true when the Tilemap grid coordinate matches the exact position of the Locator, shown here as X.
Useful Methods, Camera Projection, Notes
The GetLocator methods allow you to also pass in a Vector2Int dimensions parameter. This lets you create arbitrary-sized Locators. Normally, Locators are the size of a chunk. If you do not pass-in dimensions, that’s the size that’s used. Using a different dimensions value allows you to size a Locator however you want.
Why do that? Let’s say you want to find out which Zones are inside a Camera Viewport, and which are outside. The Viewport is (usually) bigger than a single chunk. Passing in the dimensions of the Viewport creates a Viewport-sized locator. That’s handy for use with GetZoneRegsForRegion and FindRegionalZoneRegs.
GetZoneRegsForRegion takes a Locator for input and returns a list of all the ZoneRegs within the Locator.
FindRegionalZoneRegs takes a Locator for input and populates a HashSet with all the individual Locators within the input Locator and populates a List with all the individual ZoneRegistration instances found outside the input Locator. This is a specialized method that’s used by another component called a ZoneLayout, we’ll discuss that in a later section.
To get individual ZoneRegistrations, use these instance methods:
- GetZoneRegsForGridPosition
- GetZoneRegsForWorldPosition
- HasZoneRegForLocator
- GetZoneRegForLocator
Camera Projection
A ZM is agnostic to the camera’s projection mode. However, there’s a big difference in how one calculates the viewport bounds for the two types of cameras. This matters for ZM clients such as TpZoneLayout, which only supports Orthographic cameras.
Multiple ZoneManagers
You can have as many as you want. Note the warning about sharing the same Tilemap with different ZMs. Don’t do it. Besides that, ZMs are independent, and can have different chunk sizes, world origins, and so on.
Scene Loading and Unloading
In general, you are responsible for deleting ZMs when a scene that they are in is destroyed. An example of how that’s done can be seen in the TpZoneLayout component’s OnDisable event handler, which handles this for you.
TpZoneLayout
At an even higher level, the TpZoneLayout MonoBehaviour component leverages a ZM to implement a basic camera Viewport chunking system. This component can be used as is, or as a base class for something more complex. Examine the “Layout” demo to see how to use it.
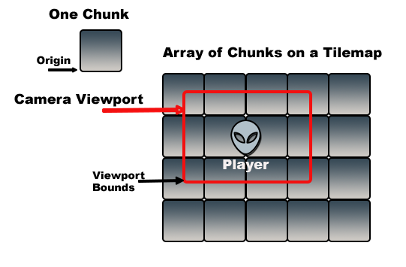
The following crude illustration shows an array of chunks on a Tilemap, some type of Player character, and a camera tethered to the Player, that is, a simple Top-Down view of a Tilemap.
Example Zone Layout
ZoneLayout places TileFabs in the visible area of a camera viewport and deletes them from outside the viewport. The provided implementation only supports orthographic cameras. The location for each of the Chunks shown in the above illustration corresponds to a Locator maintained by a ZoneManager instance.
As the Player moves, so does the Camera. As the Camera moves, its Viewport moves, and overlaps different chunks after each movement, akin to a window sliding over the sGrid and the Tilemap. When a chunk moves out of view it should get deleted, and when there’s an empty chunk in the view then a Chunk should be placed there.
The TpZoneLayout component does most of the initialization work for you.
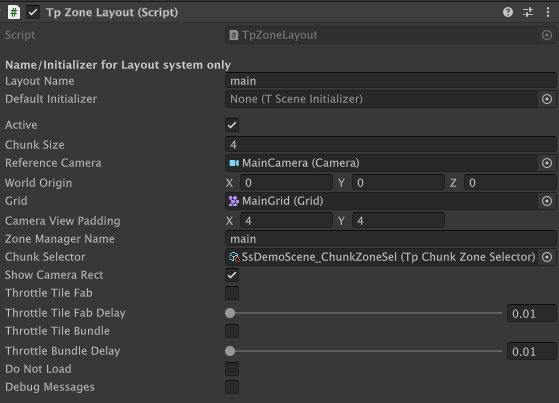
Let’s look at some of the ZoneLayout fields:
- LayoutName: A name for this ZoneLayout. Used with ChunkedSceneManager.
- DefaultInitializer: The default Initializer Scriptable Object asset. Used by ChunkedSceneManager.
- Active: Handy for debugging, if unchecked then this layout is ignored.
- Chunk Size: Size of chunks 4,6,8… This value is used to subdivide or 'Chunkify' the TileFabs and their Bundles.
- Reference Camera: the Camera you want to use for its viewport. In many situations this value will be the same for multiple layouts. But it doesn’t have to be.
- World Origin: the origin of the sGrid. Can be different on each layout.
- Grid: the parent Grid of the Tilemaps that this layout will be using. When using multiple layouts, it is important to ensure that this is the correct Grid for the Chunks that you’ll use.
- Camera View Padding: adds some extra space around the Camera viewport.
- Zone Manager Name: Must be unique for each Layout. If not, one of the duplicates will be ignored.
- Chunk Selector: A Scriptable Object asset that selects which Chunk to use at a particular Locator.
- Show Camera Rect: displays a marquee around the Viewport. Useful for debugging.
- Not shown in the image above: Show Zones. When a layout pass occurs, draw boxes for the zones using chunk-sized squares showing how it is subdivided.
- Note that when these boxes appear the Camera Rect display, if enabled, is temporarily not drawn.
- Throttle TileFab and Delay: add a delay between TileFab loads.
- Throttle TileBundle and Delay: add a delay between loads of a TileFab’s individual bundles.
- Do Not Load: No Chunks are ever loaded. You can watch the marquees move about without any distractions. Can get hypnotic.
- Debug Messages: exactly what it says...
TpZoneLayout uses a method in TpZoneManagerUtils to calculate a RectInt which describes the viewport.
Please note that if either 'throttle' checkbox is on, padding is automatically increased by (1,1) to avoid visual artifacts.
Since the viewport size is floating-point and a RectInt is not, the calculations always round up, so in general, the RectInt computed as the viewport size is bigger than the actual viewport. This is completely OK and is desirable as the effect helps to reduce visual artifacts.
Even with the rounding-up of the viewport size, you always need to add some padding so that there are no visual artifacts. This is very app dependent.
Then ZoneLayout uses the ZM to detect which chunks are within the viewport and which are not. Chunks outside the viewport are deleted from the Tilemap. Any empty Zones within the viewport are filled in with a Chunk provided by either a ChunkSelector asset or via a callback provided during initialization of the Layout (that’s not done in the Layout demo programs). The TileFabs can have filtering if you provide a filter callback.
If Prefabs Will Move
IMPORTANT: a TpTileBundle may contain prefabs which were parented to the archived Tilemap when the Bundle was created. Such prefabs are added to the Tilemap when the Bundle is loaded by TpZoneLayout and deleted when the Bundle is unloaded. However, these prefabs should not move. If they move into another Zone they won’t be deleted until that other Zone is deleted.
Hence, prefabs that will be moved should be tracked by your own code. See the TopDown Layout demo to see how that works: The GameController's PreFilter and the GameState service handle this aspect.
- GameStateService subscribes to TpServiceManager Service Messages sent by the Spawner Service when a prefab is spawned and despawned.
Special TileFab User Fields
Each TileFab has two user fields: a boolean and a string. These can be used for various things, dependent on your game structure. One use might be in the LoadingFilter callback passed to TpZoneLayout. UpdateTickAsync.
Selectors and ChunkSelectors
By now you’re wondering what this new bit of jargon is all about. A Selector is a bit of code that ZoneLayout invokes to obtain the Chunk to place at a certain location. At a low-level, a callback for this can be provided when initializing the ZoneLayout from code. A ChunkSelector is the same thing, except it is embedded inside a Scriptable Object so that it’s easier to use in the Unity Editor environment.
Since they’re essentially the same thing, we’ll just call them Selectors from now on.
ChunkSelectors use the IChunkSelector interface, which contains methods for initialization and Selection.
TpSingleFabChunkSelector couldn’t be simpler: it just returns the same Chunk every time. This is useful when you want to fill a solid background layer.
TpChunkZoneSelector is almost the same: it returns a single TileFab. However, internally it subdivides the archived tiles into areas of an arbitrary size, effectively precaching all the data required for quick loading to a Tilemap using that class’s bulk-move methods.
To dig into this more, see this for an extended discussion, including more information about a higher-level component called TpChunkedSceneManager.
TpChunkedSceneManager lets you load one or more Tilemap “Scenes” using the ZoneLayout/ZoneManager layout system.
You define Tile Scenes or TScenes using a specialized editor window.
The TpChunkedSceneManager MonoBehaviour component allows you to load TScenes by name, an index in a list of TScenes, or by the TScene’s GUID. Using the GUID is preferred for save files. ChunkedSceneManager also handles all the work involved in the creation and re-use of Zone Manager instances.
A flexible system of SceneInitializers lets the ChunkedSceneManager automatically invoke code that can extract information from the loaded tiles (e.g., waypoints, spawners) when the TScene is loaded.
Callbacks invoked at several stages of the loading process are used to
- Indicate that the current TScene is about to be unloaded.
- Indicate that a new TScene is about to be loaded.
- Indicate that the new TScene loading was completed so you can do any final initialization.
Layout System : Introduction
TilePlus Toolkit’s Layout system was changed in Versions 4 and 5. It’s more memory efficient and sports better performance.
The older system required the use of a Template Tool to break up a set of layered Tilemaps into numerous TileFabs and their child TileBundles, one TileFab for each subdivision (AKA, Chunk) of the Tilemaps. It had two disadvantages:
- The TemplateTool can take a while to run, up to several minutes, which is annoying when iterating designs.
- The chunk size chosen when the TemplateTool runs can’t be changed later.
The new system does away with the TemplateTool. One just creates a TileFab by creating a GridSelection and TilePlus Toolkit tools. The created TileBundles subdivide themselves and cache these subdivisions at runtime with a chunk size of your choice that’s also provided at runtime. Hence, if certain rules are followed, any chunk size can be used.
These are the rules:
- The bounds captured in a TileFab and its child Bundles must be square.
- The size of the bounds must be divisible by 2.
- The selected chunk size must be evenly divisible into the bounds; for example:
- TileFab of 256x256. Square: check. Divisible by 2: check. A Chunk Size of 12 = error.
- TileFab of 200x200. Square: check, Divisible by 2: check. A Chunk Size of 16 = error.
This is tested and if you get it wrong there will be errors and warnings printed to the console. In general, sticking to powers of 2 works best.
So, what does the layout system do?
In its current form, it supports top-down games and loading of multiple “Tile Scenes” or TScenes within one Unity scene. There’s also a handy Tile-scene manager that lets you easily load TScenes without dealing with the underlying complexity.
The system can also support side scrolling as seen in the Side Scroll Layout Demo, however, that's a very basic demo.
Layout System Nomenclature
| Name | Class Type | Use |
|---|---|---|
| TileFabLib | Static | Loads TileFabs, supervises ZoneManager instances. |
| ZoneManagerLib | Static | Utilities for ZoneManagers |
| TpChunkedSceneManager | Component | Loads TScenes (Tile Scenes) under your control. |
| TpZoneLayout | Component | Controls layout as the camera moves |
| Selector | Scriptable Object | Selects what to load |
| TpZoneManager | Scriptable Object | Manages what’s loaded and where |
| TSceneInitializer | Scriptable Object | Initialize your app after TScene loaded |
| TSceneList | Scriptable Object | A list of TScenes used by TpChunkedSceneManager |
| TScene | C# class | A field in the TSceneList with one or more TSceneSpecs. |
| TSceneSpec | C# class | A field in the TScene, specifies the TpZoneLayout to use. |
| TpTilePositionDb | Scriptable Runtime Service | Optional ‘database’ of occupied positions on the Tilemaps. |
We also use TScene to refer to the actual Tile Scene, that is, the original design scene where you create the design using tiles and prefabs.
In words, the TSceneList describes the TScenes to be loaded by TpChunkedSceneManager. Each TScene definition comprises one or more TSceneSpec instances. TSceneSpec instances connect a Selector and its TileFab to a specific TpZoneLayout to use for layout of the Selector’s TileFab.
Your program calls a method in TpChunkedSceneManager to load a TScene based on what’s specified in that specific TScene definition.
TpChunkedSceneManager sets up the load and several callbacks into your code are used to customize exactly what happens.
Selectors, TpZoneLayouts and TpZoneManagers handle almost all of the layout work for you, again, using a few callbacks for customization. TSceneInitializers are Scriptable Object assets that are used to refactor common initialization steps. You add TSceneInitializers to TScene specifications and a default TSceneInitializer to TpZoneLayout components. Using Scene Initializers is optional.
That’s a brief overview.
Creating and editing the SceneList is made simple with the SceneList Editor. You can access this by inspecting a SceneList asset and clicking the EDIT button or with the ChunkedSceneManager component’s EDIT button.
Preparing a TScene
Now, how do you create a TileFab for use with this system?
You create a TScene in a Unity scene that you use for design purposes only. There are examples of design scenes in the Layout Demo programs.
Add a Grid and as many Tilemaps as you need. Design it as you will, with tiles and prefabs. Ensure that prefabs are parented to one of the Tilemaps. Proper parenting happens automatically if you use Painter to paint prefabs.
Create a Grid Selection (square, with a size that’s divisible by 2) and use Tools/TilePlus/Prefabs/Bundle Tilemaps or use Painter’s Grid Selection mode to accomplish the same thing: creating a TileFab for the Grid and Tilemaps: an archive of all the tiles and prefabs on all the Tilemaps.
-
Using Painter's Grid Selection
Create TileFabwhile holding down SHIFT automatically creates a TpChunkZoneSelector asset and populates it's TileFabSource field with the newly-created TileFab's reference. -
If you use the Menu command, you'll need to use the Asset Create menu to create a TpChunkZoneSelector asset in the same folder where you saved the TileFab. Drag the TileFab reference into the TileFabSource field. Ensure that the Load Flags are set to ChunkifiedDefault.
Create a TSceneList asset somewhere in your project, like in a folder called TScenes.
Scene List Editor
Now that you have a TSceneList asset, let's edit it.
Examine the asset in an inspector and click the button to open the customized editor window and you’ll see something that looks like this:
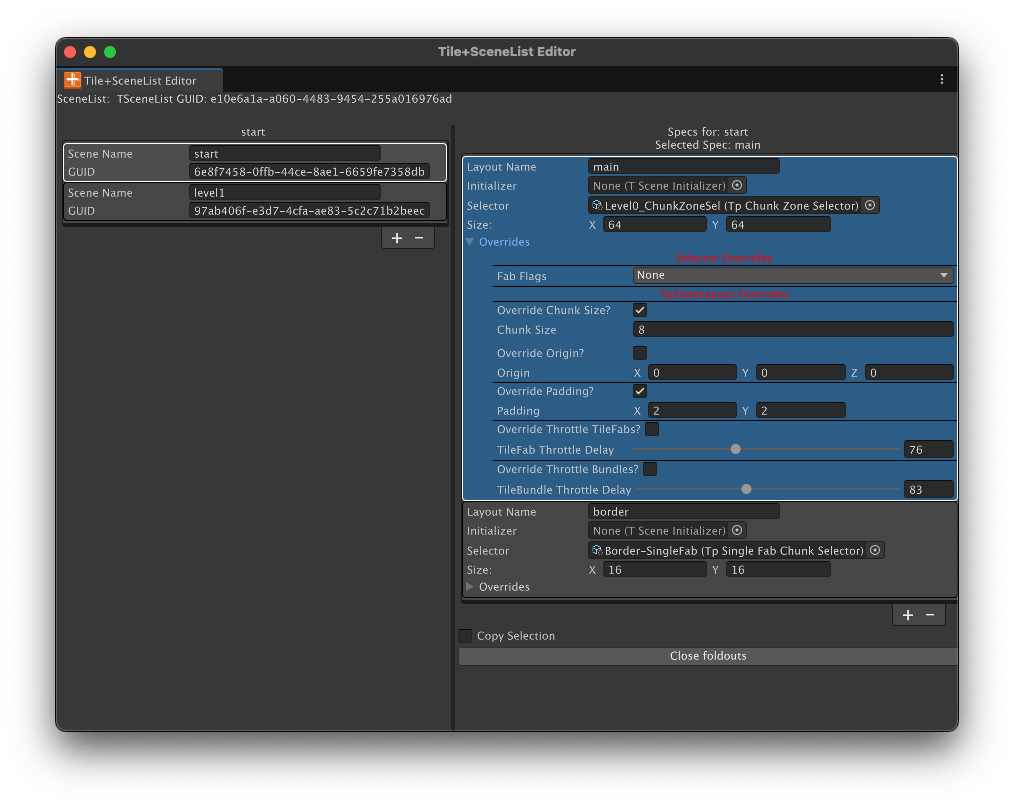
The left column lists all the TScenes in the asset; there are only two shown but more can be added with the + button. The Scene Name, the index of the TScene in the list, or the GUID can be used to load the scene using TpChunkedSceneManager.
The right column lists all the TSceneSpecs for the TScene shown in the left column. You can add more TSceneSpecs but often one is all you need. The reason for more than one will be discussed a bit later.
The TSceneSpec contains the name of the TpZoneLayout component to be used with this Spec, making the connection to the layout engine’s setup for this TSceneSpec. Again, more on this later.
The TSceneSpec also has a reference to a Selector; drag its reference into the field. When this field is populated, the non-editable SIZE field shows the total size of the area that the Selector represents: the size of the largest bounds of all the TileFabs referenced in the Selector.
Each Spec contains overrides for the Selector and for the ZoneLayout being used by the Spec.
Fab Flags allows overriding the LoadingFlags chosen in the Selector. Note that None won’t set the flags to None but rather indicates “no overrides.” To actually set the LoadingFlags to None use “Override None”.
The remaining overrides allow changing fields of the TpZoneLayout named in the LayoutName field. For example, to change the Chunk Size that’s in the ZoneLayout component just check the Override Chunk Size checkbox and whatever value is in the Chunk Size field below the checkbox will be poked into the ZoneLayout when the TScene is loaded.
Changing the Chunk Size is the most common override.
Please note that if either 'throttle' checkbox is on, padding is automatically increased by (1,1) to avoid visual artifacts.
Relationships: Chunksize, Padding, Selector
This system is flexible, but it is easy to make mistakes. If you have the chunk size set too large and use large values for padding it’s entirely possible that the entire TileFab for the TScene gets loaded all at once; i.e., no chunking.
Internally, the TileFab is Chunkified (broken up into smaller areas of ChunkSize x ChunkSize) regardless of what the padding values are set to. Padding is very sensitive to layout.
If you try tweaking the overrides for the Level0 Selector in the demo so that:
- Override Chunk Size checked
- Chunk Size set to 16
- Override Padding checked
- Padding set to 4,4
Ensure that the Scene View is visible and click PLAY. You’ll see that the entire TScene is loaded. What’s actually happening is that padding of 4,4 expands the Camera view bounds enough to cause the layout system to load every chunk within the TileFab.
This is not a bug and doesn’t hurt anything but there’s no reason to use a chunking system if you want to load the whole thing at once; there are simpler ways to load an entire TileFab at once.
Most of the time you want to use the smallest possible chunk size that makes sense for performance; noting that you have a lot of control over this with the ‘Throttling’ feature of the ZoneLayout component. Adjust padding while watching the Scene view as your player moves around. The idea of Padding is to ensure that new chunks (Zones) are loaded outside of the camera view even if your player is moving.
At Runtime...
During your Unity scene initialization you can load the first TScene by calling TpChunkedSceneManager.
When the OnAfterTSceneChange callback is handled by your custom code you call the UpdateTickAsync method in TpZoneLayout which fills in the initial camera view with chunks of tiles using the Chunk Size that you’ve chosen.
Then, as the camera moves, your custom code continues to call the TpZoneLayout.UpdateTickAsync method and the chunks outside the camera view are deleted and chunks that will be within the camera view are added automatically.
If you change to a new Unity scene, use ClearScene in TpChunkedSceneManager. This will delete all loaded zones prior to you changing scenes.
The TpChunkedSceneManager MonoBehaviour component allows you to load TScenes by name, an index in the list of TScenes, or by the TScene’s GUID. Using the GUID is preferred for save files rather than using an index or name as it reduces the chance for errors that could occur if you change names or order of TScenes in the asset file used to record all that information.
A flexible system of SceneInitializers lets the ChunkedSceneManager automatically invoke code that can extract information from the loaded tiles (e.g., waypoints, spawners) when the TScene is loaded.
Callbacks invoked at several stages of the loading process are used to
- Indicate that the current TScene is about to be unloaded. All Tiles and Prefabs will be deleted.
- If you’ve spawned any Prefabs that aren’t parented to any of the Tilemaps, delete them.
- Indicate that a new TScene is about to be loaded.
- Indicate that the new TScene loading was completed so you can do any final initialization.
You can optionally enable a Tile Position Database (TPDB). If enabled, the TPDB keeps track of all positions occupied by tiles for specific Tilemaps; you specify which ones during your initialization.
Simple path-testing and ‘position occupied’ methods in TPDB can be used to avoid collider issues in many situations. This is illustrated in the demonstration program.
Layout System Block Diagram
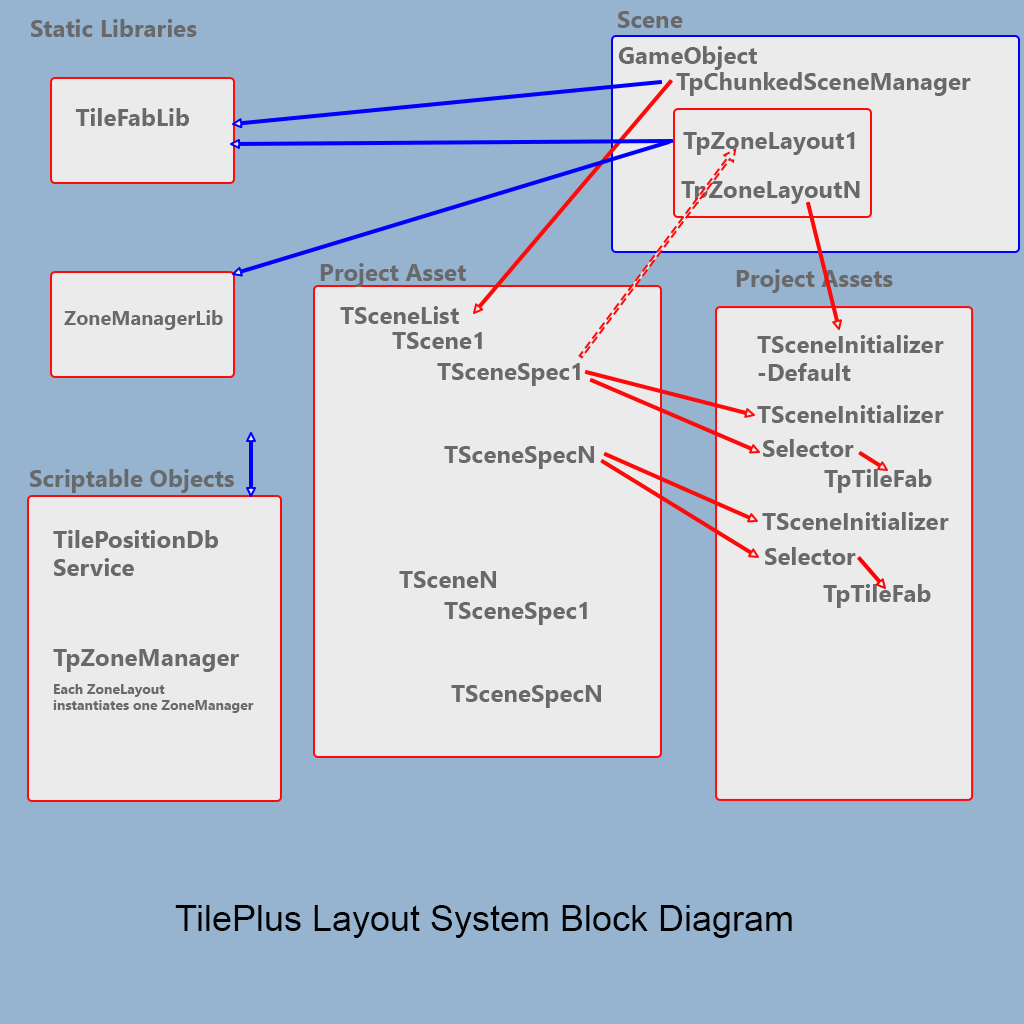
This block diagram illustrates the main parts of the Layout system.
The lowest-level APIs are within TileFabLib and ZoneManagerLib. These libraries handle all the tile/prefab loading and unloading as the camera moves around.
The next highest-level component is a ZoneLayout. This is attached to a GameObject in your Unity scene. As your camera moves, your custom code calls a special Update method in the ZoneLayout to unload/load tiles and prefabs as they move out of and into the camera view.
Each ZoneLayout component will instantiate a ZoneManager scriptable object at runtime. The ZoneManager tracks which chunks are currently loaded.
It’s entirely possible to have more than one TPZoneLayout, as I’ll discuss a bit further on.
The Layout Name field in the TpZoneLayout component is used to link the TSceneSpec to the ZoneLayout (the dashed line in the block diagram). The TpChunkedSceneManager component uses the Layout Name to determine which TpZoneLayout to use for a particular TSceneSpec.
The next highest-level component is the TpChunkedSceneManager. It has a public field which can be used to provide a List of TpZoneLayouts, but it will automatically use those which are attached to the same GameObject.
The ChunkedSceneManager uses data in the TSceneList project asset file to load Tile Scenes or TScenes.
The Layout system can be used with TScenes although that's not a requirement. See the Side Scroller demo for an example that doesn't use the ChunkedSceneManager.
One or more TSceneList project assets (in the middle of the picture) are referenced by the ChunkedSceneManager (upper-right).
You create an instance of this SceneList asset in a project folder as you normally would. The inspector for the asset prompts you to click a button which opens a customized Editor window for the asset.
The SceneList asset is added to the ChunkedSceneManager as a reference (dragging it in or by code). Then your code can make calls to ChunkedSceneManager to load one of the individual Tile Scenes (TScenes) within the SceneList. One can use the index of the TScene in the SceneList, the SceneName string value (part of the TScene data but can be changed by you) or the GUID of the TScene (added automatically when they’re created and not alterable).
It would probably be helpful to open TSceneList.cs. Scroll down to about line 200 or so and you’ll see m_TileScenes. That’s the list of TScene instances. Each of these can have one or more TSceneSpec instances. TSceneSpec instances connects the Selector (selects what TileFab to load) to the appropriate Layout.
In your scene and on some GameObject, add the TpChunkedSceneManager component and as many TpZoneLayout components as there are groups of Tilemaps. A Tilemap group is a single Grid with one or more child Tilemaps.
TSceneList
Each TSceneList asset comprises information about one or more TScenes (Tile Scenes). These are shown in the left column of its editor window. You add or delete TScenes with the + and – buttons under the list. When you select a single TScene the right column shows a list of TSceneSpecs for that TScene.
You add or delete TSceneSpecs with the + and – buttons under the right-column list. If adding a TSceneSpec when one is already selected in the List -and- the “Copy Selection” checkbox is checked, then all the fields of the selected TSceneSpec are copied to the new TSceneSpec except for the Selector.
The Layout Name field in a TSceneSpec must match the name of the TpZoneLayout that the TSceneSpec should use. The Layout Name field in the TSceneSpec and in the TpZoneLayout components default to "layout_name".

Please note that the Layout Name is case-insensitive and is always evaluated as lower-case characters. In the SceneListEditorWindow and in the ZoneLayout inspector whatever you type in the Layout Name fields is converted into lower-case letters automatically.
TpZoneLayout
You may have noticed in TSceneList that each TScene can have multiple TSceneSpecs. What’s that for?
Each TSceneSpec helps ChunkedSceneManager understand which TileFab is used to add tiles to a particular Tilemap group.
A Tilemap Group comprises a Grid with one or more child Tilemaps. Each Tilemap group uses one Chunk Size. For example, a Chunk Size of 32 means that 32x32 areas of Tiles are swapped in/out for all the Tilemaps which are in the group.
One limitation is that a Tilemap Group must be exclusive to a single ZoneLayout. Using a Tilemap Group with multiple ZoneLayouts will produce undefined results and possible exceptions.
Different Tilemap Groups can have different Chunk Sizes. For example, you can have two Grids with their child TileMaps. Each Grid/Map group is ‘handled’ by a TpZoneLayout. The SceneSpec tells ChunkedSceneManager which TpZoneLayout to use for a Tilemap Group.
In the demo program, the first TScene has two TSceneSpecs, implying two Groups. The second one paints a TileFab as an outer border and uses a single-TileFab Selector. Very simple, it just returns the same TileFab each time.
Since TpSceneSpecs are in a project asset and a TpZoneLayout is a component in a Unity scene, a direct connection by reference isn’t possible. That’s the reason for the Layout Name field of the TpZoneLayout component. At runtime, the name embedded in the TSceneSpec is used by TpChunkedSceneManager to locate a particular TpZoneLayout.
It’s all handled automatically, behind the scenes. All your code needs to do is to call the ZoneLayout’s UpdateTick method as your character moves, and handle several callbacks:
From ChunkedSceneManager
public event Action<TpChunkedSceneManager, TSceneList.TScene?>? OnBeforeTSceneChange;
Invoked just before current TScene is unloaded.
public event Action<TpChunkedSceneManager, TSceneList.TScene>? OnNewTsceneChosen;
Invoked just before the new TScene is loaded.
public event Action<TpChunkedSceneManager, TSceneList.TScene>? OnAfterTSceneChange;
Invoked just after the new TScene is loaded.
public event Action<TpChunkedSceneManager, TSceneList.TScene?, TSceneLayout, ZoneReg, TpZoneManager>? OnZoneRegAddedForLayout;
Invoked when a Zone Registration was added. You don’t normally need to handle this.
public event Action<TpChunkedSceneManager, TSceneList.TScene?, TSceneLayout, ZoneReg, TpZoneManager>? OnZoneRegDeletedForLayout;
Invoked when a Zone Registration was deleted. You don’t normally need to handle this.
public event Action<TpChunkedSceneManager, Tilemap, List<TilePlusBase>>? OnTptTilesWillBeDeletedForLayout;
Invoked when TilePlus tiles will be deleted. This is handy for extracting any save-file information before the tile is deleted. The demo program shows how this works for the particular save file scheme used in the demo.
Using Multiple ZoneLayouts
This is a really useful feature. You might have a Tilemap Group comprising a Grid with, say, 8 child Tilemaps and want to use a Chunk Size of 16 and a second Group comprising another Grid with a single Tilemap, but you want a Chunk Size of 64 for this Group because you want to expose sections for a ‘fog of war’ type of situation (which can be done but isn’t further discussed here).
In this hypothetical case you’d have two TSceneSpecs for that TScene along with two TpZoneLayout components. Each TpZoneLayout component has a field that you can use to name it; you copy the names into the two TSceneSpecs.
Then when ChunkedSceneManager loads a Tile Scene (TScene) it can easily make the connections between Layouts and their data sources and load/unload tiles and prefabs from the two different Tilemap Groups automatically using two different ZoneLayouts with different Chunk Sizes.
Chunked Scene Manager reconfigures the TpZoneLayout parameters on a per-scene basis, so you only need as many TpZoneLayout components as the most complex TScene requires.
This is implemented in the demonstration program where a second ZoneLayout is used to load a border. This is an example of two TpZoneLayouts with two separate Grids: MainGrid and BorderGrid.
This uses a second TileFab and Selector in Chunking/DesignTileFabs/Border. This is a single-TileFab selector, which simply means that it returns the same TileFab every time.
Note that the Border-SingleFab selector has the LoadFlags set to None. This selector doesn’t support ‘Chunkifying’ but that’s not needed.
This Border TileFab was created in the same ‘DesignScene’ as the actual TileScenes, and the source tiles were painted on the “Overlay” Tilemap. But the name of the target Tilemap is different: BorderTilemap. Normally this would mean that TileFabLib will look for the Overlay map to place the TileFab’s tiles. But that’s not what we want. There are two ways to handle this:
- Edit the TilemapName field in the BorderTileFab asset.
- Provide a remapping Dictionary to LoadTileFab.
Just to illustrate how to do it, a remapping is performed in ChunkingGameController.LoadingFilter in the section that begins with if (layout.m_LayoutName == "border"). The remapping Dictionary is updated in OnAfterTSceneChange, where we know the Current Scene and can determine if there’s a border or not. This is true in Level 0 but not Level 1.
In general, it’s much easier to just change the name in the asset.
Zones and LoadFlags
Zones
A Zone is a square area of a Tilemap which is internally represented by a RectInt. The X and Y sizes are the same and are the Chunk Size. So, for Tilemap Groups using a Chunk Size of, say, 16, each Zone is 16 x 16 tiles. Hence, the layout of all the Zones on a Tilemap acts as a sort of Super- or Higher-order grid.
LoadFlags
LoadFlags control specific aspects of the loading process. They are of flag Enum type FabOrBundleLoadFlags.
/// <summary>
/// Options for LoadTileFab and LoadBundle
/// </summary>
[Flags]
public enum FabOrBundleLoadFlags
{
    /// <summary>
    /// No flags used.
    /// </summary>
    None = 0,
    /// <summary>
    /// Use this in a TSceneSpec to indicate clearing all the Selector flags.
    /// </summary>
    OverrideNone = 4096,
    /// <summary>
    /// Load Prefabs. Normally true
    /// </summary>
    LoadPrefabs = 1,
    /// <summary>
    /// Clear Prefabs. Normally false
    /// </summary>
    ClearPrefabs = 2,
    /// <summary>
    /// Clear Tilemap. Normally false
    /// </summary>
    ClearTilemap = 4,
    /// <summary>
    /// Force Refresh. Normally false.
    /// </summary>
    ForceRefresh = 8,
    /// <summary>
    /// New GUIDs for TilePlus tiles. Normally true
    /// </summary>
    NewGuids = 16,
    /// <summary>
    /// Apply filtering only to TilePlus tiles. Normally true
    /// </summary>
    FilterOnlyTilePlusTiles = 32,
    /// <summary>
    /// Do not clone TPT tiles in TpTileBundle.Tileset
    /// </summary>
    NoClone = 64,
    /// <summary>
    /// Mark a Zone Reg as immortal. Note: ONLY valid when using ZoneManager and Layouts.
    /// </summary>
    MarkZoneRegAsImmortal = 128,
    /// <summary>
    /// Indicates to TileFabLib.LoadTilefab that this load is from a Chunkified bundle
    /// and the raw tile data is already cached. Note that this doesn't include
    /// any prefabs. Those still must be instantiated.
    /// </summary>
    Chunkified = 256,
    /// <summary>
    /// Most common set of options, with filtering only TPT tiles
    /// </summary>
    NormalWithFilter = LoadPrefabs | NewGuids | FilterOnlyTilePlusTiles,
    /// <summary>
    /// Most common set of options, with filtering for anything (if a filter is provided)
    /// </summary>
    Normal = LoadPrefabs | NewGuids,
    /// <summary>
    /// Default for Chunkified loads: see TSceneList
    /// </summary>
    ChunkifiedDefault = LoadPrefabs | Chunkified | FilterOnlyTilePlusTiles

}
Selectors have a field for specifying what flags to use when loading a TileFab or a section thereof.
The value of LoadFlags in the Selector is the default value for LoadFlags, but this value can be changed at other points of the processing.
When using the ChunkZoneSelector you need to use Chunkified at a bare minimum. ChunkifiedDefault is usually what you want. Note that this Selector’s Select method enforces the flag bits for Chunkified = true and NewGuids = false.
There are several ways that the LoadFlags from the Selector can be overridden on a TScene-by-TScene basis:
Each SceneSpec has a field called OverrideFlags which can be used to change these if needed for a particular TScene.
In other words, if the SceneSpec’s OverrideFlags aren’t ‘None’ then the SceneSpec’s OverrideFlags are poked into the Selector. Use OverrideNone to actually set the LoadFlags to None (OverrideNone has no meaning aside from this and shouldn’t be used except in a SceneSpec).
Note that these new values will be retained unless changed in another SceneSpec.
When using the LayoutTick method in ZoneLayout you can optionally modify these flags if you’ve provided a LoadingFilter callback. This is used in the demonstration program to mark Zones as Immortal (not removable) when an Immortalizer tile is found in a Zone.
Selectors
Selectors are used by the layout system to determine what and how to load. Each Selector has a reference to one or more TileFabs (but usually just one) and a LoadFlags field.
There are two types provided with this distribution: SingleFabChunkSelector and ChunkZoneSelector.
SingleFabChunkSelector is very simple and just causes the same TileFab to be painted to each Zone. This Selector does not accommodate variable Chunk Size: Chunk Size is the size of the TileFab referenced by the SingleFabChunkSelector.
ChunkZoneSelector is almost the same, however, its Chunkify method causes all the child Bundles of the referenced TileFab to subdivide themselves into the specified chunk size.
When Bundles “Chunkify” themselves, they ready their tiles for Tilemap loading using SetTiles(TileChangeDataArray). The tiles from the Bundle asset are reorganized into groups of tiles for each Chunk. For example, if a Bundle has a size of 512 x 512 and the Chunk Size is for the TScene is 128 then the Bundle is subdivided into 16 chunks arranged in a 4 x 4 matrix. Since this is performed at runtime, you can use any applicable chunk size.
This is a big advantage since you can easily tweak the chunk size during development or even in a deployed app for performance optimization on different platforms.
Useful Selector Methods
public List<RectInt>? AllLocators Get all of the locators for this Selector.
This subdivides the entire bounds of the TileFab into N RectInts of a size equal to the Selector's Chunk Size.
BoundsInt SelectorTotalSize(TpZoneLayout layout)
The returned BoundsInt defines the size of a single complete image ie the entirety of the Selector's TileFab. By default this is placed in Quadrant 1 of a 2D plane whose origin is at m_Layout.m_WorldOrigin
and the size is always a square.
Selector Query
List<TemplateSelectorQueryResults<T>> GetTilePlusTilesOfType<T>(Func<T, string, bool>? filter  = null,
                                                                    int size = 16,
                                                                    object? options = null)
Note: the options parameter is reserved.
where SelectorQueryResults is:
/// <summary>
/// name of TileMap
/// </summary>
public readonly string m_MapName;

/// <summary>
/// the tile instance of type T
/// </summary>
public readonly T m_Tile;

/// <summary>
/// the position
/// </summary>
public readonly Vector3Int m_Position;
So the return value is a list of TPT tiles of Type T in the entire TileFab, the name of the Tilemap that they're placed on, and the position.
New to TPT Version 6
One shortcoming of the method shown above is that it scans all of the TPT tiles in each bundle: time consuming. In TPT6 each bundle has a TypeCache, a Dictionary of Types (keys) and each Type's Instances. The Typecache is generated only when used.
List<TemplateSelectorQueryResults<T>> GetBundleTilesOfType<T>(Func<T, string, bool>? filter = null, int size = 16)
and
public override List<TemplateSelectorQueryResults<TilePlusBase>> GetBundleTilesWithInterface(Type interfaceType, int size = 16)
Each uses the Bundles' TypeCache and is more efficient than the older method shown above (retained for compatability). Note that GetBundleTilesWithInterface returns tiles cast to TilePlusBase.
What are these methods used for for?
When you load a new TileScene you will need information from it. For example, if you are using waypoints you might want to find out all the waypoints so you can position your player at a specific location: the most recently enabled waypoint.
But since in general only those chunks near the camera are loaded, not all of the TPT tiles in the TScene are actually loaded yet and hence are not locatable via the TpLib query methods.
You've loaded a save file with a GUID of a 'Start' waypoint but how do you find it if it isn't loaded yet??
Using GetBundleTilesOfType<T> is an easy way to extract this information. You can see how it's used in the next section.
This is a generic Query method which examines the Selector's TileFab, returning a list of information about each TPT tile.
The method accesses ALL the TileFab's bundles to create a list of a particular type of TPT tile, with filtering. Intended to be used during a scene or game init as this can take a while, depending on how many bundles are in the TileFab and how many TPT tiles are in each bundle.
It's NOT something to use inside a Monobehaviour Update: since the results are the same for each method call (unless the TileFab is changed, which is unlikely) , so cache the results if not needed immediately.
If you do cache the results please note that holding on to any tile references after the TScene is unloaded will result in memory leaks, so avoid that if at all possible or ensure that the references are nulled when you change TScenes.
The filter uses the tile ASSET and name of Tilemap as input params, returning a bool. If that bool is false then the tile is excluded from the method's output.
It's important to note that:
- The tile returned is a locked TilePlus tile ASSET in the PROJECT and not an INSTANCE in the scene.
- So don't mess with it. Reading the contents of fields is A-OK.
- Only the string name of the Tilemap (as preserved in the TileFab) is available.
- The bundles aren't unarchived, the locked TilePlus tile assets are examined directly
- In general it's a bad idea to maintain references to these tiles; doing so will cause a memory leak. So don't cache the TemplateSelectorQueryResults outside of the calling method.
TSceneInitializer
You use one of the SetScene overloads of ChunkedSceneManager to change TScenes.
The very last thing that TpChunkedSceneManager.SetScene does prior to invoking the OnAfterTSceneChange callback is to evaluate all the Initializers for each TSceneSpec in the TScene and each Initializer referenced by the TpZoneLayout that’s specified by name in the TSceneSpec.
Quite a mouthful. But what’s a TSceneInitializer, anyway?
It’s a Scriptable Object asset in your project. It must subclass TSceneInitializer. It has one method that you need to override: Exec(), and one serialized field: AugmentDefault.
TSceneInitializers are evaluated in a simple hierarchy: the TSceneInitializer referenced by the TpZoneLayout is the default and the TSceneInitializer referenced by the TSceneSpec (if any) is secondary: it can be used in addition to the default (augments) or instead of. The state of AugmentDefault is used to control what happens when there are two TSceneInitializers:
AugmentDefault on the TpZoneLayout’s TSceneInitializer is ignored.
Possible cases:
-
TSceneSpec has TSceneInitializer and so does TpZoneLayout
-
TSceneSpec TSceneInitializer has AugmentDefault = true
- exec
TpZoneLayout TSceneInitializer - exec
TSceneSpec TSceneInitializer(augments whatever the ZoneLayout’s TSceneInitializer does).
- exec
-
TSceneSpec TSceneInitializer has AugmentDefault = false
- exec TSceneSpec TSceneInitializer
-
-
only TpZoneLayout has TSceneInitializer
- exec TpZoneLayout TSceneInitializer
-
only TSceneSpec has a TSceneInitializer
- exec TSceneSpec TSceneInitializer
In words, if there’s a TSceneInitializer attached to the TpZoneLayout it’s the default and ChunkedSceneManager will always invoke its Exec method. If there’s also a TSceneInitializer in a TSceneSpec it can be used in addition to the default (augment) or instead of the default, or, if there’s no default at all then that one is used.
What are TSceneInitializers used for?
Entirely up to you. Examine MainGridSceneInitializer in the Layout demo for an example.
When loading a level you often need to do further configuration based on what was loaded. For example, your level might have waypoints, and you want to have a list of where they are so that you can position your Player character at the last waypoint. You may have some special features that are in some levels and not others.
Often this devolves into having lots of tests specific to particular levels. Using initializers allows you to have post-load operations that are generic to all levels in the TpZoneLayout’s referenced TSceneInitializer; sort of like a refactoring.
Then, for levels with specific initialization requirements, use another TSceneInitializer referenced by a particular TSceneSpec. The AugmentDefault setting on this secondary TSceneInitializer can be used to control whether it is used in addition to the default TSceneInitializer or instead of the default TSceneInitializer.
Let’s examine the MainGridSceneInitializer with some added comments:
/// <inheritdoc />
/// <remarks>Here the passed-in object to the callback is the TpChunkedSceneManager component</remarks>
public override bool Exec(TSceneList.TSceneSpec tSceneSpec,
                          TpZoneLayout          zoneLayout,
                          TpChunkedSceneManager sceneManager,
                          Func<TSceneList.TSceneSpec, TpZoneLayout, object?, object>? callback)
{

    //get all the waypoints in this Tscene
    var selector = tSceneSpec.m_Selector;
    if (selector == null)
        return false; //should not occur

    var zm = zoneLayout.LayoutZoneManager;
    if (zm == null)
        return false; //should not occur.

    ChunkingDemoGameState.m_TemplateWaypoints.Clear();
    ChunkingDemoGameState.m_TemplateWaypoints
                         .AddRange(selector.GetTilePlusTilesOfType<CdemoWaypointTile>(zoneLayout,
                                       WpFilter, 32));      \\FINDING ALL THE WAYPOINTS

    //filter does nothing, use is illustrative only.
    //the tile is an asset from a TileBundle.
    //the string is the tilemap name embedded in the bundle's parent TileFab.
    bool WpFilter(CdemoWaypointTile tile, string s)
    {
        return true;
    }

    ChunkingDemoGameState.m_TemplateNpcSpawners.Clear();
    //get all spawners.  This is just as an example; the returned value isn't used in this demo.
    ChunkingDemoGameState.m_TemplateNpcSpawners       FINDING ALL THE SPAWNERS
                         .AddRange(selector.GetTilePlusTilesOfType<NpcSpawnerTile>(zoneLayout));

     //FINDING ALL THE IMMORTALIZER TILES

    //get all Immortalizer tiles. This tile is a totally passive tile that describes an area.
    //ALL layout zones in this area will be immortal ie won't be deleted until
    //ALL zones become deleted on a change scene.
    var immortalizerTiles = selector.GetTilePlusTilesOfType<TpImmortalizer>(zoneLayout);
    ChunkingDemoGameState.S_TemplateImmortalZones.Clear();
    ChunkingDemoGameState.S_TemplateImmortalZonesLocatorPositions.Clear();
    //A hashset of all the locators. Hashset ensures no duplicates
    foreach (var qr in immortalizerTiles)
    {
        var pos     = qr.m_Position;
        var locator = zm.GetLocatorForGridPosition(pos);
        ChunkingDemoGameState.S_TemplateImmortalZones.Add(locator);
        ChunkingDemoGameState.S_TemplateImmortalZonesLocatorPositions.Add((Vector3Int) locator.position);
    }

    //now we have a hashset of the locator positions that are immortal. Faster, see loading filter callback.
    //note that even if there are multiple immortalizer tiles in one zone the HashSet will have only one entry.

    return true;
}
You’ll note the repeated use of selector.GetTilePlusTilesOfType.
- Use TPT6's new GetBundleTilesOfType or GetBundleTilesWithInterface: much more efficient.
This is a very handy method that can be used to extract any particular Type of TilePlus tile. It’s assumed that any interactive tile will be derived from TilePlusBase. There’s no similar facility for normal Unity tiles.
Normally there aren’t that many TilePlus tiles in a TScene. Nevertheless, it’s recommended to only use this method during initialization as it has to scan through all of the TilePlus tiles each time that it’s called.
About the Layout Demo
Save Files
There are two different types of save files:
- CdemoSaveFile.txt: contains the GUID of the current TScene (the GUID in the left column of the TSceneList asset’s custom editor window).
- CdemoSaveFile_guidstring.txt: contains JSON representing the data in the ChunkingDemoSavedData for a particular scene. The ‘guidstring’ is the GUID of the TScene that the data is for.
When the demo starts for the very first time, the first scene in the TSceneList is loaded since there aren't any save files. When a waypoint is reached the scene’s data is saved, and the guidstring part of the filename is the same as the currently-loaded scene’s GUID.
After that the CdemoSaveFile.txt does exist, and the GUID found there is used to load the corresponding TScene.
TdDemoGameController.Start
The Start method does all the setup for the demo game. It first calls VerifySetup which validates some of the fields and caches a few references.
Then Start waits for TpLib to be ready. Now let's load and set up our Services.
For simplicity this demo uses a SRS (Scriptable Runtime Service) as a global game state singleton. This demo is complex enough! A number of references are added to the GameState service. Note that this Service is basically just a Scriptable Object attached to TpServiceManager.
Some of the initialization is performed when TScenes are loaded using TSceneInitializers. Here we just set up a list of all the Tilemaps in the Unity scene, some other references and initial values such as a ChunkedSceneManager and CompositeCollider references, and a reference to the Player Prefab. The Player is added to a list of Persistent Game Objects. This list contains GameObjects that the Layout system should never remove.
The ChunkedSceneManager callbacks are set up, then the FileAccess and Layout services are loaded. The handles (references) are kept as local variables since we'll be using them repeatedly in the demo.
The last Service to load requires a bit of initialization: TpTilePositionDb. The initializaton just adds the maps that the PositionDb should monitor.
Next, the FileAccess Service is used to try to get the guidKey. That value is the GUID of the TScene to load. If this is the first time that this minigame starts then that ends up being an empty string.
The next line initializes the SceneManager component. This actually loads the appropriate TScene from the TSceneList reference of the SceneManager Monobehaviour component. If the passed-in GUID is string.Empty or if the passed-in GUID isn't found at all then the very first TScene is loaded. If the GUID matches a different TScene then that TScene is loaded.
In other words: Determining the location and GUID of the waypoint to use for placing the Player requires reading the save files. If found, the location and GUID of the current waypoint for the TScene are available. If not, the zeroth TScene from the TSceneList is used, and the single waypoint with the m_IsStartWaypoint field = true is used as the start position.
The SceneManager callbacks set up earlier:
   sceneManager.OnBeforeTSceneChange += OnBeforeSceneChange;
   sceneManager.OnAfterTSceneChange  += OnAfterTSceneChange;
   sceneManager.OnNewTSceneChosen    += OnNewTSceneChosen;
are used when the initial TScene is loaded and every time the TScene is changed.
-
OnBeforeTSceneChange: called just after SceneManager.SetScene is called. This is used to clean up the current Unity scene, mask the camera during a scene change, or any other housekeeping required before a TScene change commences.
-
OnNewTSceneChosen: The new scene was correctly chosen. In the demo this callback saves the GUID of the new TScene in the filesystem. That way the next time that the demo begins it will use that TScene as the starting TScene.
-
OnAfterTSceneChange: The load is complete. All TSceneInitializers have run. Here one performs any final setup. For the demo this includes:
Once we know where to place the Player, we create one if necessary and/or place it in the proper position. When creating a Player we also set up the Camera follower component (placed on the Camera GO).
Finally, we update all the TpZoneLayout components, which will be discussed next.
It’s important to note that while we know where the initial waypoint location is prior to updating the TpZoneLayouts, the actual TilePlus tile used for the waypoint is NOT actually on any Tilemap until after the TpZoneLayout updating is complete and the tiles are actually loaded.
That’s the reason for this:
if (startWaypointGuid != string.Empty)
{
    var guid = new Guid(startWaypointGuid);
    while (!TpLib.HasGuid(guid))
        await Awaitable.NextFrameAsync();
}
What’s happening here?
Once the waypoint is loaded its GUID will appear in TpLib’s GUID list. This is very conservative and probably redundant but is a good practice if you want to absolutely ensure against a race condition.
Finally, if a save file was located then use the JSON data from the save files to update loaded TilePlus tiles with the current state that they should be using.
Update
The Update method in TdDemoGameController monitors the camera and if the camera orthographic size changes the view is forced to re-layout with the new camera size.
User Input
User input is done in TdDemoPlayerController. It's pretty simple:
- Set up and accept input from the New Input System
- Use the PositionDb Service to see if the Player character prefab can move in the desired direction.
- Ensure that the Player prefab isn't going to move outside of the TScene boundary.
The PlayerController's Update method's local method TestForMove is used to interact with the PositionDb Service and do these and other tests.
- Convert from the Vector2 obtained from the New Input System callback into an enum value which describes what direction to move in.
- Do some conversions and obtain the Grid and World position of the Player prefab.
- Use the PositionDb Service to ensure that the Player stays on the road tiles.
- Use the PositionDb Service to see if there are any blocking tiles.
- Test the set of spawned GameObjects to see if there are any collider intersections.
- Determine what direction the Player should rotate to and perform the rotation.
This shows the hybrid approach used by the Layout system: PositionDb for tile collisions and colliders for GameObjects.
One advantage using the PositionDb for tiles is that the PositionDb responds to changes within one frame with low compute overhead. This is important when using the tweener since you want to be able to collide with the sprite and not the tile. A Tilemap collider can certainly adapt to sprite position and scale changes. However, when tweening these changes are happening every frame and that's extra work for the Tilemap collider.
What about Layout?
In this demo, that's performed in LayoutDemoLayoutService.
When the Player moves, TdDemoPlayerController invokes its OnPlayerHasMoved callback to TdDemoGameController. Let's take a look at that code in TdDemoGameController:
private async void OnPlayerHasMoved(Vector3Int newPlayerGridPosition, Vector3 currentPosition)
{
    if (!layout || !gameState)
        return;
    if (layout.LayoutIsRunning) //if layout is still in progress we just return.
        return;

    //do a layout pass.
    var layoutSuccess = await layout.UpdateLayout(currentPosition,
                                                              newPlayerGridPosition,
                                                              m_Grid!,
                                                              m_Camera!,
                                                              gameState.SceneManager!,
                                                              m_LayoutMessages);
    if (!layoutSuccess)
        Debug.LogWarning("UpdateLayout had error return...");

}
await layout.UpdateLayout is the only substantial action taken by this callback. Note that this whole callback chain is Async, hence, the Layout pass doesn't block anything else. Of course, the Layout code runs on the main thread so it can slow down your app if you set it up incorrectly.
UpdateLayout
- UpdateLayout checks to see if the Player has moved to a new Grid position. If not, there’s no need to re-layout the Tilemap chunks.
- Any null spawned GameObjects are deleted from the spawned GameObjects list.
- Then for each TpZoneLayout which is currently in use an Awaitable is created which invokes the TpZoneLayout’s UpdateTickAsync, which we’ll talk about next.
- WhenAll is used to await the completion of all the Awaitable tasks.
- Tiles are messaged.
Why Message Tiles Now?
Since the Player has moved to a new Grid position, all tiles that take action based on the Player's position need to know about the change.
At this stage, TilePlus tiles that are messaged may post an event to TpEvents.
- Waypoints: Waypoints can just save game data and the current waypoint position, or it can do that AND change to a new TScene.
- The m_IsLevelChange field in the tile controls whether the waypoint changes level or not.
- false: Save the TScene’s data (ChunkingDemoSavedData class is JSONized).
- true: Save the TScene’s data and load a new TScene based on the waypoint’s m_NextLevelGuid field.
- The m_IsLevelChange field in the tile controls whether the waypoint changes level or not.
- Treasure Chests: if the Player is within the Zone set by each chest then the chest animation is run, etc.
Waypoint Saves:
This updates the save data: if the Event was from a waypoint then we record the waypoint’s position and GUID in the ChunkingDemoSavedData instance, then disable all other waypoints in the TScene. Then the GUID of the scene is saved and the overall game data are saved.
TpZoneLayout.UpdateTickAsync
UpdateTickAsync uses information from the method’s parameter list and from the TpZoneLayout’s serialized fields in order to determine what to unload and load. Unloading means removing Chunks of tiles and Loading means adding Chunks of tiles. Chunks can be any size from 4x4 and higher. Note that the Chunk Size is specified as a single integer and not a Vector2Int: this means that chunks are always square. Chunk Size can’t be less than 4 and must be an even number.
Basically, the area in the Camera view area (plus padding) is examined for any empty Chunks using data about already-loaded chunks which are maintained in the TpZoneLayout’s spawned TpZoneManager. As the Camera moves around, new empty chunks will be encountered, and they’re loaded. Additionally, already-loaded chunks will pass out of the Camera view area (plus padding) and such chunks are deleted.
It’s deceptively simple; most of the actual loading and unloading is performed in TileFabLib and the “Chunkifying” of TileBundles is performed in the TileBundle assets themselves.
Using PositionDb Service with Layout
The TilePositionDb is a Scriptable Runtime Service: it’s an optional feature that you can use to keep track of what positions are occupied on one or more Tilemaps. The intent is to make collision detection easier in certain situations; typically, turn-based games.
Read more about it here.
Basically:
TilePositionDb hooks into a Tilemap callback and creates two internal datasets:
- A HashSet of occupied positions.
- A Dictionary of Tilemaps with sprite sizes for each position where the sprite size is more than one unit.
Oversized sprites? That occurs when the tile's sprite transform has an x or y size > 1.0f.
Why is this important? If you have tiles with sprites that are statically larger than 1x1 or if the sprites are changed at runtime, then this feature ensures that you can detect all possible positions that the sprite occupies.
For example, if you use the Tileplus Tweener, sprite sizes and positions are constantly changing. The PositionDb will automatically update its internal data as these values change.
One limitation may occur if you’re using the ‘Matrix’ tweening target, where you can change transform position, rotation, and scale in one tween. It’s possible to do all sorts of weird transformations and the sprite size calculations may not be able to handle every situation.