TilePlusBase
Information about the TilePlusBase class: the basis of this system
The Big Deal
A Key Feature
None of the TpLib TMDB and query functions, and none of the Event, Messaging, Persistence, and most other TilePlus functionality would work without the special TilePlusBase class.
Throughout the documentation and codebase you'll see TilePlusBase tiles referred to as TPB. TPB and derived tiles are generically referred to as TPT tiles.
Here's a class diagram generated in Rider which shows the basic class structure for all the TilePlus tiles in the Runtime library:
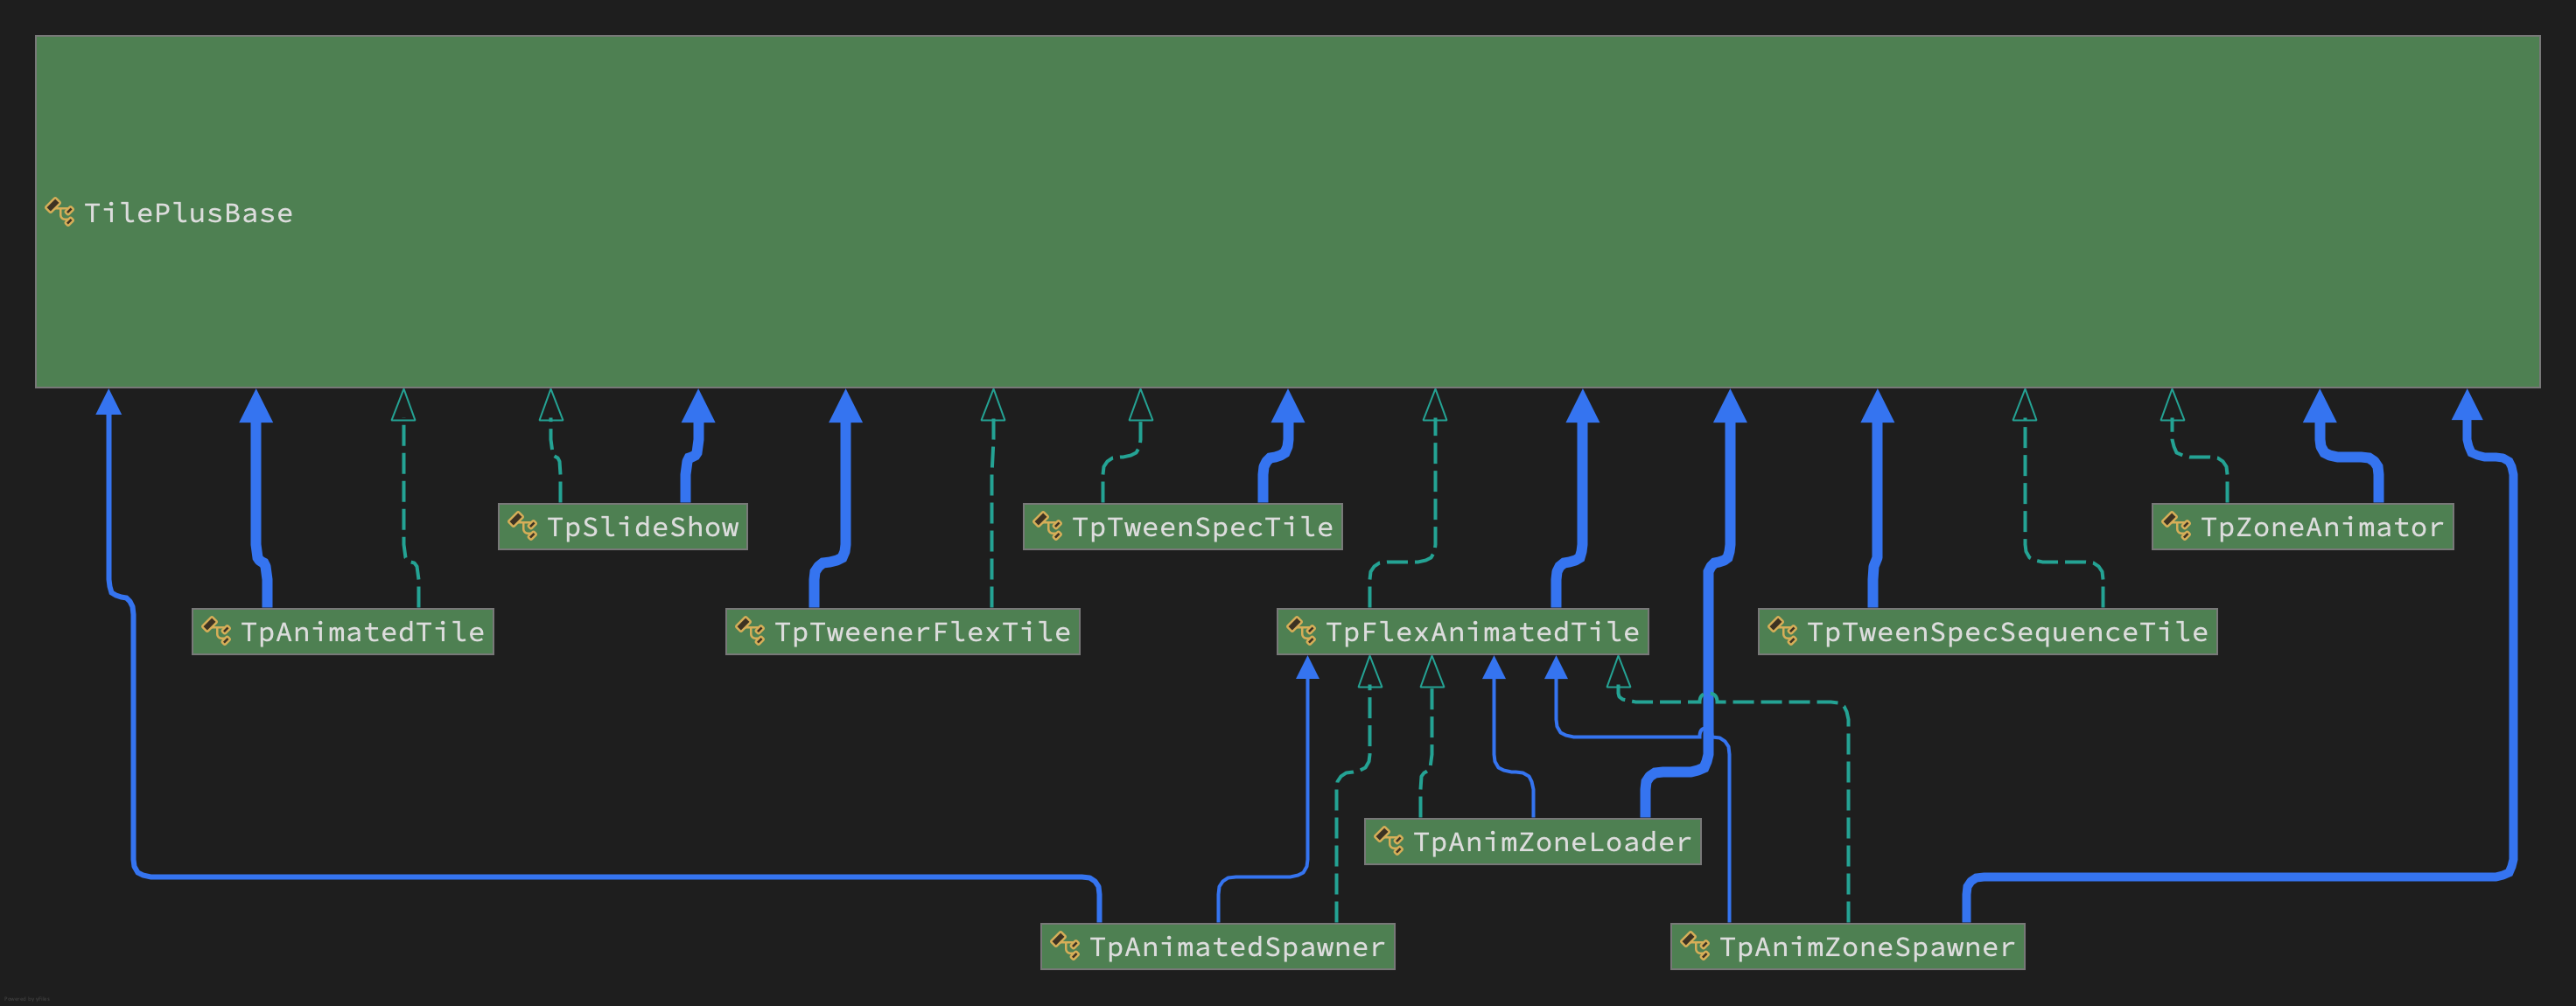
The lines show inheritance and the various dependencies.
TilePlusBase is divided into several partial classes just for organizational purposes:
- TilePlusBase
- TilePlusBaseData
- TilePlusBaseEnums
- TilePlusBaseStubs
- TilePlusBaseZoneEditor
- (Editor Folder) TilePlusBaseEditor.
Name the most powerful boss from any game you like: you would rather meet that boss in unarmed naked combat (IRL) then mess with this code. Seriously, read-only!
But unless you're deep into coding, you can ignore it. You can create a TilePlusBase tile asset and Paint it on a Tilemap but there's limited use for such an asset.
All the useful TPT tile types are derived from TilePlusBase, which, aside from supporting the use of cloned tiles properly, provides many properties and methods for the derived classes to use including basic animation support features.
Usually you'll only need to create derived classes from TpSlideShow, TpFlexAnimatedTile, or one of the two animated spawner variations.
Two important notes:
- Overidden methods generally should have their base classes invoked.
- StartUp should call the base class before doing anything else and return false if the base class returns false.
Basics
TPT tiles have three possible states maintained by the TilePlusBase instance.
- Asset: The tile is an asset in a Project Folder. Painting it changes state to Clone.
- Clone: The tile is present in a Scene. You can save it to the Project as an Asset.
- Locked: The tile is part of a TpTileBundle (Bundle) asset in the Project Folder.
If you Inspect a TPT asset in the Project window and open the “TilePlus Basic Settings” foldout, you’ll note that the State field is Asset.
When a TPT tile is added into a Palette it remains in the Asset state. You can see this by selecting it in the Palette Window – the Brush Inspector’s Tile Info/Name field displays [Asset].
When the tile is painted on a Tilemap, the state changes from Asset to Clone. You can see this by picking the tile using the Palette Select tool and looking at the “TilePlus Data” section’s first line.
The only exception is when you use the Pick function of a Brush or Tile+Painter to copy and paste tiles. In that case, the copied tile is already a clone, and the pasted tile is the same clone, which is not what’s wanted. The system recognizes when this happens (in-editor only and Play mode if you copy/paste programmatically), makes a new clone of the tile and paints it in the pasting location. This is implemented by TpLib.CopyAndPasteTile.
You can use a Selection Inspector toolbar button to save a TPT tile from the Scene to the Project as a Normal, cloneable TPT tile asset. The selected tile isn’t affected. This is handy for prototyping: you can customize a TPT tile right in the Scene and save it either for backup or as a template for further use. A simple versioning scheme adds version numbers to the saved assets.
Locked TPT tiles are the same as ordinary tiles in the sense that any modifications to the Locked tile painted on the Tilemap affect the tile asset in the Project. They’re only seen as sub-assets of an asset created when the Tilemap bundling functions are used.
If a Locked tile is present in a tilemap, it converts into a Clone tile at runtime.
One of the key features of TilePlusBase tiles (and their subclasses) is that the Tile instance always knows what Tilemap it’s part of and always knows its position on the Tilemap. The position information isn’t static: the position is updated if you move a tile. To be clear, this is performed entirely within the tile and has nothing to do with how the tile was placed: Unity Tilemap Editor, Tile+Painter, or via code.
When a tile is placed or moved, it calls a method in TpLib to register itself in the various data structures. This also happens when you start your app or load a new scene.
Editing
The TilePlusBase class section is always handled with a customized GUI when viewing any TilePlus tile in a Selection Inspector. Various sections of this inspector are visible or hidden depending on the context.
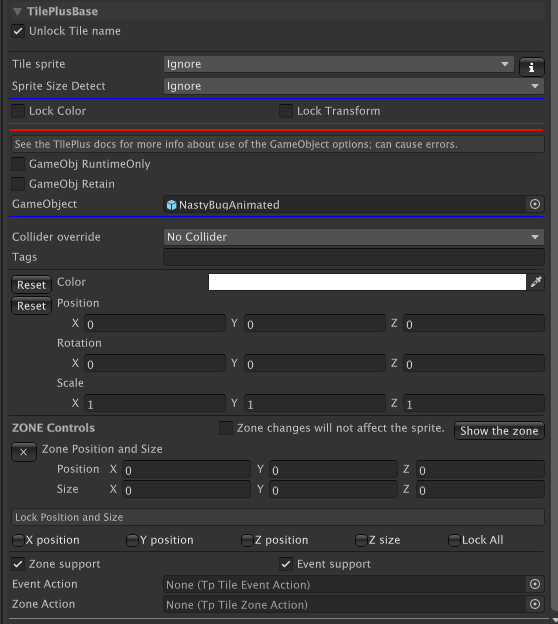
Let's go through the various parts of this inspector.
-
Unlock Tile Name: Normally one doesn't change the name of the tile. If you need to, uncheck the box and you can change the name.
-
Tile Sprite: Tile Sprite is used to control visibility of the Tile’s sprite. This is handy if you just want to use the GameObject of the Tile and don’t want the sprite to appear on the Tilemap, but you want to see it in the Palette or Painter.
- If this is set to ClearOnStart or ClearInSceneViewAndOnStart then the Tile’s sprite will be invisible when painted. You can still find it using Painter and change the setting directly.
- ClearOnStart is useful for tiles with no visual appearance since you can have a sprite for visibility in the Palette and in the Scene View but the sprite is disabled when the game runs.
-
The Lock Color and Lock Transform flags can be used to change the flags setting on the Tilemap and the tile instance’s flags value.
- If Lock Color is checked then the Color field is hidden.
- If Lock Transform is checked the the transform fields are hidden.
-
If you add a GameObject to the tile (the GameObject field), the GameObject Runtime-only and Retain flags become visible. A GameObject can also be added by viewing the project folder asset in a Unity inspector.
- Effect on the Inspect Prefab button: The button appears only if the Tile has a GameObject. What is inspected when you click this button depends on a Tile flags setting:
- Instantiate-Runtime-Only is ON: Prefab asset in the Project folder.
- Instantiate-Runtime-Only is OFF: GameObject instance of the Prefab in the Scene.
- This can occasionally be confusing: if you did not have Instantiate-Runtime-Only ON when the Tile is painted then the Tile creates the scene GameObject immediately. If you later turn this flag OFF, the scene GameObject will not be removed! In this edge case the GameObject in the Scene is what will be inspected.
- Effect on the Inspect Prefab button: The button appears only if the Tile has a GameObject. What is inspected when you click this button depends on a Tile flags setting:
-
The instanced GameObject in the scene isn’t editable. Hence, the only way to remove the GameObject from the scene is to delete the Tile. This is a Unity effect, not a TilePlus effect.
-
Collider override can be set to No Override, which means that the setting from the tile asset in the project folder is used. The other settings can be used to set the collider type on a per-tile basis. This action occurs during the execution of the tile’s GetTileData method.
-
Tags is a field where you can place one or more comma-delimited tags. TpLib methods can be used to look for tagged tiles.
- The tag
-----(five hyphens) is reserved.
- The tag
-
Color is a field that’s used to change the sprite color on the Tilemap and tile instance’s color value.
- Use the Reset button to reset the Color.
-
The Position, Rotation, and Scale fields can be used to affect the transform of the sprite on the Tilemap and the tile instance’s transform value.
- The Reset button resets the tile sprite transform.
-
Zone Controls: A Zone is a BoundsInt that describes a region.
- The small
Xbutton resets the Zone to one tilemap unit. - These controls appear only when
Zone Supportis checked. - Position is an offset from the Tile's position. Z is ignored.
- Size is the size of the Zone.
- If
Zone changes...is checked, then the tile's sprite is affected by changes to the Position, Rotation, and Scale fields. - The
Lockcheckboxes let you lock the entire zone to ensure it's not editable or just some of the components. - The
Show The Zonebutton displays a marquee around the zone in the Scene view. This is very handy when editing!
- The small
-
Zone and Event support are advanced features that you can read about here. Adding the Scriptable Object references for Event and Zone Actions is done in this inspector or by inspecting the asset in the project folder.
Certain tiles use a built-in capability to inhibit the visibility of the Name, Collider, Tags, Color, and/or Transform sections of the foldout.
For example, tiles such as TpAnimZoneLoader and TpAnimZoneSpawner modify the sprite transform as you adjust the zone size. These tiles hide the transform fields since the transform shouldn’t be modified by humans.
To be clear, when acting on TilePlus tiles, the actions of modifying flags, transform, or color in the Selection Inspector or Tile+Painter changes the corresponding value in the tile instance and on the parent Tilemap of the tile. When you save the scene, the changes in the tile are preserved. The original tile asset in the project folder is not affected. When acting on Unity tiles, only the Tilemap is affected.
In Tile+Painter, it’s easy to pick tiles from the scene and perform Color or transform modifications. Again, the only thing affected is the Tilemap. The asset in the project folder is not affected.
Tile+Painter also has a bulk modification feature: you can select an area of a Tilemap and apply changes to Color, transform, and tile Flags for all tiles in the selection.
When the Editor is in Play mode the display will change somewhat, as most of the information becomes read-only, and some additional data appears showing the state of the animation flags (introduced in 2022.2).
When looking at a TilePlus Tile asset in the Editor, you can change the Description and Info fields. These appear in the Basic Info section as shown above, and in the Brush Inspector. You may find these fields useful: one use would be prompts to remind you what the tile does before you paint it.
If you change the size of the sprite and there’s another tile in the same area it might be obscured by the transformed sprite (or vice versa). If that’s a problem, you can adjust the transparency in the Color field (TilePlusBase section of the Selection Inspector) or change the Tilemap Renderer’s Sort Order setting.
Plugins/TilePlus/Runtime/Textures/TriggerZoneSprite can be used for the sprite for this tile, but you can use any sprite. Note that the sprite won’t appear if you change the TileSpriteClear to Clear In Scene View. If you don’t want the trigger zone to appear in Play mode, set TileClearMode to Clear On Start.
Note that the Tilemap Renderer will sometimes cull enlarged sprites. There’s a FAQ in the User Guide regarding this.