TilePlus Toolkit
Documentation for TilePlus Toolkit, available on the Unity Asset Store.
The information in this book reflects Toolkit Version 5 and newer.
If upgrading from Version 4.X or earlier, please see 'Upgrading' in the "Introduction to TilePlus Toolkit" chapter.
- Introduction To TilePlus Toolkit
- Introduction To TilePlus Toolkit
- Upgrading From Earlier Versions
- Getting Started
- Key Elements
- TpLib Organization
- TpLib
- Editor Library
- Tile+Brush
- Design Philosophy
- TilePlusBase
- Tile+Brush
- Selection Inspector for Unity tiles
- Selection Inspector for Tile+ tiles
- Selection Inspector Details
- Selection Inspector Toolbar
- Brush Inspector
- Other Assets
- TilePlus Tile Asset Varieties
- Animated Tiles
- Special Tiles
- Tweener Tiles
- Zone-Based
- UI Tiles
- Event and Zone Actions and SubObjects
- Prefabs
- Components
- Services
- Messages and Events
- TpTweener
- Tweener Service
- Tweening GameObjects
- Custom Tweening
- Coroutines and Awaitables
- Version 6 Improvements
- Runtime Utilities
- Diagnostics
- TileFabs and Bundles
- TileFabLib, ZoneManagers, and Layout
- Exposition
- Infrastructure
- TileFabLib
- Grid Selections
- TpZoneManager
- The Super-Grid
- Useful Methods, Camera Projection, Notes
- TpZoneLayout
- Layout System : Introduction
- Layout System Nomenclature
- Preparing a TScene
- Scene List Editor
- Relationships: Chunksize, Padding, Selector
- At Runtime...
- Layout System Block Diagram
- TSceneList
- TpZoneLayout
- Using Multiple ZoneLayouts
- Zones and LoadFlags
- Selectors
- TSceneInitializer
- About the Layout Demo
- Using PositionDb Service with Layout
- Interfaces
- Attributes
- Persistence
- Create Your Own
- Ui System
- Technical Notes
Introduction To TilePlus Toolkit
An introduction to this system
Introduction To TilePlus Toolkit
TilePlus Toolkit (TPT) is a unique way to work with Unity Tilemaps. It’s a Unity extension that can change the way you think about Tilemaps and how you use them.
This document applies to Version 5.
Main Features:
- New Tile class which allows private instance data on a per-tile basis.
- New Brush for the Unity Tilemap Editor which supports editing these tiles’ data.
- New Brushless Painting/Editing tool: Tile+Painter.
Other Capabilities:
- High-level ‘Tile Scene’ subsystem.
- Archiving of single or multiple Tilemaps for fast loading and chunking.
- Fine-grained tile animation control including rewinding, looping and ping-pong looping.
- Tiles can control the animator component of a spawned prefab.
- Tiles can message other tiles or send events to Monobehaviours.
- Monobehaviours or static classes can message tiles.
- Simple save/restore systems for tiles’ data.
- Built-in Zone creation for setting trigger zones.
- Chunking Layout System for top-down or side-scroll orthographic views.
- Pooled Prefab and Tile spawner.
- Dynamically loadable Runtime Services.
- Internal scheduler you can use for timers inside tile code or elsewhere.
- Customized Tweener for tile sprites, including limited GameObject support.
- Tween the tile sprite’s transform position, rotation, scale, matrix, or color.
- Tween GameObject position, rotation, scale, or color
- Tween GameObject position along a Bezier curve.
- Sequences are supported
- Convert Tweens and Sequences into Awaitables.
- Custom tweens: tween anything.
- Assortment of utility methods for Tilemaps.
- Several pre-created Tiles for common uses
- Use Tiles as UI.
- Animated and static buttons
- Ascii characters and strings (no editing)
- Hover zones for tooltips and tile animation triggering.
- Radio buttons
- Toggle buttons
And importantly, there is no interference with your existing project. No special dependencies, no special GameObject tags, no changes in how Tilemaps work: just a lot of C# code – and the source is included.
Upgrading From Earlier Versions
Upgrading
Please note that TilePlus version 6 no longer resides in the Plugins folder.
- Please ensure that you delete the Plugins/TilePlus and TilePlusExtras folders before upgrading.
If you're upgrading from Version 5 or earlier and you've been writing custom code using TilePlus' APIs:
- Copy your project and open the copy prior to loading TilePlus Version 6 or newer. You will have many errors due to API changes.
If you haven't written any custom code and use TilePlus Toolkit as-is, you should have no issues. However, please back up your project first.
Versions 5 and 6 removed some obsolete demo programs and certain infrequently-used or newly obsolete TilePlus tile classes and added several new or replacement classes.
Getting Started
If you’re not into coding and want to play with some feature demos, head over to the TilePlus Extras folder. Each demo has its own documentation in text or markdown format or look here.
If you haven't read the user guide, read it on this website and read it first.
If you want to use Tile+Painter: it has a short “Quick Guide”. Clicking the ‘?’ button in Painter displays a quick summary right in same window.
Other documentation
The basic user guide and an API reference (zip file) can be found in the TilePlusExtras/Documentation folder.
Click these links for the most recently-edited user guide and API references.
Find all additional documentation on this website.
Key Elements
New Tile Class
The key component of TPT is a new Tile base class cleverly dubbed “TilePlusBase” (TPB). This tile clones itself when placed on a Tilemap in a scene.
Why would anyone care?
The One With No Instance Data
One of the issues that developers run into with Unity Tilemaps is that there’s no way to add fields (variables) to tiles and have the data serialized and saved in the scene just like the serialized fields of scripts used for components. This is because the Tilemap’s serialization is hard-wired to save data from the basic fields present in a Tile class.
For many (including your TPT developer) this is annoying, to say the least. Perhaps you want a configurable waypoint. Maybe you want to be able to paint a tile and set it up as a spawn zone. And you want to be able to edit fields as you usually do.
Using TilePlusBase and the supporting libraries you can have any sort of code and/or data in a tile. Since the tile is cloned, it is no longer connected to the asset in the project folder: it exists in the Scene, and its data is saved with the scene.
If you’ve used the Unity Tilemap Editor (UTE) you’ve used its Selection Inspector. That inspector is very different from the normal Unity inspector panel: the UTE Selection Inspector is hard-wired to support the fields of the Tile-class tile and that’s it.
The support libraries for TPT have an alternative Selection Inspector that’s available in the UTE as the “Tile+Brush” or by using the TPT’s Tilemap painting and editing tool: Tile+Painter (T+P).
Decorate your TPB-derived tiles with TPT’s custom attributes and this alternative Selection Inspector lets you view and edit those fields or display property values. See Attributes.
Services
Services make it easier to use single-instance Scriptable Object assets as runtime-loadable code blocks.
- Replacing static classes with loadable classes can improve reload time in the editor.
- Unload code when you don't need it anymore to free memory.
- TilePlus includes several bundled services: Spawner, Tweener, and others.
- It's easy to add your own!
See the Services section for more information.
TileBundles and TileFabs
Another important feature of this system is the ability to archive the contents of one or more Tilemaps into archives which can be loaded by code.
With most Unity GameObjects + components you make prefabs.
They're not terribly useful with Tilemaps. If you instantiate such prefabs you'll end up with multiple Tilemaps and Grids. What would be more useful is the ability to quickly add and delete areas of tiles on demand.
That's what you can do with Bundles and TileFabs. These archives are also the only way to archive TilePlus tiles. Since these are scene objects and don't correspond to assets in the project, references to these are lost and one ends up with the familiar pink/whatever colored tiles.
The TilePlus system has a custom archiver that can:
- Bundle all tiles from a Tilemap.
- Bundle all the tiles from an area (Grid Selection) of a specified Tilemap.
- Optionally archive references to all Prefabs which are parented to the Tilemap's GameObject.
When presented with several Tilemaps, the archiver also creates a TileFab asset. This asset contains all the Bundle references for all the Tilemaps.
The TileFabLib static-class library has methods which allow loading of individual bundles or an entire set from a TileFab. There are both synchronous and asynchronous methods, and the async methods allow distributing individual bundles loads over several frames.
It's important to note that Bundles and TileFabs created from a Grid Selection (that is, just some portion of the Tilemap) are position-independent. This means that you can load a TileFab and its bundles anywhere on the Tilemap(s), not just their original locations.
Built on this framework are ZoneManager and ZoneLayout which are part of an automatic layout system for top-down views. This system adds and deletes TileFabs and their bundles as the Camera moves.
TileFabs and Bundles are also used extensively with Tile+Painter.
- They can be paintable objects
- Use them like paintable tile-prefabs.
- Select scene view areas to bundle.
- Select Palette areas to bundle
- And Much More (tm).
An even higher layer of software enables "tile scene" management.
See this for more information.
TpLib Organization
Overview
The TilePlus Toolkit base runtime system, generically called "TpLib," is divided into two groups of code. This is a block diagram of the core software. Dashed lines are inheritance, solid lines are dependencies.
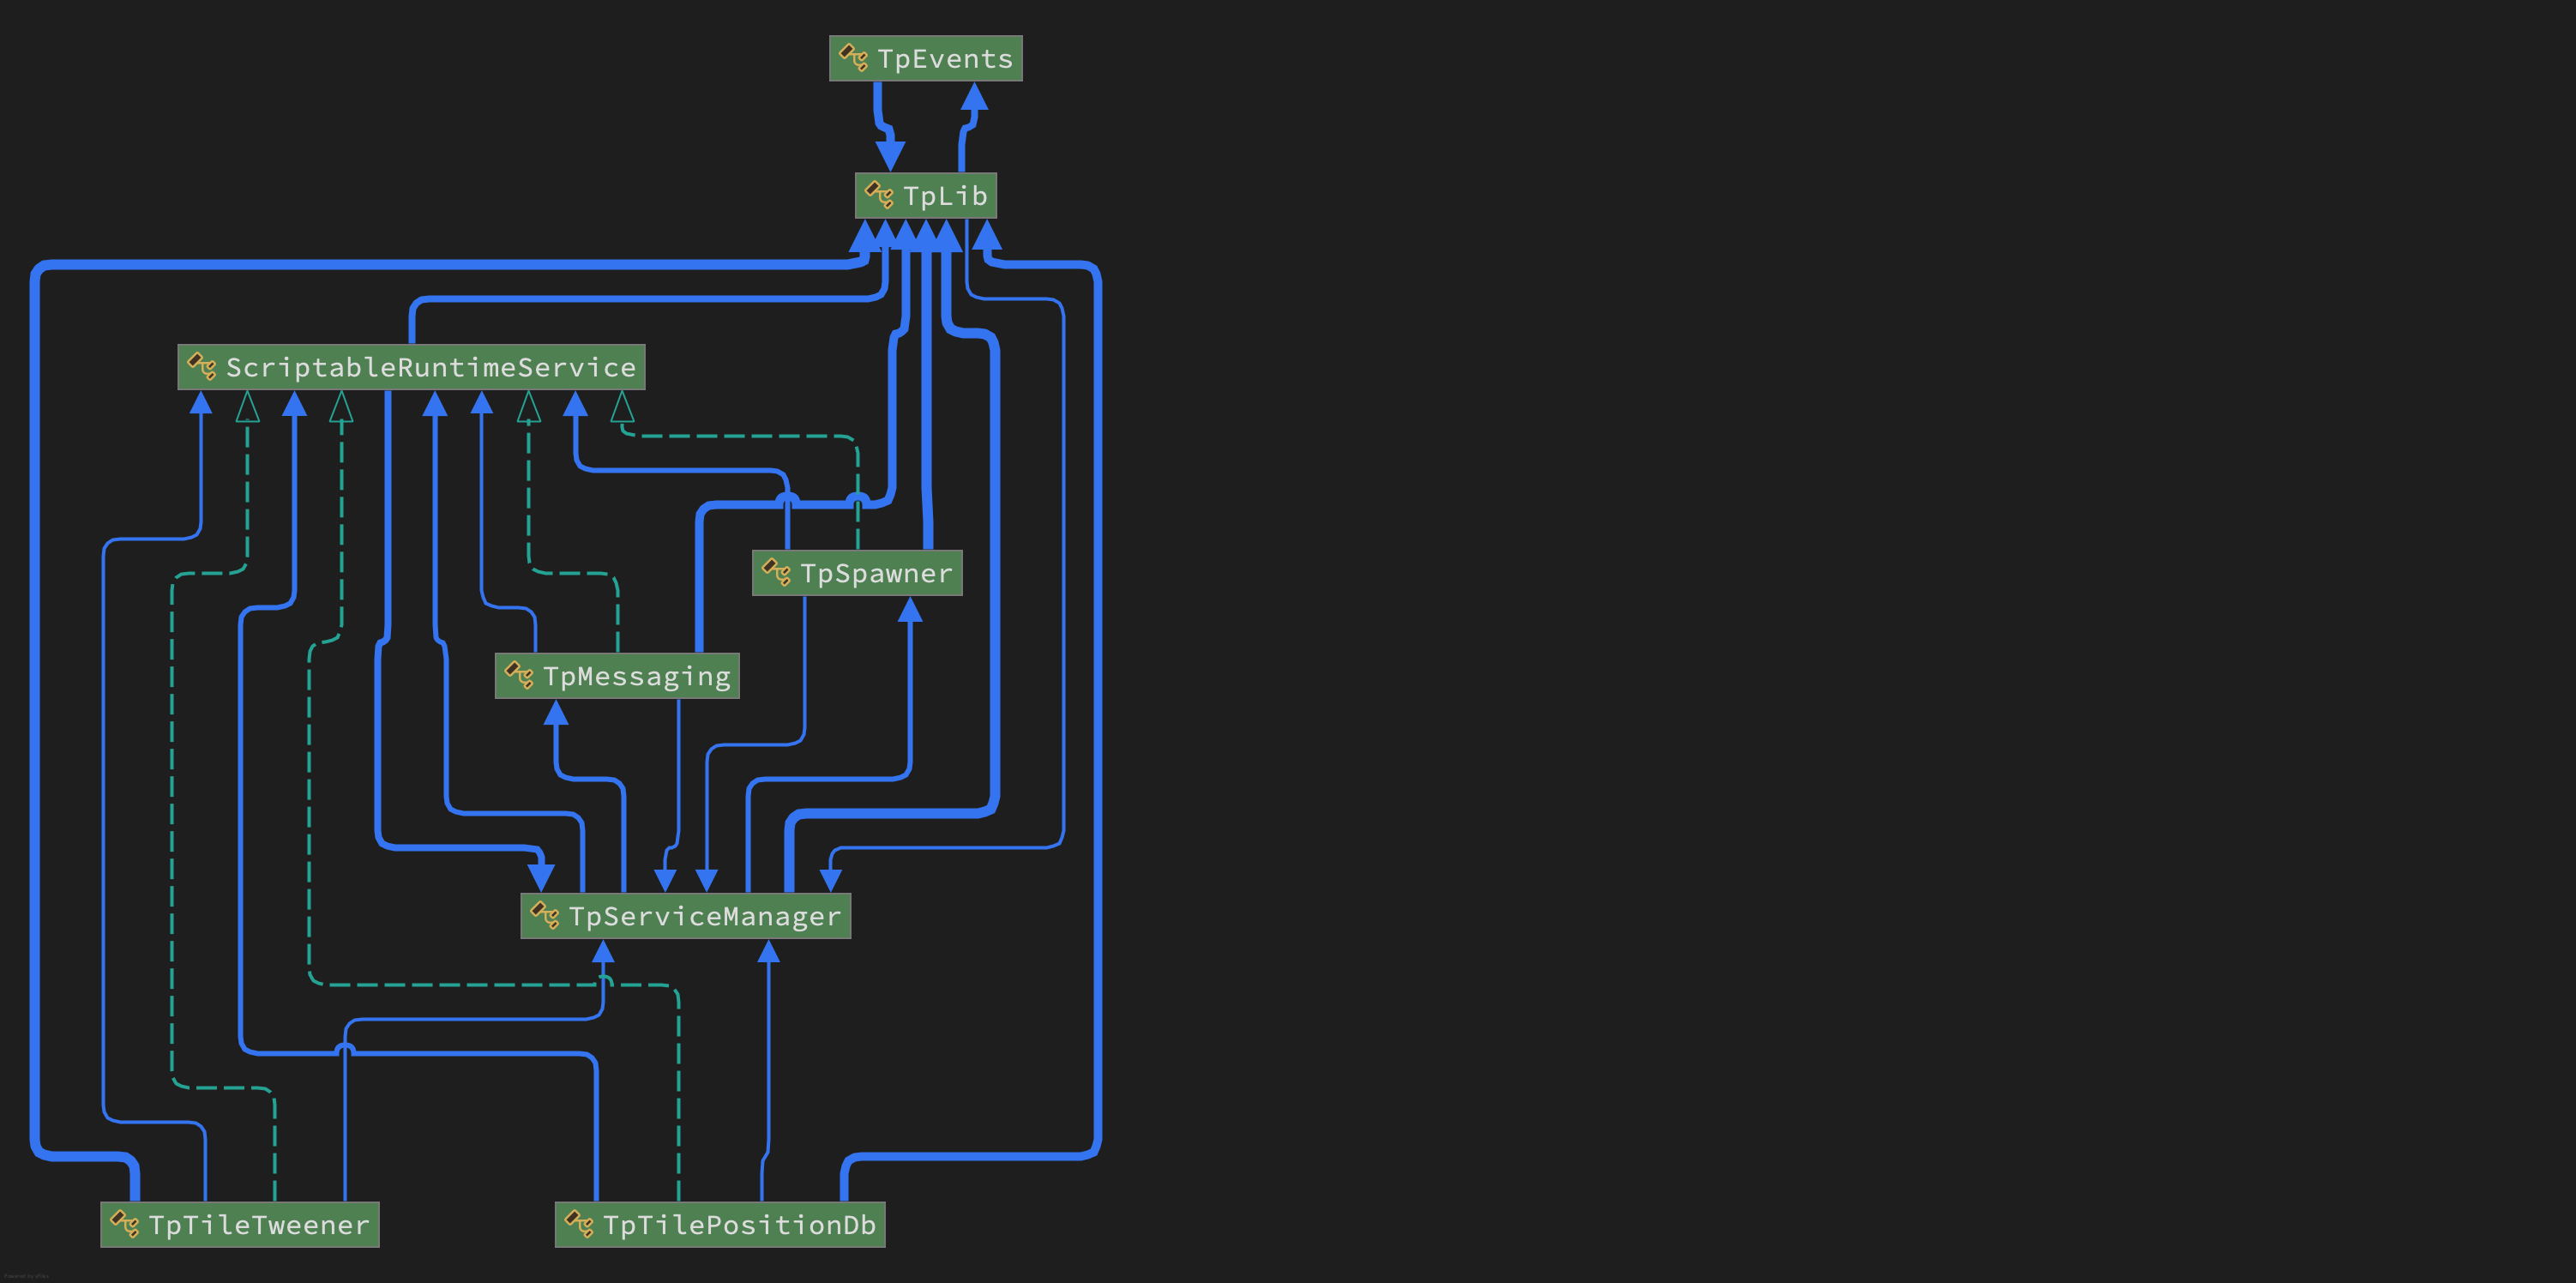
Note: this diagram shows Messaging as a service: in Version 6 that service still exists but is a wrapper for the TpMessages static class and is only provided for backward compatability.
Static classes
- These are static because they are required for editing support, or have low impact on domain reloading, or are required immediately in a built-app or when switching to Play mode in the Editor.
- TpLib: The enabling and underlying library. Implements a Tilemap DataBase (TMDB) and queries, and provides update 'ticks' for various system functions.
- TpZoneManagerLib: Editing support and Tile+Painter.
- TpMessages: Typed messaging system featuring Monobehaviour-to-tile or tile-to-tile messaging and general messaging features.
- TpServiceManager: small and required immediately in Play mode.
- TileFabLib: API for loading Tilefabs and managing ZoneManagers (Layout system). Needed for both Edit and Play/Build use.
- TpTileUtils: small utility library, improper as service.
- TpEvents: small, required immediately in Play mode.
Generally, these have to be present after a domain reload and are required for edit support for the Tile+Brush, TilePlusPainter, etc. Where possible, their domain reload time is minimized by:
- Lazy initialization of arrays and lists
- Simple 'InitializeOnLoad' methods.
- Small memory allocations
- Overrideable with a project-level scriptable object for runtime initialization.
Scriptable Runtime Services
In this documentation these are often referred to as SRS. SRS are dynamically-loadable Scriptable Objects designed for independent services like those shown below or for any you create.
There's a simple base-class for these that you can use to create your own and add them to the system-level Service Manager.
These are runtime-only. They aren't needed for edit support and would impact domain reload time for various reasons, or perhaps you don't actually want to use all of these extra features.
- TpTweener: a tweener for tile sprites and GameObjects.
- TpSpawner: pooled spawner
- TpTilePositionDb: keeps track of occupied positions on specified Tilemaps.
Please see the Services section for more info.
TpLib
TpLib itself is a large class divided into eight partial classes:
- TpLib
- TpLibData
- TpLibDataAccess
- TpLibPools
- TpLibScene
- TpLibTasks
- TpLibTiming
An Editor folder has the final partial class:
- TpLibEditorUtils
If you're coding to the TpLib API, the parts you'd most likely be interested in are TpLibDataAccess, TpLibTasks, and TpLibTiming. Complete information can be found in the API reference (a zip file in the TilePlusExtras folder and here).
In this documentation, the dataset maintained in TpLib is generically called "Tilemap DataBase" or TMDB. It's not a database, but there's a set of query operations available which are tailored for use with TilePlus tiles and Unity Tilemaps. Data are added and removed from the TMDB automatically using features in the TilePlus tiles and the Unity Tilemap component.
TpLibDataAccess
The methods in TpLibDataAccess have pre-built 'queries' that allow you to extract information from the TMDB, which are data loaded into various structures in the TpLibData section of TpLib such as Types, Interfaces, Tags, GUIDs, etc.
There is also functionality for complex operations:
- Cut And Paste: Move a TPT tile from one position to another.
- Copy And Paste: Copy a TPT tile and place the copy elsewhere.
- This should always be used for this sort of operation so that the cloned tiles are copied correctly.
Queries
Please consult the API reference for complete information. Not every variation is shown below.
-
GetAllTilesInRegionForMap: load all TPT tiles on a specified Tilemap and within a RectInt region into a provided List.
-
GetAllTiles<T>: load all TPT tiles of Type T in all Tilemaps into a provided List, with filtering callback.
-
GetAllTilesOfType: load all TPT tiles of a particular Type from a specified Tilemap into a provided List, with filtering callback and a RectInt region. If the specified Tilemap is null, uses all Tilemaps.
-
GetAllTilesWithInterface<T>: load all TPT tiles from a specified Tilemap into a provided List, with filtering. If the Tilemap is null, uses all Tilemaps.
- An overload uses a provided list of Type T (saves casting later) and queries all Tilemaps. This includes a filter and a RectInt region.
-
GetTilesWithTag: Get all tiles on a specified Tilemap with a particular tag into a provided List with filtering and a RectInt region. If the specified Tilemap is null then all Tilemaps are used.
-
GetFirstTileWithTag: Convenience method, returns the first tile found from GetTilesWithTag.
-
GetTilePlusBaseFromGuid: Find a TPT tile on any Tilemap that has a specified GUID.
- Overloads allow use of a GUID string or byte array.
-
GetTilePlusBaseOfTypeFromGuid<T>: Similar to GetTilePlusBaseFromGuid but returns null if the tile is not of Type T.
The methods that don't take a Tilemap reference or allow the reference to be null provide a Tilemap- and position-independent way to locate tiles without having any idea where they are actually located.
This is extremely useful!
When used with the TileFab loading and the Layout systems you can easily locate TPT tiles as they're loaded and you won't get null ref errors after the tiles are unloaded.
You can use TpMessages to send messages to tiles based on their Type, Interface, tags, etc., without having to prebuild a list of targets. It happens auto-magically.
GUIDs
GUIDs can be used as a persistent identifier for a specific tile. That's all they are used for.
But they're incredibly useful, especially for saving and restoring data from and to TPT tile instances. See Persistence.
Since you can retrieve any TilePlus tile by searching TpLib using its GUID, it's a truly Tilemap-independent means of locating a tile.
TpLibTiming and TpLibTasks
TpLib's core is built around static classes and Scriptable Objects, neither of which have any access to what we're all used to in a Monobehaviour update.
TilePlus Services use a class derived from ScriptableObject called ScriptableRuntimeServices. There's a chapter of this book devoted to them but briefly, Services such as the Tweener and the PositionDatabase require an Update method.
TpLibTiming
The classic solution to having an Update in a non-Monobehaviour class like a static class or a Scriptable Object is to have a dont-destroy-on-load GameObject spawned that vectors its Update method somewhere else. TilePlus used to do this.
But with the advent of the various domain-reload options in the editor, its not that easy to make that work flawlessly for this sort of an extension.
TPT version 6 uses a modified Player Loop which updates at PostLateUpdate and just after 'Update'.
If you're curious, check it out.
That update 'tick' is used in many ways, and that brings us to TpLibTasks.
TpLibTasks
TpLibTiming invokes TpLibUpdate in the TpLibTasks partial class. Here's a brief description of what happens in that method.
-
If a target frame rate has been set the frame rate is calculated and maxima and minima are also calculated.
-
TpServiceManager's Update is invoked.
- The Service Manager sends an Update to all SRS that need it. This can change dynamically.
-
Delayed Callbacks are evaluated (see next section).
-
An internal cloning queue is examined and tiles waiting to be cloned are actually cloned at this time.
- This handles cases where TPT tiles are 'woken up' by the Tilemap before TpLib is ready to register them; these requests are cached until the proper time. This is basically an edge case.
Delayed Callbacks
As a simple example: a tile wants to delete itself when its StartUp method is invoked (this is a real case). If you do something like:
Tilemap.SetTile(position,null)
from within that StartUp method Unity usually crashes.
In Editor windows, doing certain types of things during a GUI event cause GuiClip and other errors.
So lots of times you want to just wait till the end of the frame to perform these actions.
Or maybe a TPT tile wants to spawn a prefab 1 second after being sent a Message.
One way to do this is by using Coroutines or Awaitables/async methods. But that's actually way more complex than needed.
The DelayedCallback method is simple to use. It works within the TpLibUpdate method mentioned above to process these callbacks.
You can also provide a 'Condition' Func to test a condition, so if that condition isn't fulfilled by the end of the specified delay the delayed callback isn't actually invoked until the condition is met and the Condition func returns true.
This method is used over 80 times in TPT (including the demos). It's very useful, and being removed from the scene hierarchy it isn't affected by scene loading or unloading. Null-checking is used throughout so if a TPT tile, an Editor Window, or some other caller which could possibly become null does become null is deleted prior to the timeout then the callback is not executed.
Repeated Invokes
The convenience method InvokeRepeatingUntil sets up a automatically-repeating callback or timer.
It's essentially DelayedCallback with an empty Callback method. The parameter invokedFunc is the same as the Condition for DelayedCallback. The invokedFunc is a func taking a float [Time.deltaTime] and returning a bool.
Like DelayedCallback, the ID of the process is returned so you can terminate it if you want to. But it can be done by the repeatedly-invoked Func.
This Func is executed at a rate set with the repeatInterval parameter. If the Func returns false the timer continues running. When the Func returns true the timer terminates. In other words, you don't have to explicitly terminate the timer via its ID.
- the Func is equivalent to the Condition Func for DelayedCallback: return false = condition not satisfied.
Unlike DelayedCallback, the parent parameter can't be null.
An example of this sort of use can be seen in the CloudSpawnerTile, which is part of the Topdown Layout demo.
Update for Tiles
Use InvokeRepeatingUntil with an appropriate interval.
Editor Library
The Editor Library comprises, well, a whole lot of stuff!
There's no exhaustive explanation or API reference for this part of TilePlus. This one also advises you that Molag Bal will visit you if you mess around with this code. Seriously, there's no need although there's a lot of clues for those who like editor code.
Painter is a Painting / Editing tool with separate documentation for you to read. It’s UI-Elements based and does away with the concept of brushes completely.
Tile+Brush
When using the Unity Tilemap Editor (UTE) you can use the Tile+Brush instead of the default GridBrush.
The Tile+Brush is installed by default when you install the TilePlus package. The User Guide explains how to revert that if you want to.
Brushes have Brush and Selection inspectors. The Brush inspector is what's shown in the bottom portion of the UTE window. The Selection inspector replaces the normal Unity inspector when you select a tile with the UTE.
The Tile+Brush has replacment Brush and Selection inspectors that can display fields and properties from TilePlus tile instances. Tile+Painter uses the Brush's Selection inspector and a modified version of the Brush inspector when it displays tile information.
For more detailed information, see the User Guide and this.
Design Philosophy
In an earlier epoch I designed embedded system hardware, software, and development tools in two different areas:
- Pro Audio
- Digital Signal Processing
Both of these fields are 'real-time' programming. It's not dissimilar to what you have to deal with in Unity3D:
-
A frame in pro audio at 44.1 kHz doesn't allow much time per-sample to process much, about 22 microseconds.
-
A frame in a game at 60 Hz is about 17 milliseconds which sounds quite generous by comparison.
Either way, you have a certain amount of time to do your processing or:
- Audio ==> Audible 'artifacts' such as clicks and pops
- Game ==> Dropped frames
This is all to say that this biased my approach to coding: performance and memory are #1.
So I tend to eschew the modern programming idiom of write first optimize later.
- If using a little more memory increases overall execution speed: use the extra memory.
- Use inheritance and interfaces for Tile classes.
- Use generics where it makes sense (to me), such as in the
MessagingService's messages. - Tightly hardcode things that by nature have to be optimized, such as the
TweenerService and the internals ofTpLibTasks. - Extensively pool class instances and other objects.
- Extensively cache tile instances in the layout system.
No acronym-based coding style will be found anywhere :-)
TilePlusBase
Information about the TilePlusBase class: the basis of this system
The Big Deal
A Key Feature
None of the TpLib TMDB and query functions, and none of the Event, Messaging, Persistence, and most other TilePlus functionality would work without the special TilePlusBase class.
Throughout the documentation and codebase you'll see TilePlusBase tiles referred to as TPB. TPB and derived tiles are generically referred to as TPT tiles.
Here's a class diagram generated in Rider which shows the basic class structure for all the TilePlus tiles in the Runtime library:
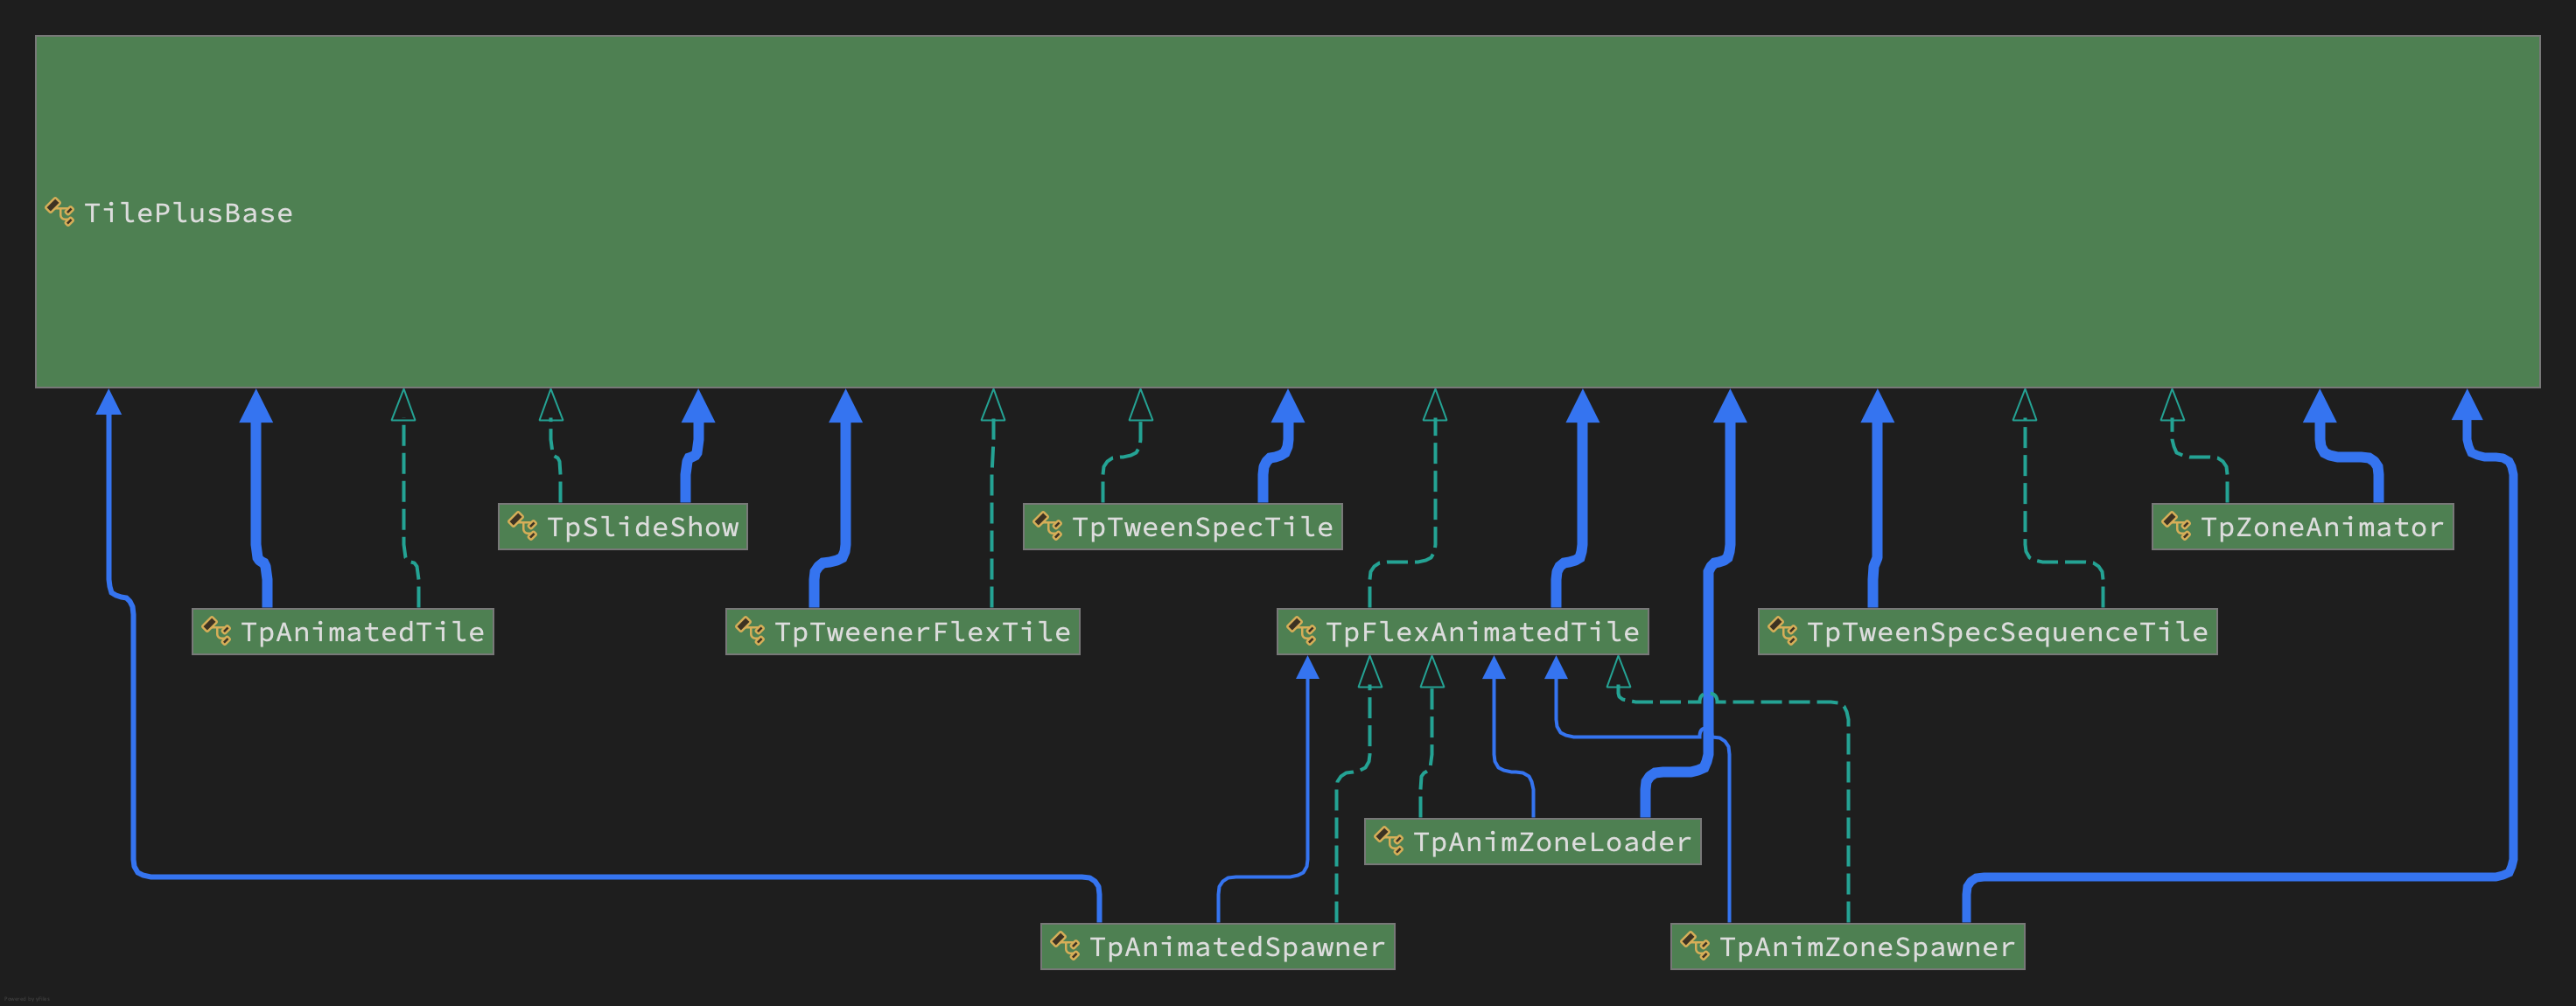
The lines show inheritance and the various dependencies.
TilePlusBase is divided into several partial classes just for organizational purposes:
- TilePlusBase
- TilePlusBaseData
- TilePlusBaseEnums
- TilePlusBaseStubs
- TilePlusBaseZoneEditor
- (Editor Folder) TilePlusBaseEditor.
Name the most powerful boss from any game you like: you would rather meet that boss in unarmed naked combat (IRL) then mess with this code. Seriously, read-only!
But unless you're deep into coding, you can ignore it. You can create a TilePlusBase tile asset and Paint it on a Tilemap but there's limited use for such an asset.
All the useful TPT tile types are derived from TilePlusBase, which, aside from supporting the use of cloned tiles properly, provides many properties and methods for the derived classes to use including basic animation support features.
Usually you'll only need to create derived classes from TpSlideShow, TpFlexAnimatedTile, or one of the two animated spawner variations.
Two important notes:
- Overidden methods generally should have their base classes invoked.
- StartUp should call the base class before doing anything else and return false if the base class returns false.
Basics
TPT tiles have three possible states maintained by the TilePlusBase instance.
- Asset: The tile is an asset in a Project Folder. Painting it changes state to Clone.
- Clone: The tile is present in a Scene. You can save it to the Project as an Asset.
- Locked: The tile is part of a TpTileBundle (Bundle) asset in the Project Folder.
If you Inspect a TPT asset in the Project window and open the “TilePlus Basic Settings” foldout, you’ll note that the State field is Asset.
When a TPT tile is added into a Palette it remains in the Asset state. You can see this by selecting it in the Palette Window – the Brush Inspector’s Tile Info/Name field displays [Asset].
When the tile is painted on a Tilemap, the state changes from Asset to Clone. You can see this by picking the tile using the Palette Select tool and looking at the “TilePlus Data” section’s first line.
The only exception is when you use the Pick function of a Brush or Tile+Painter to copy and paste tiles. In that case, the copied tile is already a clone, and the pasted tile is the same clone, which is not what’s wanted. The system recognizes when this happens (in-editor only and Play mode if you copy/paste programmatically), makes a new clone of the tile and paints it in the pasting location. This is implemented by TpLib.CopyAndPasteTile.
You can use a Selection Inspector toolbar button to save a TPT tile from the Scene to the Project as a Normal, cloneable TPT tile asset. The selected tile isn’t affected. This is handy for prototyping: you can customize a TPT tile right in the Scene and save it either for backup or as a template for further use. A simple versioning scheme adds version numbers to the saved assets.
Locked TPT tiles are the same as ordinary tiles in the sense that any modifications to the Locked tile painted on the Tilemap affect the tile asset in the Project. They’re only seen as sub-assets of an asset created when the Tilemap bundling functions are used.
If a Locked tile is present in a tilemap, it converts into a Clone tile at runtime.
One of the key features of TilePlusBase tiles (and their subclasses) is that the Tile instance always knows what Tilemap it’s part of and always knows its position on the Tilemap. The position information isn’t static: the position is updated if you move a tile. To be clear, this is performed entirely within the tile and has nothing to do with how the tile was placed: Unity Tilemap Editor, Tile+Painter, or via code.
When a tile is placed or moved, it calls a method in TpLib to register itself in the various data structures. This also happens when you start your app or load a new scene.
Editing
The TilePlusBase class section is always handled with a customized GUI when viewing any TilePlus tile in a Selection Inspector. Various sections of this inspector are visible or hidden depending on the context.
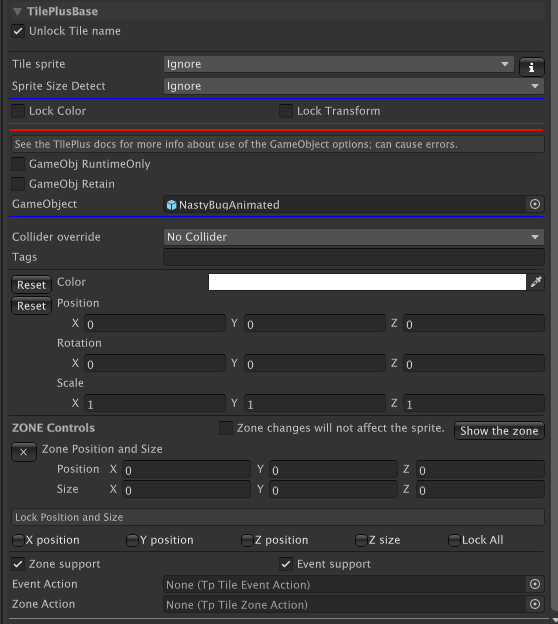
Let's go through the various parts of this inspector.
-
Unlock Tile Name: Normally one doesn't change the name of the tile. If you need to, uncheck the box and you can change the name.
-
Tile Sprite: Tile Sprite is used to control visibility of the Tile’s sprite. This is handy if you just want to use the GameObject of the Tile and don’t want the sprite to appear on the Tilemap, but you want to see it in the Palette or Painter.
- If this is set to ClearOnStart or ClearInSceneViewAndOnStart then the Tile’s sprite will be invisible when painted. You can still find it using Painter and change the setting directly.
- ClearOnStart is useful for tiles with no visual appearance since you can have a sprite for visibility in the Palette and in the Scene View but the sprite is disabled when the game runs.
-
The Lock Color and Lock Transform flags can be used to change the flags setting on the Tilemap and the tile instance’s flags value.
- If Lock Color is checked then the Color field is hidden.
- If Lock Transform is checked the the transform fields are hidden.
-
If you add a GameObject to the tile (the GameObject field), the GameObject Runtime-only and Retain flags become visible. A GameObject can also be added by viewing the project folder asset in a Unity inspector.
- Effect on the Inspect Prefab button: The button appears only if the Tile has a GameObject. What is inspected when you click this button depends on a Tile flags setting:
- Instantiate-Runtime-Only is ON: Prefab asset in the Project folder.
- Instantiate-Runtime-Only is OFF: GameObject instance of the Prefab in the Scene.
- This can occasionally be confusing: if you did not have Instantiate-Runtime-Only ON when the Tile is painted then the Tile creates the scene GameObject immediately. If you later turn this flag OFF, the scene GameObject will not be removed! In this edge case the GameObject in the Scene is what will be inspected.
- Effect on the Inspect Prefab button: The button appears only if the Tile has a GameObject. What is inspected when you click this button depends on a Tile flags setting:
-
The instanced GameObject in the scene isn’t editable. Hence, the only way to remove the GameObject from the scene is to delete the Tile. This is a Unity effect, not a TilePlus effect.
-
Collider override can be set to No Override, which means that the setting from the tile asset in the project folder is used. The other settings can be used to set the collider type on a per-tile basis. This action occurs during the execution of the tile’s GetTileData method.
-
Tags is a field where you can place one or more comma-delimited tags. TpLib methods can be used to look for tagged tiles.
- The tag
-----(five hyphens) is reserved.
- The tag
-
Color is a field that’s used to change the sprite color on the Tilemap and tile instance’s color value.
- Use the Reset button to reset the Color.
-
The Position, Rotation, and Scale fields can be used to affect the transform of the sprite on the Tilemap and the tile instance’s transform value.
- The Reset button resets the tile sprite transform.
-
Zone Controls: A Zone is a BoundsInt that describes a region.
- The small
Xbutton resets the Zone to one tilemap unit. - These controls appear only when
Zone Supportis checked. - Position is an offset from the Tile's position. Z is ignored.
- Size is the size of the Zone.
- If
Zone changes...is checked, then the tile's sprite is affected by changes to the Position, Rotation, and Scale fields. - The
Lockcheckboxes let you lock the entire zone to ensure it's not editable or just some of the components. - The
Show The Zonebutton displays a marquee around the zone in the Scene view. This is very handy when editing!
- The small
-
Zone and Event support are advanced features that you can read about here. Adding the Scriptable Object references for Event and Zone Actions is done in this inspector or by inspecting the asset in the project folder.
Certain tiles use a built-in capability to inhibit the visibility of the Name, Collider, Tags, Color, and/or Transform sections of the foldout.
For example, tiles such as TpAnimZoneLoader and TpAnimZoneSpawner modify the sprite transform as you adjust the zone size. These tiles hide the transform fields since the transform shouldn’t be modified by humans.
To be clear, when acting on TilePlus tiles, the actions of modifying flags, transform, or color in the Selection Inspector or Tile+Painter changes the corresponding value in the tile instance and on the parent Tilemap of the tile. When you save the scene, the changes in the tile are preserved. The original tile asset in the project folder is not affected. When acting on Unity tiles, only the Tilemap is affected.
In Tile+Painter, it’s easy to pick tiles from the scene and perform Color or transform modifications. Again, the only thing affected is the Tilemap. The asset in the project folder is not affected.
Tile+Painter also has a bulk modification feature: you can select an area of a Tilemap and apply changes to Color, transform, and tile Flags for all tiles in the selection.
When the Editor is in Play mode the display will change somewhat, as most of the information becomes read-only, and some additional data appears showing the state of the animation flags (introduced in 2022.2).
When looking at a TilePlus Tile asset in the Editor, you can change the Description and Info fields. These appear in the Basic Info section as shown above, and in the Brush Inspector. You may find these fields useful: one use would be prompts to remind you what the tile does before you paint it.
If you change the size of the sprite and there’s another tile in the same area it might be obscured by the transformed sprite (or vice versa). If that’s a problem, you can adjust the transparency in the Color field (TilePlusBase section of the Selection Inspector) or change the Tilemap Renderer’s Sort Order setting.
Plugins/TilePlus/Runtime/Textures/TriggerZoneSprite can be used for the sprite for this tile, but you can use any sprite. Note that the sprite won’t appear if you change the TileSpriteClear to Clear In Scene View. If you don’t want the trigger zone to appear in Play mode, set TileClearMode to Clear On Start.
Note that the Tilemap Renderer will sometimes cull enlarged sprites. There’s a FAQ in the User Guide regarding this.
Tile+Brush
A different Brush for the Unity Tile Editor.
Selection and Brush Inspectors
Some information is repeated for clarity
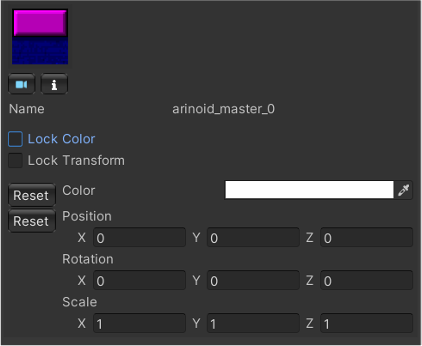
Selection Inspector for Unity tiles
Selection Inspector
When displaying a normal Unity tile, the Selection Inspector will look something like this:
Selection Inspector for Tile+ tiles
Here’s an example of a Selection Inspector when displaying a TilePlus tile. This is used in Tile+Painter and as the Selection Inspector for the Tile+Brush.
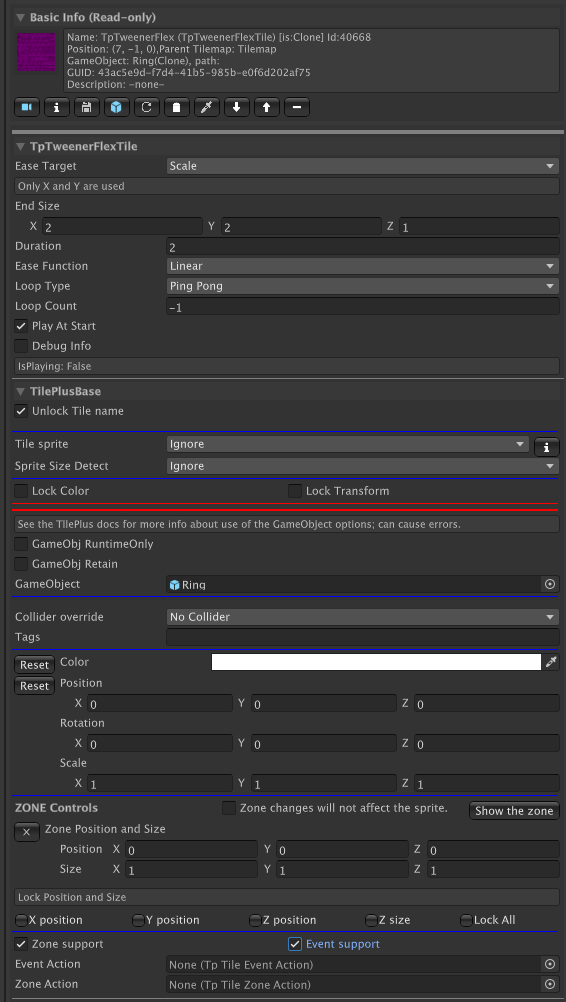
Open this image in a new browser window then skip to the next page.
Selection Inspector Details
The Basic Info section displays read-only information from the tile. This area changes depending on what type of tile is being inspected. The last two items on the first line are the state of the tile and the Instance ID.
The Toolbar is followed by fields and properties from the inspected tile, ordered by the tile’s class hierarchy. Each section is in a foldout. See the Toolbar section on the next page for more information about changing the display.
The TilePlusBase foldout is always the bottom element and has some special functionality.
- Unlock Tile name. When unchecked, the tile’s name can be edited.
- Tile Sprite is used to control visibility of the Tile’s sprite. This is handy if you just want to use the GameObject of the Tile and don’t want the sprite to appear on the Tilemap, but you want to see it in the Palette or Painter.
- If this is set to ClearOnStart or ClearInSceneViewAndOnStart then the Tile’s sprite will be invisible when painted. You can still find it using Painter and change the setting directly.
- The Lock Color and Lock Transform flags can be used to change the flags setting on the Tilemap and the tile instance’s flags value.
- If you add a GameObject to the tile, the GameObject Runtime-only and Retain flags become visible. See the note below about how this setting affects the Inspect Prefab button.
- Collider override can be set to No Override, which means that the setting from the tile asset in the project folder is used. The other settings can be used to set the collider type on a per-tile basis. This action occurs during the execution of the tile’s GetTileData method.
- Tags is a field where you can place one or more comma-delimited tags. TpLib methods can be used to look for tagged tiles.
- Color is a field that’s used to change the sprite color on the Tilemap and tile instance’s color value.
- The Position, Rotation, and Scale fields can be used to affect the transform of the sprite on the Tilemap and the tile instance’s transform value.
- Zone and Event support are advanced features that you can read about here.
Effect on the Inspect Prefab button: The button appears only if the Tile has a GameObject. What is inspected when you click this button depends on a Tile flags setting:
- Instantiate-Runtime-Only is ON: Prefab asset in the Project folder.
- Instantiate-Runtime-Only is OFF: GameObject instance of the Prefab in the Scene.
This can occasionally be confusing: if you did not have Instantiate-Runtime-Only ON when the Tile is painted then the Tile creates the scene GameObject immediately.
If you later turn this flag OFF, the scene GameObject will not be removed! In this edge case the GameObject in the Scene is what will be inspected.
Notes
Certain tiles use a built-in capability to inhibit the visibility of the Name, Collider, Tags, Color, and/or Transform sections of the foldout.
For example, tiles such as TpAnimZoneLoader and TpAnimZoneSpawner modify the sprite transform as you adjust the zone size. These tiles hide the transform fields since the transform shouldn’t be modified by humans.
What's affected when changing flags, transform, or color
To be clear, when acting on TilePlus tiles, the actions of modifying flags, transform, or color in the Selection Inspector or Tile+Painter changes the corresponding value in the tile instance and on the parent Tilemap of the tile. When you save the scene, the changes in the tile are preserved. The original tile asset in the project folder is not affected. When acting on Unity tiles, only the Tilemap is affected.
In Tile+Painter, it’s easy to pick tiles from the scene and perform Color or transform modifications. Again, the only thing affected is the Tilemap. The asset in the project folder is not affected.
Tile+Painter also has a bulk modification feature: you can select an area of a Tilemap and apply changes to Color, transform, and tile Flags for all tiles in the selection.
Simulation
Some tiles will display ► buttons in the inspected tile’s fields area. These invoke methods in the tile and are useful for testing your tiles, especially for TilePlus’ animated tiles.
In PLAY mode
When the Editor is in Play mode the display will change somewhat, as most of the information becomes read-only, and some additional data appears showing the state of the animation flags (introduced in 2022.2).
Finally.... When looking at a TilePlus Tile asset in the Editor, you can change the Description and Info fields. These appear in the Basic Info section as shown above, and in the Brush Inspector. You may find these fields useful: one use would be prompts to remind you what the tile does before you paint it.
Selection Inspector Toolbar
The Selection Inspector shows this toolbar:
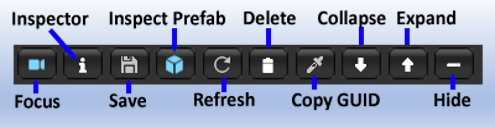
- Focus: Focus scene view on selected tile.
- Inspector: Open an inspector for the tile.
- Save: Save the tile as a new asset.
- Inspect Prefab: If the tile has a GameObject then this button appears: open an inspector for the prefab.
- Refresh: Refresh the tile.
- Delete: Delete the tile.
- Copy GUID: Copy the GUID of a tile to the clipboard.
- Collapse: Collapse all the tile sections.
- Expand: Expand all the tile sections.
- Hide: Hide all details of the sections.
Certain tiles have an additional button: the Simulate ► button. Simulate is an editor-only function that, well, simulates what the tile will do at runtime.
For example, with TpAnimatedTile or TpFlexAnimatedTile the simulate function will cycle through the animation sequence so that you can preview it.
For TpSlideShow, simulate displays the slide show tiles.
It’s a convenient way to preview what your tile will do at runtime and is especially handy when you’re editing tiles in the scene and want to see if the changes make sense. It’s a simulation and won’t be exact.
About the Focus button
About the Inspect Prefab button
- Instantiate-Runtime-Only is ON: Prefab asset in the Project folder.
- Instantiate-Runtime-Only is OFF: GameObject instance of the Prefab in the Scene.
This can occasionally be confusing: if you did not have Instantiate-Runtime-Only ON when the Tile is painted then the Tile creates the scene GameObject immediately. If you later turn this flag OFF, the scene GameObject will not be removed! In this edge case the GameObject in the Scene is what will be inspected.
The instanced GameObject in the scene isn’t editable. Hence, the only way to remove the GameObject from the scene is to delete the Tile. This is a Unity effect, not a TilePlus effect.
Why Save a painted tile as a new asset?
You can save any painted TPT tile as a new asset file. This is an important feature, as you can create a TPT tile as a prototype, customize it in-editor and then save it as a new asset which can be dragged into a Palette.
Why copy the GUID?
For an example, see the Animation demo program (AnimatedTiles/Scenes/Animation-UnityUI) in the TilePlus Extras folder. There you’ll see UI buttons which can trigger Animation on/off in the animated tiles. The UI buttons send the GUID to a script that looks up the tile reference via TpLib. GetTilePlusBaseFromGuid.
The script then uses the MessagingService to send a message to the tile, affecting the animation.
GUIDs are used a lot in the TilePlus system as an alternative (i.e., not the primary) way to locate and/or communicate with TPT tiles. GUIDs have nothing to do with how the tiles actually work; rather, they’re present so that there’s a unique value to put in JSON (or other) save data files. You can locate a tile by its GUID without knowing what Tilemap it’s placed on.
There are easier ways to do this as can be seen in the other Animated Tile demos: intercept New Input System actions and use the mouse position to locate a tile, then send it a message. See this.
Brush Inspector

This is the Brush Inspector seen when using the Tile+Brush with the Unity Tile Editor. It looks a bit different in Tile+Painter.
The Help foldout at the top has some hints about how to use this inspector, followed by information about the tile. Note that the last item on the first line indicates the state of the tile. For this inspector, the state will be [Asset] or in rare situations, [Locked].
The Toolbar allows you to open an inspector for the tile asset, focus the Project window on the asset, or open the asset script in your programming IDE.
The center area has information about the tile asset being inspected. If there’s a GameObject associated with the tile (via the GameObject field in the asset) then a preview of the prefab is shown, if possible. Like the Selection Inspector, the tile information is divided according to the class hierarchy, but there are no foldouts, just some thin lines to point out the division. None of the information is editable, but you can click the leftmost toolbar button to open an inspector.
The Brush Toggles foldout has a few options: Flood Fill preview, overwrite protection, and a toggle to hide the Toolbar.
Overwrite protection, available only when the Tile+Brush is the active brush, prevents painting over existing tiles.
You can override the Overwrite protection or the PaintMask by holding down a key defined in Unity’s shortcuts editor (Edit/Shortcuts). The default is ‘1’. This makes it easy to paint over a tile (overwrite) without toggling the control in the Brush Toggles section, or to paint a tile on a tilemap that’s not in the PaintMask list without changing the Paintmask field in the tile asset. A strike-through line inside the painting marquee is shown while the shortcut key is held down.
Other Assets
Specialized Scriptable Object assets
TilePlus Tile Asset Varieties
These are all project-level asssets.
- TpTileBundle: The asset created when you create a prefab from Tilemaps.
- TpTileFab: Another asset created when you create a prefab from Tilemaps.
- ProxyTile: a special tile used by Tile+Painter. Not available in a build.
- TpPrefabList: A group of prefab references for TpAnimZoneSpawner tiles.
- TpTileList: A group of TPT tile asset references for TpAnimZoneSpawner tiles.
- TpSlideShowSpriteSet: A group of sprite references for the TpSlideShow tile.
- TpSpriteAnimationClipSet: A group of sprite references for the TpFlexAnimatedTile tile.
- TpChunkSelectorBase, TpSingleFabChunkSelector, TpChunkZoneSelector: used with the Layout system.
- TpLibInit: Controls various TpLib options when entering Play mode (or running a built game)
- TpTweenSpec: A list of specifications for tweens. Optional but useful when using the same tween repeatedly.
- TpGoTweenSpec: A list of specifications for GameObject tweens.
These assets can be created from the Assets/Create/TilePlus menu except for the first three and TpChunkSelectorBase.
TpTileBundle and TpTileFab are assets created when you use the Tools/TilePlus/Prefabs/ Bundle Tilemaps menu command.
TpPrefabList is a list of TpPrefabSpawnerItems. Each item has the following fields:
- Prefab: The prefab to spawn
- Parent: Name or Tag of a GameObject to parent the spawned Prefab to. Optional.
- UseParentNameAsTag: If a Parent is specified, interpret as a Tag if this is checked.
- Position: Position of the prefab. Can be left at Vector3.zero.
- PositionIsRelative: If checked, the Position value is relative to the tile grid position.
- KeepWorldPosition: If checked, keeps the prefab’s world position relative to tile grid position.
- PoolInitialSize: The pool preload size.
TpTileList is like TpPrefabList, but for TPT tiles.
- Tile: The tile to paint
- PaintPosition: Where to paint it. An Enum selects where to paint.
- Around the position of the tile doing the painting.
- At the position of the tile doing the painting if the target Tilemap is not the same.
- A random position within the painting tile’s Zone (see TpZoneSpawner/TpAnimatedZoneSpawner)
TpSlideShowSpriteSet has a list of TpSlideClips. Each clip has the following fields:
- Name: Name of the slide show
- WrapAround: Stop at the last sprite or wrap around to the first.
- StartIndex: The starting sprite for this slide show
- Sprites: A list of sprites to display.
TpSpriteAnimationClipSet has a list of TpAniClips. Each clip has the following fields:
- Name: Name of the AniClip
- DefaultTileIndex: When animation isn’t running, which tile to use for the static sprite.
- AnimationSpeed: Speed of animation relative to that set on the Tilemap component.
- OneShot: Stop the animation at the end of the sequence or repeat.
- RewindAfterOneShot: Rewind to the first frame after a one-shot animation ends.
- Converting from Unity sprite animation clips
- This asset's inspector lets you copy the sprites from a Unity AnimationClip to a new AniClip.
- Place an input AnimationClip in the provided field.
- Click the button: adds an AniClip with the name of the Unity AnimationClip.
- The AnimationClip field is cleared when you click the button.
- If the AnimationClip doesn't have any sprites then an empty list of sprites will result (don't know why I need to say this...)
- This operation is only possible in-editor.
Please note that when adding a new clip to the asset: AnimationSpeed will be 0, will cause a runtime warning if OneShot is true. Internally, a value of 1 is used if AnimationSpeed is zero, which may produce unintended results.
Animated Tiles
TpAnimatedTile
TpAnimatedTile is a simple animated tile and if you want to learn about the code, it’s the simplest TPT Tile.
Public fields:
- PlayOnStart: Begin animation when the game starts.
- AnimationSpeed: Set animation speed relative to that set in the Tilemap.
- OneShot: Play the animation once, then stop.
- Rewind After One Shot: if checked, after a one-shot animation, the animation rewinds to the first sprite.
- To return to the Tile’s sprite, use the ActivateAnimation method to turn off animation.
- Update Physics: see the description of this Tile Animation Flag in the Unity documentation.
- AnimatedSprites: A list of sprites to animate (use an Inspector on the Project asset).
Note that for TpAnimatedTile the static tile is the tile sprite. For TpFlexAnimatedTile the sprite specified by a clip’s DefaultTileIndex value is displayed. If that doesn’t work (it’s incorrect or the sprite is null) then the static tile is the tile sprite.
If painting this tile via script, see the FAQ entry “Animated tile not animating.”
TpFlexAnimatedTile
TpFlexAnimatedTile is an upgraded TpAnimatedTile that adds the ability to have multiple animation sequences contained in an asset file. Once placed, you can select on a per-tile basis which animation sequence is used initially, and several other settings, including whether to play automatically when the Scene is loaded, and which sequence is in use. When using many animated tiles, the use of an asset is more memory efficient than TpAnimatedTile.
The asset file for this tile is TpSpriteAnimationClipSet, and its fields are mostly the same as those for TpAnimatedTile. You can create it from the Assets/Create menu.
Public fields:
- PlayOnStart: Begin animation when the game starts, using the preset animation sequence.
- DefaultSprite: Sprite to display when nothing else is available, for example, a missing ClipSet asset.
- ClipSet: The TpSpriteAnimationClipSet asset from your Project folder.
- UseAnimationSpeedOverride: Don’t use the animation speed from the Clipset.
- AnimationSpeedOverride: Use this animation speed if UseAnimationSpeedOverride is checked.
- ForceOneShot: Ignore the OneShot setting in the ClipSet asset and always play one-shot animations.
- Rewind After One Shot: after a one-shot animation is completed the animation rewinds to the first image. Overrides the RewindAfterOneShot setting in the animation clip IF ForceOneShot is checked.
- To return to the Tile’s sprite, use the ActivateAnimation method to turn off animation.
- Update Physics: see the description of this Tile Animation Flag in the Unity documentation.
When inspecting one of these tiles using the Selection Inspector, you’ll see a dropdown Clip to use where you can select the animation sequence from the ClipSet to be used when your game starts. This can also be changed via code.
If painting this tile via script, see the FAQ entry “Animated tile not animating.”
TpSlideShow
TpSlideShow lets you display one Sprite at a time from a list of Sprites contained in an asset file. The initial Sprite to display can be changed, and you move from one Sprite to the next programmatically, with automatic wrapping or limiting, or set the displayed sprite directly.
Wrapping means that incrementing from the last slide returns to the first slide (or when decrementing, from the last slide to the first slide) and limiting means that incrementing from the last slide or decrementing from the first slide has no effect. This tile is used for the background in the BasicTiles demo.
The asset file for this tile is TpSlideShowSpriteSet, and its fields discussed in the Programmer’s Guide. You can create it from the Assets/Create menu.
Public fields:
- SlidesClipSet: The TpSlideShowSpriteSet asset from your Project folder.
- SlideShowAtStart: The name of the slide show to show when your game starts.
- WrappingOverride: Override the ‘wrap’ setting from the TpSlideShowSpriteSet asset.
- SlideIndexAtStart: is useful to set which slide is used when the app starts, and you can set this in the UI.
- CopyToSlideIndex: if checked, the ChangeSlide buttons copy the current slide index to SlideIndexAtStart.
- Convenience function useful when using only one slide show from a slide show sprite set.
- Trigger On Value Change: if checked, posts an Event when the slide changes.
- Accepts Clicks: if checked, accepts ActionToTile messages.
- Zone Capability: controls propogation of messages.
The last three features listed above are discussed here.
When inspecting one of these tiles using the Selection Inspector, you’ll see a dropdown where you can select which slideshow set from the TpSlideShowSpriteSet to be used at start. This can also be changed via code.
Technically, the SlideShow tile uses the Tilemap's animation system but the animation is always on pause. Changing slides changes the animation parameters but only one sprite (slide) is shown at a time.
AnimatedSpawner
Animated Spawner is a subclass of TpFlexAnimatedTile. It responds to ActionToTile packets via the Messaging system or one can directly call methods that will spawn a tile. All of the Animation methods of FlexAnimatedTile are of course available.
Public Fields:
- PrefabList: a reference to a PrefabList asset with the prefabs that might be spawned.
- SpawnMode: spawn prefabs in the order found in the PrefabList or spawn random prefabs from the asset.
- PositioningMode: how to position prefabs or tiles. UseAssetSetting uses info from asset. Any other ignores that info.
- KeepWorldPosition: Keep world position when a Prefab is spawned.
One might note that AnimatedSpawner and FlexAnimatedTile both have explicit declarations of MessageTargets (for the Messaging system) which take ActionToTile packets.
This shows the power of Explicit declarations: the MessageTarget in the FlexAnimatedTile superclass is ignored by the Messaging System because sending a message to an AnimatedSpawner instance is sent to the 'override' method with the highest level explict declaration. (oversimplification).
Special Tiles
TpBundleTile
TpBundleTile loads a TileBundle to the Tile's parent Tilemap.
- TileBundle: a reference to a Bundle in the project.
- ApplyMatrix: Apply the Matrix to all tiles in the bundle. Ignored if Matrix is invalid
- TptNewGuids: Apply new GUIDs to TilePlus tiles? RECOMMENDED: TRUE
- Matrix: Matrix to apply to all tiles.
This tile has a custom editor, use it to set up the Matrix via inspecting the project asset.
Immortalizer
TpImmortalizer tiles may be painted into a Zone (ie a square area of a particular size eg 8x8, 16x16 etc) to mark that Zone as Immortal when used with the Layout system. It's not useful outside of that environment.
Note that this tile is a convenience, but the implementation is part of your app, see the Layout for an example.
Tweener Tiles
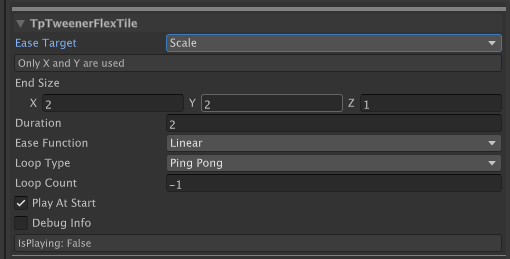
TweenerFlex
This is the best tile to use when experimenting with tweens. When viewed in a TilePlus Selection inspector only the fields appropriate for the particular 'target' are displayed.
Note about Color tweens: there's no Ease Function for these. 'Lerp' is always used.
Not shown in these images: the Flex and Sequence tiles have Await Result toggles and a PauseUnpause button.
- These are used as an example to show how to make a tween or sequence Awaitable and to demonstrate how to pause tweens or sequences.
- Note that infinite loop count (<0) cannot be made awaitable and an error is logged to the console.
For example: scale
For example: matrix
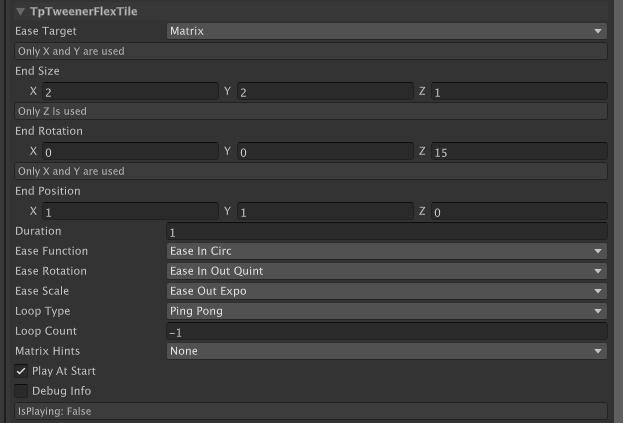
When tweening any of the Matrix varieties, EaseFunction is used for the Position tween, EaseRotation is used for the Rotation tween, and EaseScale is used for the Scale tween.
Matrix Hints
When using Matrix tweens you can tween the entire matrix (position, rotation, scale) or any of the components.
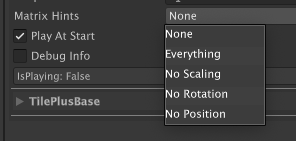
One can use this to create, say, a Matrix tween that only affects rotation and position but not scale. This is equivalent to executing a Position and Rotation tween at the same time.
TweenSpec
This tile allows you to use one tween from a TweenSpec asset.
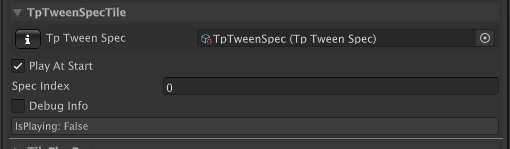
The Spec Index determine which tween from the asset is used.
TweenSpecSequence
This tile allows you to run an entire sequence from a TweenSpec asset.
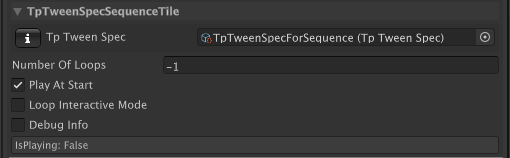
It just plays the entire sequence. You can control the number of loops.
If Loop Interactive Mode is checked, the sequence is forced to not loop.
When the sequence completes, it restarts with a fresh set of value fom the Tween Spec asset. Hence, if you change values of this asset while the editor is Playing, such changes will be seen when the sequence restarts. As is true for project assets, the changes will remain after you exit play mode. It's a great way to play with sequences and Matrix-style tweens.
The TweenSpec asset
This is a project-level asset where you can set up one or more tweens. Use them independently with the TweenSpec tile or as a sequence using a TweenSpecSequence tile.
This asset has a custom UIElements inspector that works similarly to what you see in the TweenerFlex tile.
A great way to play with tweens and learn how they work with tiles is to use the TweenSpecSequence tile with the Loop Interactive Mode active. You can change the fields in the TweenSpec asset and see the change the next time that the sequence loops.
The TpGoTweenSpec asset
This is a simular project-level asset used for setting up GameObject tweens. See this for more information.
Zone-Based
AnimZoneLoader
This class is a subclass of TpFlexAnimated tile and inherits its fields and editor appearance.
It’s used to load archived Tilemaps from TpTileFab assets, which are created by the Tools/TilePlus/Prefabs/Bundle Tilemaps command.
IMPORTANT
It's somewhat obsoleted because of the Layout system and may NOT be compatible with it.
Public fields:
- Loading Offset: the location where the TileFab will be placed.
- Preview: preview the TileFab at the Loading Offset.
- TileFab: A TileFab archive from a Project folder.
- UseZoneManager: Optionally use a Zone Manager for detection of already loaded TileFabs.
- ShowOffsetPositionGizmo: show a marquee at the
Zone Managers and their uses are discussed here.
More about Preview
Preview loads the tiles into a preview tilemap or maps, if there are multiple TpTileBundle assets referenced by the TpTileFab asset. The preview is active until you click Preview again or the Editor’s Selection changes. When preview is active, you can change the loading offset and the preview area will change position.
Loading or previewing tiles depends on there being compatible Tilemaps that are named or tagged in such a way that the system can identity which Tilemap to use. This information is embedded in the TileFab asset when you create it. If you need to change it just edit the asset’s TileAssets section in the Project window.
The tile does not automatically load Tilemaps at runtime. Rather, you send a message to it via the TpLib SendMessage methods. As configured, it expects the message to contain a Vector3Int describing a position. If the position is within the Zone bounds, the tile uses TpLib’s PostTileEvent method to post a trigger event.
AnimZoneSpawner
This can be used to spawn prefabs and TPT tiles, using assets with lists of prefabs or tiles. This tile uses the Spawner service.
Prefabs can be unparented or parented to a Scene Object by using the GameObject name or tag.
Tiles can be painted on the same tilemap or on a different tilemap which you specify using a GameObject name or tag, or a reference. This tile can respond to a SendMessage containing a Vector3Int describing a position. If the position is within the Zone bounds, it will spawn prefabs or paint tiles as you’ve configured it. Alternatively, you can spawn/paint via code using the instance methods SpawnPrefab or PaintTile if this approach doesn’t suit you.
You can use either a TpTileList or a TpPrefabList asset (or both) to specify which tiles or prefabs (or both) to use with this tile.
Public fields include those from TpAnimZoneBase and its superclasses, and these additional fields. Public fields:
- PrefabList: a reference to a TpPrefabList asset. Note: preload amounts are set in the asset.
- TileList: a reference to a TpTileList asset provides a list of TPT assets along with the spawn position for each. Spawn position is one of eight positions immediately surrounding the tile position on the Tilemap, a random position in the Zone, or the painting tile’s position if the painting is to a different Tilemap.
- SpawnMode: spawn prefabs or paint tiles in the order that they appear in the asset or randomly from those assets.
- Use Trigger: If checked, a the tile posts an event whenever spawning occurs.
- PositioningMode: spawn or paint using the setting in the assets, or force to the Spawner’s position, the contact position in the Zone, or somewhere Random in the zone.
- ParentingMode: Tiles painting only, use the same tilemap to paint tiles (can’t paint at the Tile’s position), or use a provided reference (Painting Tilemap), or use a Tag to locate a Tilemap’s GameObject using PaintingTilemapNameOrTag, or use a string to Find a Tilemap’s GameObject using PaintingTilemapNameOrTag.
- PaintingTilemap: Tile painting only: Optional reference to alternate Tilemap used to paint tiles.
- PaintingTilemapNameOrTag: Tile painting only, string with name or tag of alternate tilemap.
Tile Painting
When doing Tile painting you have several configuration options using PositioningMode, PaintingTilemap, PaintingTilemapNameOrTag, and Parenting mode. When painting tiles it’s important that the tile which is doing the painting is not painted over. Furthermore, since the tile occupies a position on a tilemap, you probably don’t want it to appear as an obstacle to a Player or NPC walking through the tile’s trigger zone (TpZoneBase or TpAnimZoneBase).
All these controls exist so that you can paint the this tile on a different Tilemap from the one that you use for pathfinding and character movement.
Paint one of these tiles on Tilemap A and use it to paint tiles on Tilemap B. When you do that, the tile needs to know which Tilemap to use. That’s done by setting ParentingMode appropriately and filling-in correct values for PaintingTilemap or PaintingTilemapNameOrTag.
Prefab Pooling in TpAnimZoneSpawner
AnimZoneSpawner uses the Spawner service which provides GameObject pooling.
When a TpAnimZoneSpawner tile instance’s StartUp is invoked and if SpawnMode is set to RandomPrefabs or PrefabsInOrder and if the TpPrefabList has any prefabs where the PoolInitialSize is nonzero, the tile will ask SpawningUtil to preload prefab instances. This only occurs on the first StartUp and will not occur if you change the TpPrefabList asset during runtime.
Note that preloading takes time, as each prefab must be instantiated, so choose the preload sizes carefully. If there’s no preload, the pool expands automatically as prefabs are instantiated and spawned.
Normally the pooler does not attach the pooled and/or preloaded prefabs to a parent GameObject. If this bothers you, head over to the Project folder Plugins/TilePlus/Runtime/Assets and drag the Tpp_PoolHost prefab into your scene. This prefab has an attached component which sets DontDestroyOnLoad so that the prefab persists between scene loads. The pooler looks for a GameObject with this specific name.
The pooler will automatically add a component of type TpSpawnLink to spawned prefabs if it doesn’t already exist. TpSpawnLink can also despawn the prefab after a timeout.
New In Version 5: if the spawned GameObject has a Collider2D or Collider component AND the TpSpawnlink instance on that GameObject has its m_IgnoreCollider field = false THEN a reference to the spawned GameObject is added to an internal HashSet of “Collidables” and the callback OnCollidableObjectSpawned is invoked.
Similarly, if a Collidable is despawner by the Spawner service the callback OnCollidableObjectDespawned is triggered.
A method IsCollidable() can be used to see if a GameObject is in the HashSet.
This feature was added as part of the Layout system upgrade, and is used to keep track of prefabs that are spawned by tiles or otherwise – its used to ensure that spawned prefabs in a Chunked Zone (region) can be removed when the Zone’s tiles are removed.
This can get complicated since spawned GameObjects may not be in the same position when they're deleted. Keeping track of them ensures that they are removed only when the Zone that they're actually in is removed.
- You can see this in action during the Layout demo. The NPC characters are collidables; they move around but are despawned based on where they are when the Zone is deleted rather then where they were initially spawned.
- When using the Layout system this is all handled automatically.
The Layout system removes all tiles and GameObjects in a Zone, but it only handles GameObjects parented to one of the Tilemaps controlled by the layout system. The Layout system doesn’t know what GameObjects might have been spawned by tiles (such as TpAnimatedSpawner) or exactly what Zone the GameObjects might be in since they might have moved from their original spawning location.
ZoneAnimator
Like other Zone-type tiles, it depends on you sending it a message with a position using TpMessaging, the TilePlus messaging system. Depending on how the Tile is set up, various actions will occur at StartUp() and/or when the tile’s internal state changes from ‘position is within the Zone’ to ‘position is outside of the Zone’.
That state change occurs when a message with a new position being sent to the tile.
The Zone is set up in the TilePlusBase section seen when inspecting the tile.
It's merely a BoundsInt which describes an area relative to the tile’s position on a Tilemap.
The tile’s code is set up to handle six basic types of operation based on a value from the PrefabMode enumeration:
- PresentWhenNotInZone: Spawn the prefab when the tile’s Start method is executed; despawn it when the Zone is entered and respawn it when the Zone is exited.
- PresentWhenInZone: Spawn the prefab when the Zone is entered and despawn it when the Zone is exited.
- SpawnInZone: Spawn the prefab when the Zone is entered. Never re-spawn.
- DespawnInZone: Spawn the prefab when the tile’s Start method is executed; despawn it when the Zone is exited. Never re-spawn.
- AnimInZone: Spawn the prefab when the tile’s Start method is executed. Animation on/off when the Zone is entered/exited.
- AnimOutZone: Spawn the prefab when the tile’s Start method is executed and activate animation. Animation OFF on Zone entry and ON again on Zone exit.
The various state specifications change depending on which mode you select.
As you can see, some of these modes allow you to optionally start animations when the prefab is spawned. AnimInZone and AnimOutZone always require animations unless all you want to do is spawn a prefab at the tile’s position when StartUp runs; there are much simpler ways to spawn prefabs.
There’s also the option of using scriptable object plugins: TpAnimatorActions to handle animations and/or control prefab spawning for special cases; e.g., spawning a timed series of prefabs.
The base code will use the first animator that it finds via FindComponentsInChildren.
Optionally, the code won’t halt animation when the Zone is exited; rather, you can have a StateMachineBehaviour do it; use the base class AnimStateTilePingerBase as the base class for your StateMachineBehaviour.
Those interested in using this complex tile should check out the source code and this.
UI Tiles
Event and Zone Actions and SubObjects
AnimatorAction
Animator Actions are project-level scriptable object plugins. They're only used with TpZoneAnimator tiles.
If you specify an action for one of the three sets of Actions (in the tile) it will ALWAYS be used instead of one of the specified 'StateName' fields.
The plugin get passed the tile instance. Inherit from the TpAnimatorAction class (see the example in the Layout demo).
The base class doesn't do anything and there's no asset create menu item for it.
If you specify an action for one of the three sets of Actions (in the tile) it will ALWAYS be used instead of one of the specified 'StateName' fields.
You can do whatever you want within the Action and the tile instance gives access to all the fields/properties like Target (the prefab) and PrefabAnimator.
Note that these values may be null depending on when an Action is invoked, e.g., when an ActionAtStart is used the animator may be null.
For example, if you want to use 'setfloat', 'setbool' etc: use an Action. This tile only uses the Animator.Play methods (though you can hack this code in a derived class).
If an Action spawns any prefabs and you want such prefabs to be auto-deleted when the Player moves out of the zone (ie when you use messaging to send the position to the tile and the position is outside of the zone) then add refs to these prefabs via AddSpawnedGameObject.
An Action can use its parent ZoneAnimator tile's CleanupPrefabs() to delete the prefabs; normally this is done automatically when the zone is exited OR if an AnimatorControlPacket causes a despawn (see below).
TileEventAction
These are project-level scriptable object plugins added as references to TPT tiles.
Takes an action when a TileEvent is evaluated by a controlling program. If the program uses TpEvents.ProcessEvents the Exec method in these plugins can be optionally invoked automatically. See Events.
TileZoneAction
These are similar to EventActions, but aren't automatically invoked in TilePlus. Generally the Exec method of these plugins is invoked by a TPT tile while acting on a message. See ZoneActions.
TweenerSubObject
This is a scriptable object plugins added to Event or Zone actions for adding tween capability to those plugins. See this.
UiButtonEventAction
An example Event Action for the UiButton tile that changes values on specified tiles using the UiControl interface.
ZoneActionRadio
An example Zone Acton for the UiToggleButton tile. This implements a radio-button set of toggle buttons using a Zone or a tag.
Prefabs
TPP_PoolHost
Add to a scene to use this as the parent of spawned prefabs.
TpTriggerZoneSprites
A grid-like sprite for use as sprites - handy for editing tile Zones. Use as your tile's sprite and check 'modify sprite'.
Components
Monobehaviour components for TilePlus
TpBundleLoader, TpFabLoader
These are components that can be added Tilemap’s GameObject to load TileBundle or TileFab archives.
- TpTileBundle or TpTileFab: the primary asset which holds all the tile assets and their locations.
- LoadOnRun: automatically load when app runs. Uses LoadPrefabs and ClearMap settings.
- Offset: offset every item in the archive when loading. Normally 0,0,0.
- DelayTime: delay before refreshing the Tilemap in Play mode or in a built application.
- When the Asset field is populated, a Load button will appear.
- LoadPrefabs: if this is checked then runtime-loading or the Load button also loads prefabs in the asset.
- ClearMap: if this is checked then runtime-loading or the Load button clear the Tilemap before loading.
- ClearPrefabs: if checked runtime-loading or the Load button clears ALL GameObjects parented to the Tilemap.
If any Bundle was built with prefabs included, then clicking “Load” with the LoadPrefabs toggle checked instantiates the saved prefabs (or variant prefabs, if that’s what you chose to save) if LoadPrefabs is true.
TpSpawnLink
This component should be attached to any prefab that you use with the SpawningUtil pooling system. If you forget it, SpawningUtil will automatically add it for you, but that’s a tiny bit slower.
If you add it to a prefab manually you can use some of its special features:
- Auto-Destroy after a timeout.
- UseMessaging: send "Service Messages" via TpServiceManager.
- Add a note or a comma-separated list of tags.
This class can be extended, however please ensure to call base class methods if you override any methods.
Unity UI and New Input System
Unity UI can invoke methods in monobehaviour targets using Unity events. That's not useful if you want, say, a button click to send a message to a tile.
If you're using the New Input System it can be handly to translate a mouse click or some other Action to locate and message a tile.
TpGuidToAction
This component can be used as a target for a Unity UI control, it just sends a message to a tile that's specified by a GUID. You can see how to use this in the AnimatedTiles demo (Animation-UnityUI scene).
TpInputActionToTile
This component converts New Input System actions into TPT tile locations and can send a message to a target tile if you click on it. An example can be found in the AnimatedTilesDemo (Animation-MouseClicksDirect) and in the Layout demo. It's also used for the 'UI system'
This component is an easy to use front-end for a TpActionToTile scriptable object instance. Check out the source code for that class if you'd like to dig into what's going on. But generally the component is a better way to use this feature.
TpActionToTile hooks into particular New Input System actions and sends an ActionToTile data packet to the tile's MessageTarget endpoint.
Looking at the image below you can see that there are two Actions used, defaulting to 'Click' and 'Point'. Different Action names can be used for different New Input System control mappings, but the 'Click' action data sent from the New Input System is interpreted as a pointer button action of some sort and 'Hover' action data is interpreted as a Vector2 screen position.
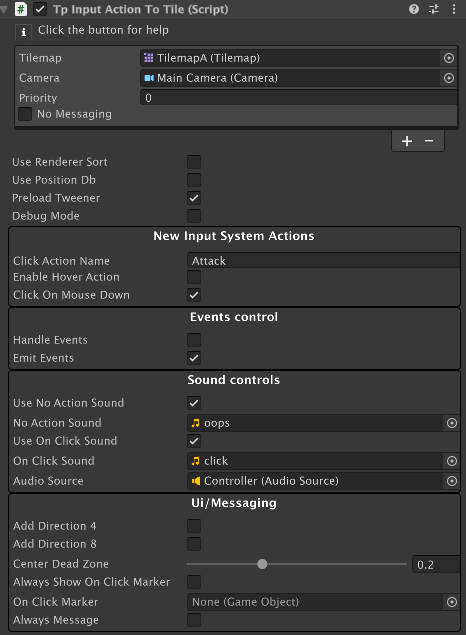
This is a Ui-Elements custom inspector that expands and contracts fields as needed depending on how you set it up.
There's a lot to unpack:
The very top section is an area where you can specify one or more pairs of Camera and Tilemap. Cameras and Tilemaps go together since both of those components are needed in order to translate from screen coordinates to Tilemap coordinates. You can have multiple pairs as needed, and a priority value can be used to select a tile target when two tiles overlap the same position.
The priority value is used when you have multiple Tilemaps unless Use Renderer Sort is checked.
- If checked, priority is set with the Tilemaps' Sorting Layers and Order in Layer values.
If No Messaging is checked then evaluation stops prior to sending a message for Clicks (only) and only the OnBeforeMessageSent or OnNoMessageSent callbacks are used for this Tilemap.
When a 'Click' action occurs and a tile is located at the pointer position then an ActionToTile packet is sent to the tile's MessageTarget endpoint. This is fairly simple.
If Hoverable is checked then this Tilemap can also be used for Hover messages. This can only be enabled for one Tilemap/Camera pair. If you check this value on more than one Tilemap/Camera pair there will be a warning after the first is found. Note that if 'No Messaging' is checked when Hoverable is checked then messages for the ClickAction are never sent but the Hover messages will still be sent.
Hovering takes a bit of explanation: there are two varieties: single-tile and Zone based.
For single tiles, hovering requires ITpUiControl { AcceptsHover: true } to be implemented on the tile for it to get ActionToTile messages from this S.O. A simple example is UiAnimButtonTile which changes animation when it is hovered over.
Alternatively, a tile can implement IHoverableControl for the tile to be sent BoolPacket messages when a Zone is entered and exited. IHoverableControl requires an explicit implementation of a MessageTarget for a bool packet. An exception will occur if you don't implement it.
The Zone is that area described by the built-in Zone that all TPT tiles have. Adjust the tile's Zone Position and Size to encompass a particular part of the Tilemap. It doesn't have to encompass the tile itself.
If a tile implements IHoverableControl and it's on the single Tilemap used for hovering, and it's Zone size is > 0 then it will get BoolPackets with a value of true or false when the tile's Zone is entered and exited. The tile does whatever it wants in response.
- Use case example: Show a tooltip when the zone is entered and erase it when the zone is exited (see the UI demo)
You can see the difference with the two animated buttons on the left side of the UI demo screen. The one on the left animates when hovered, and a UiHoverZone that's nearby has a Zone which encompasses that tile so a tooltip appears. The one directly to its right animates when hovered, but there's no UiHoverZone encompassing its position so there's no toolip.
This is admittedly a bit complex, but the main idea is only to send Hover-related messages when
- Grid position changes
- Something Hoverable is at that position.
The UI system creates a large number of 'Pointer' events in a continuous stream as you move the pointer. TpActionToTile filters out almost all of these events and only messages tiles when it makes sense.
Underneath the Tilemap/Camera pairs section are general settings.
If Use Position Db is checked then the PositionDb Service is used to locate tiles. This is useful when you have tiles with scaled sprites or if you're tweening position and/or scale. When this toggle is checked a few new fields appear:
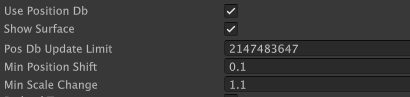
- Show surface: draws boxes around tiles in the highest priority map/Camera pair. Different colors are used for scaled/shifted and non-scaled/shifted sprites, however, the actual size and position of scaled/shifted sprites isn't shown, just a different color.
- PosDbUpdateLimit: how many Tilemap changes are processed in each internal update.
- MinPositionShift: position changes in X,Y that are less than this value won't be counted as shifted tiles.
- MinScaleChange: scale changes less than this value won't be counted as scaled tiles.
- Note: setting this value at 1.0 or less will result in no tiles being counted as scaled tiles.
When Enable Hover is checked the HoverAction name field is shown. Note that Hovering requires:
- This checkbox to be checked
- One (and only one)
Hoverablecheckbox set for a Tilemap/Camera pair. - Proper setting of the HoverAction name: it has to match a name in the New Input System settings.
- Must be a Vector2-type action such as
Point
- Must be a Vector2-type action such as
- Proper implemention of ITpUiControl and/or IHoverableControl.
Click On Mouse Down a click = mouse down. If not, a click = mouse up (i.e., after button released).
Handle Events: If checked, handle all events in this component. This only works for cases where ALL of the event response is dictated by Event actions that can automatically be invoked by TpEvents.ProcessEvents.
Emit Events: If checked, the message sent to the tile specifies that it can post an event if that's appropriate.
The optional Sound Controls section lets you add audio feedback.
The Ui/Messaging section lets you add direction info to packets and show a prefab at the click position.
Add Direction 4 and Add Direction 8 : this is a little harder to explain.
These are used when you want to know where in the tile the mouse pointer actually was. This may sound strange but consider that a tile with an unscaled sprite essentially occupies one Tilemap unit. But the mouse click can be anywhere within that space.
The ActionToTile packet sent by this component includes an offset which is the Vector2 distance from the center of the tile to where the click actually was.
If an add box is checked then that Vector2 position is converted into an angle and then into a value from the Position4 (up/right/down/left) enum and/or the Position8 (up, upright, right ....) enum.
The Center Dead Zone describes what part of the sprite's area is considered as None from the two Position enums.
So what does all that mean? If you enable this feature then a message recipient can determine if it was clicked in the center area or on one of the edges.
You can see this at work in the Oddities/Jumper demo, where clicking on the edges of a tile moves it in the direction of where it was clicked.
When using PositionDb this feature works correctly for scaled or position-shifted sprites, even if they no longer overlap the actual tile position.
Another way of thinking about this feature:
The packets have information about where within the tile the click actually occurred as well as 4 or 8-way direction info (meaning you don't usually have to evaluate the position within the tile).
The direction info is evaluated as a rotation clockwise from straight up. E.G. one can interpret DirectionType4.Right as 'move this tile to the right' or DirectionType8.RightUp as move diagonally up and to the right.
Others
Tilemap Parallax
Add it to a Tilemap, provide a follow target, and this component offsets the Tilemap's transform as the target moves. See the Side-scroll Layout demo.
SetDontDestroy
Add it to a GameObject and DontDestroyOnLoad will be set on Start().
TpNoPaint
- Add this component to a Tilemap's parent GameObject or to the parent Grid of one or more Tilemaps to prevent such Tilemaps being used for painting, deleting, etc.
- Add this component to the GameObject of a Palette prefab to inhibit reporting of # of different tiles in the palette.
TpPrefabMarker
Used during the creation of TileBundles and TileFabs. You never need to use this yourself.
TpNote
A way to add a note to a stack of components. It can also be used to add tags to game objects.
If the 'note' is a comma-separated list of tags, you can call GetTags to get an array of the individual tags.
AnimStateTilePingerBase
Yeah, annoying name. Use as a state machine behaviour to notify a TPT tile, e.g. a TpZoneAnimator.
- TpZoneAnimator pokes its instance ID into the animator as a parameter (called 'id').
Other uses of this class require a similar setup
TpGoTween
Attach to a GameObject for a simple tween.
TpGoTweenSequence
Attach to a GameObject for a tween sequence.
Services
Dynamically loadable Scriptable Object Services for the TilePlus system
TilePlus Services
Overview
In the TilePlus system, Runtime-only Scriptable Objects are called Services or SRS, and are controlled by TpServiceManager.
Services are built on a base class called ScriptableRuntimeService, which handles automatically pre-registering the service with TpServiceManager prior to the first scene load.
It's easy to create your own, just inherit from ScriptableRuntimeService and add your own data or code. Be sure to call the base classes in OnEnable and OnDisable if you override them.
Ensure that you have something like this in your derived class:
[RuntimeInitializeOnLoadMethod(RuntimeInitializeLoadType.BeforeSceneLoad)]
private static void InitOnLoad()
{
    TpServiceManager.PreRegisterSrs(  nameof(YOUR_CLASS), Create);
}
The BeforeSceneLoad version of the attribute is REQUIRED. If omitted, the service won't be available until this specific service actually registers itself.
TpServiceManager internally keeps Services in two groups:
- Available: Services which have pre-registered themselves using the method shown above.
- Running: Available Services which have been loaded.
TpServiceManager
TpServiceManager has properties and methods to deal with services:
Properties
- GetAllRunningServices: an array of ScriptableObjects that are running services.
- This is editor-only and used for in-editor diagnostics like the ServicesInspector and System Info windows.
- GetAllRunningServiceTypes: an array of running Service Types (c# Types)
- GetAllAvailableServiceTypes: an array of available service name strings.
Methods
HasServiceOfTypeAvailable: input is a string e.g., nameof(TpSpawner). Returns true if the specified service is AVAILABLE (may not be running).HasAllTheseRunningServices: Test for a set of active services. Input is an IEnumerable of Types. Returns true if ALL the services are running.GetServiceOfType<T>: One way of obtaining a service handle.- Example:
GetServiceOfType<TpSpawner>(); - If the service is NOT running this method will start it.
- Example:
GetRunningService<T>(out T? Service): Obtaining a Service handle ONLY if it's already running.- Example:
if(GetRunningService<TpSpawner>(out var spawner){...} - Returns true if there's an already-running service of Type T (and the out param has the handle)
- Returns false if there isn't an already-running service of Type T (and the out param is Null)
- Unlike GetServiceOfType<T>, the service isn't started if it isn't already running.
- Example:
GetServiceOfType is quite simple:
- ALWAYS fails unless the Editor is playing or about to change into Play mode.
- Does a fast dictionary lookup to see if the service is already running.
- If it is, return the service's handle (instance).
- If it isn't, see if it's available (pre-registered)
- If it isn't: fail (return NULL).
- If it is, create the Service instance.
- If Service Instance was already active or newly created, return that. Otherwise return null.
GetRunningService<T> is also ONLY for use when in Play mode.
Finally, if you want to terminate a service, use:
TerminateServiceOfType<T>()
If the service is running this will Destroy the service. Normally, services persist throughout the lifetime of the application once they're loaded. In the Layout demo the Dialog Box seen when you first encounter a treasure chest is actually a Bundle loaded by the DialogBoxService and this service is terminated when the Dialog box close button is clicked.
Terminating a running service doesn't mean it's no longer available: you can just use GetServiceOfType to reload it.
Initialization
It's important to avoid race conditions for Services which require initialization. This can occur if more than one source (such as a Component) use the Service.
For example, in the TopDownLayout demo, both the GameController and the TpInputActionToTile components both use the TilePositionDb service. The PositionDb is designed to reject duplicate 'monitored' Tilemaps (i.e., those maps where the PositionDb keeps track of tile positions). Other control parameters should only be modified by one entity. In this demo, that's TpInputActionToTile.
Note that this warning ONLY applies to Services which require initialization. For TilePlus, that's only the TilePositionDb
Convenience Properties
Since the Messaging, Tween, and Spawning services are commonly used, shortcut properties exist that just let you get the handle:
- SpawnerService returns a handle to TpSpawner.
- TweenerService returns a handle to TpTweener.
These use GetServiceOfType<T> and will auto-start the service if not already running. These services do not require any initialization.
Note that the TpTweener Service is also available via a protected static (i.e., within the class or derived classes only) property in the TilePlusBase class (which all TilePlus tiles derive from). This property is an alias for TpLib.TweenerService.
- A Monobehaviour or other code can use TweenerService (via TpLib.TweenerService) to create GameObject tweens.
- Creating Tile Tweens requires a TilePlusBase instance as part of the method call.
Please refer to the Tweener documentation for more information.
Services as Singletons
Usually a service is a front-end for something that needs to be defined by an API and/or an Interface, and in that sense, they're by nature singletons at least from an external point of view. Internally a service may handle multiple instances of something else but that's mostly hidden from code that uses the service.
That's the general model for this simple, but efficient, service scheme.
The ScriptableRuntimeService class can actually have multiple instances: there's no static 'Instance' at all.
It's the implementation used in TpServiceManager that enforces only one instance of each service for two main reasons:
- Lookup speed: simpler data structures.
- Multiple instances are harder to differentiate in your code.
Other systems in TilePlus need multiple Scriptable Object instances. Specifically, the Layout System which creates multiple instances of TpZoneManager Scriptable Objects. Here, the different instances are differentiated by their names. It's quite a bit more complex although the details are largely hidden via the use of Monobehaviour Components for setting up parameters.
Hence, Services are forced to be singletons as an implementation detail for this particular type of dynamically loadable service.
The intent is to use Services for, well, Services and not global data storage or state.
The Tweener, Messaging, Spawning, and PositionDb services are autonomous and don't depend on any external state aside from that being provided from internal Unity API interactions, and TpLib logging and 'Tilemap DB' methods. All their internal data are private and only accessible via methods or properties. The only significant dependency occurs when a Service requires an Update method invocation - that's minor and not a Service-to-Service dependency.
Creating services which have cross-dependencies is a bad idea and you will be plagued with bugs unless you are extremely careful.
Back to Singletons...
But there's nothing stopping you from using Services as (sort of) conventional singletons if you want to. See the LayoutSystem demo for an example.
- In that example one finds a 'GameState' service, which holds global state including the data which are saved when code in the example requests a game save.
- This approach was taken to keep the example simple (it's complex enough as it is).
- Depending on your viewpoint about Singletons, you may or may not want to avoid this approach.
Profiling
Services that require updating can set this up via the IScriptableService interface, discussed below. The update invocation for each service is automatically wrapped with Profiler.BeginSample and Profiler.EndSample regions with the Service's name. When using a modified PlayerLoop for updates, look for the TpLib section.
Messaging
Use ServiceMessage(ObjectPacket packet) to send messages to running Services. This is implemented with two IScriptableService members (see below).
Use a pooled (wrapped with using) or an an unpooled instance of ObjectPacket and set the Command property to a particular command string. Other properties of can be used to send whatever information the target understands (this is up to you).
Using the instance's properties, you can add one or more of:
- a UnityEngine.Object
- any instance of any c# class
- a string
- an int
- a boolean value
- all of the above.
Services indicate which command strings are supported.
When ServiceMessage is used, the packet's Command is examined and is used to determine which Services get the message. This is very flexible and open-ended. It's not used by the TilePlus system at all, but is used in the game that this was developed for, which is largely based on services.
More Grisly Details
The IScriptableService interface
IScriptable is an interface that lets a SRS specify how it wants to receive Update events (or not) and if it should persist across Unity scene changes.
If a service DOES NOT implement IScriptableService it inherits the default Interface properties or; no Updates and auto-kill on scene changes.
Not all Services need an Update event; for example, TpMessaging and TpSpawner. Some Services need an Update event; for example, TpTileTweener and TpTilePositionDb.
Services which require Update events must implement the following:
bool IScriptableService.WantsUpdate => true;
bool IScriptableService.ReadyForUpdate => true;
void IScriptableService.Update(float deltaTime){}
Note that these are EXPLICIT interface implementations and MUST be done this way.
- WantsUpdate is only examined twice: when the Service registers itself when loaded and when it deregisters itself when unloaded (which may not be till program shutdown).
- WantsUpdate should NEVER be a variable. If this value is different for registration and deregistration then an exception will occur during the deregistration code or soon after, at the next TpLib internal update.
- ReadyForUpdate is examined every Update and doesn't always have to be true. If your code doesn't always need Update or if it wants to delay enabling Update for some reason then the property can return the value of a variable or test some condition. The Tweener uses this feature to only get Update events when there is actually work to do.
- In words: Update is called every frame unless ReadyForUpdate is false.
Persist Across Scene Changes
If the PeristThruReload interface property is EXPLICITLY implemented and returns true then this Service will not be destroyed when a Unity scene changes.
IScriptable messaging
As mentioned above, messages can be sent to Services via ObjectPackets. The packet's Command property controls what Services are sent a particular message.
To do this, implement AcceptableMessages and MessageTarget. AcceptableMessages is a property that returns an array of strings representing the Commands that the MessageTarget can accept.
AcceptableMessages is examined only when the Service starts.
- Returning new string[1]{"XYZZY"} would mean messages with XYZZY as the command are accepted.
- Returning new string[2]{"XYZZY", "ABCDEF"} would mean messages with XYZZY or ABCDEF as commands are accepted.
- Returning Empty array (the default value of the property) == NO messages accepted.
- Returning single-item array with first item ==
"__ALL__"=> ALL messages. - AVOID: Returning new string[2]{
"__ALL__", "ABCDEF"} would mean ALL messages + all ABCDEF messages- ABCDEF messages would be sent to the service twice! (so don't do this).
Update Event Timing for Services
Note that Update timing isn't the same as Monobehaviour Update and doesn't originate from a GameObject in any scene. The modified PlayerLoop from TpLibTasks updates services at PostLateUpdate.
Spawner Service
Introduction
The TilePlus system uses pooling as much as possible and reasonable. Most of this activity is behind the scenes, but there is one pooler available for general use as a Service: SpawnerService.
SpawnerService is based on the TpSpawner : ScriptableRuntimeService<TpSpawner> class.
Use
SpawnerService can be used for painting tiles, which is a specialized use primarily for TpAnimZoneSpawner. In that case there’s no object pooling, which applies only to Prefabs. That use isn't further discussed here.
A tile can use SpawnerService to spawn pooled prefabs, with preloading. That feature is used by TpAnimZoneSpawner and TpAnimatedSpawner. You can examine those tiles' code to see how it works.
You can use SpawnerService from any code, not just tiles. Just use the SpawnPrefab method shown below:
public GameObject? SpawnPrefab(GameObject? prefab,
                                      Vector3     position,
                                      Transform?  parentTransform = null,
                                      string      parentNameOrTag = "",
                                      bool        searchForTag = false,
                                      bool        keepWorldPosition = true)
The first two parameters are obvious.
parentTransform: If provided then the spawned Prefab is parented to that transform. If the value is null a search is done for the parent using the parentNameOrTag string. If that string has a value, then one of two things occurs:
- searchForTag = true: Use GameObject.FindWithTag to locate a GameObject to use for a parent.
- searchForTag = false; Use GameObject.Find to locate a GameObject to use for a parent (slower).
If neither search provides a parent, or if parentNameOrTag is null or white space then the spawned prefab is unparented (which may be what you want).
TLDR; want parent? Provide one or use the parentNameOrTag search string.
The keepWorldPosition parameter is passed to Transform.SetParent if a parent is provided or located. If true, the parent-relative position, scale and rotation are modified such that the object keeps the same world space position, rotation and scale as before (from the Unity documentation).
Service Messages
The Spawner Service doesn't accept any Service Messages. However, it sends the following messages right after invoking the CollidableObject events.
- When Spawned: Command = "SPAWNER-ADD-PREFAB" and the ObjectPacket's UnityObject property has a reference to the spawned GameObject.
- When Despawned: Command = "SPAWNER-DEL-PREFAB" and the ObjectPacket's UnityObject property has a reference to the GameObject that will be despawned.
- As usual: it makes no sense to cache this reference as it will become inactive.
Services that want to get these messages should add these two strings to their AcceptableMessages property return value.
Preloading
Preloading a pool can be done with Preload().
You can check to see if a Prefab is preloaded with IsPreloaded().
Reset
Resetting the Pooler (normally not needed) is done with (wait for it) ResetPools().
Notes
For maximum efficiency, it’s suggested that you add the TpSpawnLink component to the root GameObject of your Prefab. If it isn’t present, then the call to SpawnPrefab will add that component automatically so that the Prefab can be tracked.
TpSpawnLink provides optional timed auto-destroy and other features. The OnTpSpawned and OnTpDespawned methods can be overridden in derived classes to provide customized activity when the Prefab is spawned or despawned. The DespawnMe method can be used to despawn a Prefab from some other entity.
If you do override anything that's virtual please be sure to properly call the base class methods from any overridden methods even if they appear to do nothing.
It’s a simple but functional system that can maintain the complete lifetime of a Prefab’s placement from a pool and a despawn with automatic return to the pool.
The System Info and Services Inspector windows show information about the pool status. Try out the Collision demo to see the pooling in action.
PoolHost
Normally the pooler does not attach the pooled and/or preloaded prefabs to a parent GameObject, which can make the hierarchy look messy.
If this bothers you, head over to the Project folder Plugins/TilePlus/Runtime/Assets and drag the Tpp_PoolHost prefab into your scene. This prefab has an attached component which sets DontDestroyOnLoad so that the prefab persists between scene loads. The pooler looks for a GameObject with this specific name and will parent non-spawned and/or preloaded Prefabs to this GameObject.
GameObjects are set inactive when held in the Pooler after preloading or despawning but are set active when fetched from the pool.
TilePositionDb Service
Introduction
The TilePositionDb Service monitors Tilemap callbacks to update a small internal dataset.
The dataset keeps track of which tile positions are occupied on the specific Tilemaps that you tell it to monitor.
TilePositionDb can optionally keep track of tiles with scaled sprites (x,y > 1) and position-shifted sprites.
Given this information, use query methods to see if a position is occupied by another tile even if the tile sprite is enlarged; for one or several Tilemaps at once.
This is useful, for example, as part of a custom Grid Graph for the A* Pathfinding Project (code available on request).
TilePositionDb supports time-varying size and position, such as you'd have when tweening a TPT tile's scale. BUT: It doesn't support accurately tracking rotated sprites.
If a sprite is rotated and Warnings are active (Checkbox in TilePlus.Config) then a warning message is printed to the console the first time that a rotated sprite is encountered. To avoid console spamming this warning occurs only once per run-session.
Use
Please check out the TpInputActionToTile component. This shows how to use position DB via the TpActionToTile Scriptable Object.
Here's an example that can guide how to use it yourself: First, initialization.
 var posDb = GetServiceOfType<TpTilePositionDb>();
 if (!posDb)
     return;

 //Add a map to monitor
 posDb.AddMapToMonitor(m_Tilemap);  //you have a field with this reference.

//-- Optional, not needed if there are no active tilemaps when the game starts.
//-- this is generally only needed in the Editor since there can be a scene already present
//-- when you click the PLAY button.
//it may be the case that the scene has tilemaps with existing tiles
//at startup. Hence, add all existing positions 'manually'
//duplicates are rejected in the AddPosition method.
var n = tilemap.GetUsedTilesCount();
if (n != 0)
{
  tilemap.CompressBounds();
  foreach (var pos in tilemap.cellBounds.allPositionsWithin)
     posDb.AddPosition(tilemap, pos);
  posDb.ForceUpdate(); //Force an Update so that the internal data structures are refreshed.

}
Querying - here's the most basic query:
public bool PositionOccupied(int            mapIid,
                             Vector3Int     position,
                             out Bounds     scaledSpriteBounds,
                             out Vector3Int tilePosition,
                             Vector3Int?    ignoreThisPosition = null,
                             bool           ignoreScaledSprites = false)
This method takes the
- instance ID of a Tilemap
- the position you're testing
and optionally:
- scaledSpriteBounds: if what's found is a tile with a scaled sprite then this is its bounds.
- tilePosition: if what's found is a tile with a scaled sprite then this is the tile's actual position. The tile may not be congruent with the sprite.
- ignoreThisPosition: if two tile sprites overlap, this position is ignored.
- ignoreScaledSprites: this is much faster if you're sure there aren't any scaled or position-shifted sprites on your Tilemap.
For ignoreThisPosition, if adjacent tiles have overlapping sprites overlap then the return value would be true. But it's indeterminate which sprite (of the two) would have its tile's position returned. If you want to exclude one of those positions use this parameter. Check out the JumperTile TPT tile script for an example.
There's a similar Query called PositionOccupiedForWorldCoordinates. This useful for certain uses. See the TpActionToTile script for an example.
If you'd like to test on multiple Tilemaps, use
public bool PositionOccupied(int[] mapIids, Vector3Int position, Vector3Int? ignoreThisPosition = null )
There are also shortcuts for really simple (and of limited use) "pathfinding" - these mostly exist for really simple uses.
public bool IsPathBlocked4Way(int mapIid, Vector3Int position, TpTileUtils.DirectionType4 direction, uint distance=1)
public bool IsPathBlocked4Way(int[] mapIids, Vector3Int position, TpTileUtils.DirectionType4 direction, uint distance = 1)
public bool IsPathBlocked8Way(int mapIid, Vector3Int position, TpTileUtils.DirectionType8 direction, uint distance=1)
public bool IsPathBlocked8Way(int[] mapIids, Vector3Int position, TpTileUtils.DirectionType8 direction, uint distance = 1)
These test for any blockages in one or more Tilemaps in a given 4- or 8-way direction, and for a certain distance.
They're fairly inefficient if you have many Tilemaps.
If you want to use something like A* PathFinding Project, the PositonOccupied methods are the basis of a Grid Graph plugin.
What is this?
A mini-database of occupied positions on Tilemaps.
This was originally intended for use with the 'Chunking'/Layout mode of TilePlus Toolkit, although there's no restriction on other uses. It's also optionally used by TpActionToTile, TpInputActionToTile, and other code where one wants to locate tiles on a tilemap from a mouse position.
Since it also keeps track of tiles whose sprites are larger than one Tilemap unit, you can locate tiles EVEN if what you click on is the sprite outside of the tile's single position. It also properly handles sprites where the position has changed and the sprite's bounds no longer overlap the tile's native sprite bounds. But for efficiency, a sprite's rotation is ignored.
You can see this in the Oddities/Jumper demo where some of the tiles have sprites bigger than one unit.
When using the Chunking system: even if you have a huge Tilemap only the parts of it within the camera view (plus optional padding) are loaded into the Tilemap. Hence, the HashSets in this Service never get that large.
HOWEVER, this assumes that you do not use this subsystem to monitor dense maps such as a 'floor' or 'ground' Tilemap where almost all positions are filled. One should use colliders or some other approach for dense maps.
Sparse tilemaps make sense to use with this Service, so roads, obstacles etc.
Tiles are added and deleted from the data structures in this Service by the OntilemapTileChanged callback (from Tilemap).
Any tiles which are on the specified Tilemaps are added or deleted from a HashSet.
But that only covers one single position. If you have tiles with sprites that are offset by the transform-position of the tile sprite then that doesn't work.
Scaled or position-shifted sprites are handled automatically.
Since evaluating scaled sprites involves some computation and Tilemap access (to get the actual sprite transform) these are cached and evalutated when this SRS is updated. That occurs at EndOfFrame (using the Awaitable pump) or at PostLateUpdate when using the PlayerLoop pump.
Note that TileBase tiles like Rule Tile and AnimatedTile cannot have scaled or position-shifted sprites since these tiles don't have a transform. They appear internally only at their actual Tilemap position. However, this isn't much of a limitation: use TpAnimatedTile or TpFlexAnimatedTile; and Rule Tiles (this one assumes) never have enlarged sprites.
When using the layout system you handle initialization via a callback (see Chunking Demo).
Otherwise you use AddMapsToMonitor (several overloads). After initialization the only way to completely change the setup is to use the .ResetPositionDb method or terminate/restart the service.
Once initialized, when a tile is added or deleted the internal HashSets are updated.
Use PositionOccupied(Tilemap, Vector3Int) to test if there's a tile at a position.
Important
Tiles are deleted from the internal dataset during the Tilemap callback. However, as mentioned earlier, additions are cached and evaluated near the end of the frame.
This means that there's always at least a one-frame delay for additions to the internal data.
Properties
PosDBRefreshPerUpdate
The Tilemap callback can dump an enormous amount of data into the update queue. This property can be used to control how many updates are processed each time that the PositionDb updates. This defaults to int.MaxValue.
For example, if you move a 10,000 tiles there will be 10,000 entries in the update queue. If PosDbRefreshPerUpdate is left at it's default value execution will block until all the updates are processed.
The side effect is that updates to the PositionDb's internal data may take more frames to be completely updated.
MinScaleOffset and MinPositionOffset
MinPositionOffset: Determines the minimum position shift for a tile sprite to be added to the set of position-shifted or scaled sprites.
MinScaleOffset: Determines the minimum transform size change > 1,1 for a tile sprite to be added to the set of position-shifted or scaled sprites.
WARNING
Take care that only one entity affects these properties. It's best to set these once and not have multiple scripts changing these values.
Multiple scripts can add Tilemaps to be monitored. However, it's best to avoid having multiple scripts removing such Tilemaps unless there's some coordination.
Merging
The Merge method can be used to combine the 'occupied position' data from multiple tilemaps into one HashSet. This can be handy to have a lookup table that can be used repeatedly rather than using PositionOccupied repeatedly.
However, it can be slow - don't update it until you need to. Updating it every Monobehaviour Update is a bad idea. If you need updating that frequently you should use Tilemap colliders instead or stick with PositionOccupied instead.
But for a turn-based game where your user does some input and you have a number of on-screen entities that need to move, Merge can be used once and the resultant HashSet can be used to determine if the entities can move to particular locations.
Note that even if none of your tiles ever move or have their sprites tweened but you are using the Layout system you should be aware that the PositionDb is updated whenever new tiles are loaded or unloaded via the layout engine. Here, you can call Merge right after a Layout pass.
HOWEVER: be aware of delays caused by PosDbRefreshPerUpdate, which may delay complete updating for several TpLib Update events. The PendingUpdates property can be used to see how many updates remain in the queue.
In the Top-down layout demo, see the OnPlayerHasMoved event handler to see where that demo does a layout pass.
TpTweener Service
See Tweener Service
Messages and Events
TilePlus has three internal messaging systems:
Events and Messages: for Tiles
ServiceMessages: send messages to Services. See the Services chapter.
Overview
TilePlus Messaging and Events
TpLib has general-purpose messaging and Event functionality. Messages get sent to tiles, and tiles can post events. Messages can also be sent between any classes: Monobehaviours or Static classes are supported.
TpServiceManager has limited messaging to any running Services.
Messages functionality uses the TpMessages Static class and Events functionality uses the TpEvents static class.
The use of Messages and Events facilitates event-driven design with TilePlus tiles. As your game proceeds you send Messages to tiles; usually from a Monobehaviour or other code which is responding to user input. Tiles post Events in response.
Messages are sent immediately. Events are stored and evaluated later.
A simple example: a game where there's a player character moving around. Your code messages all tiles interested in knowing where the player is located. If one of the messaged tiles decides that the player is at that tile's position or nearby it "posts" an Event. Your controlling program gets a callback announcing that an Event had been posted. At some point, perhaps during Update, you call a method in TpEvents to process the events.
The TpInputActionToTile Component is a convenient way to use the Unity's New Input System. Attached to a GameObject and properly configured, it can be used to process the New Input System events and:
- Message a tile using the Messaging System
- Or get callbacks that a Click or other New Input System event had occurred.
- Automatically handle Events sent from tiles using EventAction Scriptable Objects.
- And/Or get information about which tiles posted Events and handle them yourself.
It's highly configurable and really useful: check it out in the Components chapter.
Events
Events System
Superficially, the Events system implemented by TpEvents seems very simple. A tile calls TpEvents.PostTileEvent with
this as the method parameter. That passed instance is added to a HashSet. A HashSet is used to ensure that
repeated calls to this method from the same TPT tile are ignored. The OnTileEvent subscribed callback is triggered.
The real power of Events can be seen when ProcessEvents is used. When your controlling program gets the OnTileEvent callback it can either handle it immediately or just set a flag, then process the events later; e.g.; during Update.
What sounds like a simple approach would be to obtain the list of TPT tile references by copying them from the HashSet.
And you can do that if you want. Create a List<TilePlusBase> and pass it to TpEvents.ProcessEvents like this:
var theList = new List<TilePlusBase>();
ProcessEvents(theList,false);
The list will be filled with however many TPT tile references are in the HashSet.
But what does one do with this list of TPT tile references? It's simple to do things like:
(Pseudocode)
foreach(var tile in theList)
{
    if(tile is typeof(XYZ))
    {
        Examine the tile's fields and properties
            Do something
    }
    else if(tile is typeof(ABC))
    {
        Examine the tile's fields and properties
            Do something else.
    }
}
Which works but can get very hard to extend or maintain.
It would be nice if the tiles themselves had a way to do whatever function would be done in the control program.
Augh. That just changes the problem - you'd need different TPT tile Types for each "Do Something" variation. For example: Two animated tiles with different "Do Something" would require different subclasses:
Class DoSomethingA :TpAnimatedTile
{
    public void DoSomethingA();
}

Class DoSomethingB :TpAnimatedTile
{
    public void DoSomethingB();
}
This is probably worse!
Scriptable Objects to the rescue: Event Actions
If you look at a TPT tile asset in the project folder you'll see a field called: Event Action. This field is available via the Painter or Tile+Brush Selection Inspector: check the "Event Support" toggle to view the field.
Event Actions (along with Zone Actions) are a powerful feature which allows adding customizable behaviours to a TPT tile Type via the normal Unity Inspector viewing the TPT tile asset in the Project folder, or on any individual TPT tile instance in a scene via the Painter or Tile+Brush Selection Inspector.
Please be careful not to have any state variables in any Event Action. These are project-folder Scriptable Objects that can be re-used by different TPT tiles and variables:
- In Editor-play mode the actual project asset will be affected.
- The value of the variable will change for each invocation of the Event Action code.
Event Actions have a built-in base class: TpTileEventAction and an interface: IActionPlugin.
IActionPlugin is simple:
public class TpTileEventAction : ScriptableObject, IActionPlugin
{
     /// <summary>
     /// A subasset: optional.
     /// </summary>
     /// <remarks>if it exists, the object field in the SelectionInspector will
     /// have an additonal button to open this in a popup inspector.</remarks>
     public ScriptableObject? m_Subasset;

     /// <summary>
     /// A subobject, if any.
     /// </summary>
     ScriptableObject? IActionPlugin.InspectableObject => m_Subasset;

     /// <summary>
     /// DEFAULT if not overriden is TRUE.
     /// If true, this EventAction doesn't do everything
     /// needed, and TpEvents.ProcessEvents will not remove the tile reference
     /// from the output list.
     /// </summary>
     public virtual bool Incomplete => true;

     /// <summary>
     /// Execute event handler.
     /// </summary>
     /// <returns>T/F</returns>
     /// <remarks>Overrides should use base class to ensure tile isn't null</remarks>
     public virtual bool Exec(TilePlusBase tile, object? obj = null)
     {
         return tile;
     }
}
If all TPT tiles which emit Events have EventActions then one can do this:
ProcessEvents()
In this case, all TPT tiles which have posted events are examined for EventAction scriptable objects. Any EventActions S.O. found have their Exec() method invoked. Those which don't have one are ignored.
Or:
ProcessEvents(list)
That does the same thing but with two differences:
Any TPT tiles with EventActions have the Exec() methods run. If the EventAction property Incomplete is true,
the tile instance is added to the list. This means that you can have a hybrid setup with both the EventAction and
some custom code based on evaluating the Types and/or TPT tile instance fields/properties one by one.
Or:
ProcessEvents(list, false)
Here, no EventActions are used, all the TPT tiles which had posted events are returned in the list.
But don't do this:
ProcessEvents(null,false)
It does nothing at all, and a warning is printed to the console if TpLib warnings are enabled.
Details
EventActionObject
EventActionObject is a virtual property in TilePlusBase which returns an arbitrary c# object. If not null, this object is passed to the EventAction's Exec method(as the second 'object' parameter) when it's called by ProcessEvents(). The base class implementation does this:
get => eventActionObject ?? new StandardEventData(string.Empty, m_ZoneBoundsInt, this);
set => eventActionObject = value;
Hence, the return value defaults to StandardEventData if the setter is never used.
But one can use any C# object as long as your EventAction understands how to use it.
public override object? EventActionObject
{
    get => eventActionObject ?? "12345";
    set => eventActionObject = value;
}
You can see how this is used in TpUiButtonEventAction.cs, but the general idea is that you can customize the data sent during ProcessEvents' calls to the EventActions' Exec() method, eliminated much of the need to actually examine the tiles' fields and properties from the EventAction.
Sub-Assets
These are less frequently used, but allow you to add plugins (Scriptable Objects) to EventActions. This uses two fields in the EventAction asset:
public ScriptableObject? m_Subasset;
ScriptableObject? IActionPlugin.InspectableObject => m_Subasset;
The InspectableObject property provides a Type-invariant way to access the subasset. This is mostly used as a way to display a button for opening an Inspector for the subasset when using Painter or the Tile+Brush. Note that since EventActions are Project assets, changing the subobject in one EventAction changes all uses of that EventAction.
A subasset can be used when you have common functionality that you want to add to an EventAction. For example, you use a specific type of TpTween repeatedly and want to use it in several different EventActions. Rather than code it directly in several different EventAction assets, you can create one asset with the TpTween and add it via the subasset field.
For an example see Runtime/AssetScripts/Actions/TpTweenerSubObject. You add a TweenSpec asset reference to the subobject's asset and play one tween or a sequence using the TweenSpec asset's tween setup. You run the tween from the EventAction's code using the subasset method PlaySequence:
public long PlaySequence(TilePlusBase                      tile,
                                 bool relative = true,
                                 int []?                           indices     = null,
                                 int                               numLoops    = -1,
                                 Action<TpTweenSequence, bool>?    onFinished  = null,
                                 Action<TpTweenSequence, TpTween>? onNextTween = null,
                                 bool                              evenIfAlreadyRunning = false)
The 'indices' parameter allows you to choose which tweens from the TweenSpec asset to add to the sequence.
Messages
So that's Events. Messages are an entirely different animal.
- Events is a Static class.
- Events is normally used as a store-and-forward events system: tiles post events and something else evaluates them later.
- Messages are sent immediately.
Messages has two main ways of sending messages from one entity to another.
- Messages can be sent to TilePlus (TPT) tiles; for example, to notify a tile of the player’s position. Messages can also be sent from one TPT tile (or from Event or Zone Actions) to other TPT tiles.
- Messages can also be sent from any Object to any other using a Typed subscription system. This includes sending from Monobehaviours to static class instances and vice-versa.
Use with TPT tiles
When a TPT tile receives a message it can optionally espond by posting an event to TpEvents. For example, after receiving a message about the player’s position and finding that it matches the player's position.
Rather than do something like "I want to control something on a tile on Tilemap ABC at position (3,2,0), what was that method I created last week?", use TpMessages.
What's the advantage? Although you can use this Service to send messages to a tile on a Tilemap at a certain position, you usually use it to message several tiles on any tilemap, perhaps filtered for tile type, data packet contents, or a rectangular region.
You can send to all tiles, all with a particular tag, or all of a particular type or interface.
TpMessages uses generic interfaces and generic message packet classes. What does this mean?
Messages.SendMessage
This has six different overloads, including one simple one which is rarely needed:
SendMessage<T>(Tilemap map, Vector3Int position, T packet)
Clearly this just corresponds to "I want to send a message...".
But let's talk about what this does and what T is in this context.
T is a TypeSpec for a concrete class inherited from an abstract class named MessagePacket<T>.
MessagePacket has two basic data items:
- SourceInstance: what sent the message
- Id: a uLong identifier for the message.
A useful simple packet is PositionPacket, which builds on MessagePacket to add a Vector3Int for position. This can be used to send a position of the player or an NPC to one or more TPT tiles.
Another simple packet is BoolPacket, which has (you guessed it) a boolean variable in it.
Similarly, StringPacket has a string.
For more complex use: ObjectPacket. This sort of like a 'Union' of several different types of fields, and is used extensively within the TilePlus system for events and Zone/Event Actions (discussed in other documentation).
AnimatorControlPacket is used by the TpZoneAnimator tile and an animator StateMachineBehaviour to allow a tile to control an Animator and get callbacks from the Animator.
ActionToTilePacket is used by the TpActionToTile Scriptable Object to send New Input System actions to tiles. See the section about 'ActionToTile'.
ObjectPacket, ActionToTilePacket, PositionPacket, and StringPacket all have pools accessible from the TpMessaging service. See various demos for how to use these. Please use the 'using' statement version of the pool access to ensure that the message packet instance is returned to the pool. It's up to you to ensure proper pooling use: if you can't, use unpooled message packet instances.
The Messaging Service maintains a context stack. The message packet and its Type are pushed on the top of the stack before messages are sent to tiles and popped off the stack after the messages are sent. The top of the stack can be 'peeked' so that message recipients can examine the original source packet. You can see how this is used in the Patterns demo program.
Messaging Methods
SendMessage<T>(Tilemap map, Vector3Int position, T packet)
is the simplest but least useful method.
If the TPT tile instance is available, you can use
SendMessage<T>(TilePlusBase tile, T packet)
Which is a convenience method for exactly the same thing since the tile has built-in properties to retrieve its parent Tilemap and its Grid position.
If you have the GUID of a TPT tile you can also use this:
bool SendMessage<T>(Guid guid, T packet) where T:MessagePacket<T>
- This is the only one of these methods which returns a value: false if the tile with a given GUID isn't found.
- C#'s GUID class has conversions between the string, byte, and Guid forms of a Guid.
Guid.TryParse() - This method requires the Guid form of a GUID.
If you know the map and have a list of positions:
SendMessage<T>(Tilemap map, IEnumerable<Vector3Int>   positions,
               T packet,
               Func<TilePlusBase, bool>? tileFilter = null)
Here we see the addition of a filter. This can be used to filter out tiles from those found. For example, you might want to examine some property of a tile and potentially exclude it from messaging by returning false from the filter callback.
TPT tiles can have tags. Here's how to message a group of TPT tiles with tags:
SendMessage<T>(Tilemap map, string tag,
             T                            packet,
             Func<TilePlusBase, bool>?    tileFilter       = null,
             Func<T, TilePlusBase, bool>? packetFilter = null,
             RectInt?                     region       = null)`
If map is null then every Tilemap with TPT tiles is examined to find tiles with tags.
Here we see the addition of a packetFilter. This filter is similar to the tileFilter with the addition of the packet itself as a filter parameter.
Notable is the addition of a region. If you supply a RectInt describing a region then that's used as an additional filter.
SendMessage<T>(Tilemap? map,
              Type                        typeSpec,
              T                           packet,
              Func<TilePlusBase, bool>?   tileFilter       = null,
              Func<T, TilePlusBase,bool>? packetFilter = null,
              RectInt?                  region = null)
Similarly, this overload sends the packet to all tiles of a particular Type, with both filtering varieties and the region
filtering also available. Again, if map is null then every Tilemap with TPT tiles is examined to find tiles of matching Type.
SendMessage<T, TI>(T   packet,
                  Func<TI, TilePlusBase, bool>? interfaceAndTileFilter       = null,
                  Func<T, TilePlusBase,bool>?   packetFilter = null,
                  Func<TilePlusBase,bool>?   tileFilter = null,
                  RectInt?                      region       = null)
This is the most complex SendMessage overload. Here, there's no map specification at all, so all Tilemaps with TPT tiles are examined.
What's going on here? This can be used to send messages with packets of Type T to all tiles with a particular interface TI.
There's an additional filter, the interfaceAndTileFilter. This filter gets the interface type, and the tile instance.
How Does a TPT Tile Handle Messages?
TPT tiles can handle multiple message packet Types by merely adding explicit interface declarations for whatever packets the tile wants to recieve. Here's a simple one from the Waypoint tile used in the Layout demo.
void ITpMessaging<PositionPacket>.MessageTarget(PositionPacket sentPacket)
{
    if (m_IsLevelChange)
    {
        //This tile won't respond until the game's Goal has been achieved. In this simple game, get all of the chests.
        //It blinks to warn you and posts a message to the signboard.
        if (!gameState.SceneExitGoalAchieved)
            StartColorTween();
        else if (tweenerId != 0 && TweenerService)
            TweenerService.KillTween(tweenerId);
    }

    if (sentPacket.m_Position != m_TileGridPosition)
        return;
    ChangeSlide(true);
    isEnabled      = true;
    WasEncountered = true;
    TpEvents.PostTileEvent(this); //the WaypointEventAction plugin handles disabling other WPs, saving data, level change etc.

}
and this is how the message is sent from within the LayoutDemoLayout Service (slightly edited for clarity):
using (messaging.PositionPacketPool.Get(out var pkt))
{
    pkt.m_Position     = newPlayerGridPosition;
    pkt.SourceInstance = null;

    messaging.SendMessage(null!, typeof(CdemoWaypointTile), pkt);

    //update all tiles that implement ITpMessaging<EmptyPacket,PositionPacket> with a new position BUT filter out
    //the waypoints since they've been messaged already.
    //in this example, it's the NPC spawners, the ZoneSpawners etc
    if (!gameState.HadTileEvent) //don't send out this general message if an event had occurred.
    {
        bool Filter(TilePlusBase tpb) => tpb.GetType() != typeof(CdemoWaypointTile);

        //This uses the simplest filter: the 'tileFilter'. Here we toss out all Waypoint tiles.
        messaging.SendMessage<PositionPacket, ITpMessaging<PositionPacket>>(pkt, null, null, Filter);
    }
}
Note that it's irrelevant what Tilemap the CDemoWaypointTiles are placed on. Since Waypoint tiles can change game state (such as changing to a new level) they're messaged first. The second SendMessage executes only if the first SendMessage call didn't result in any messaged tile posting an Event.
The second SendMessage call uses the more complex SendMessage call that allows you to only message tiles implementing ITpMessaging<PositionPacket>. The filter is the local method just above the second SendMessage call.
This must be terribly inefficient!!
You might think that one would need to tediously examine all these different Tilemaps to locate tiles to message, and it would be slow and inefficient. That would be true if SendMessage worked that way!
This isn't ye olde Unity GameObject SendMessage!!
Packets can only be sent to TilePlus tiles. These tiles 'register' themselves in TpLib data structures and 'deregister' themselves when they're deleted from a Tilemap.
The registration process stores Types, tags, interfaces, and other information that make locating tiles both fast and tilemap-independent. Tiles are found with fast Dictionary and HashSet lookups.
Here's how the overload with tags works:
public int[] SendMessage<T>(Tilemap map,
          string                       tag,
          T                            packet,
          Func<TilePlusBase, bool>?    tileFilter       = null,
          Func<T, TilePlusBase, bool>? packetFilter = null,
          RectInt?                     region       = null)
            where T : MessagePacket<T>
{
    SaveContext(packet);

    using (S_TilePlusBaseList_Pool.Get(out var list))
    {
        GetTilesWithTag(map, tag, list, tileFilter, region);

        var num = list.Count;

        if (packetFilter != null)
        {
            for (var i = 0; i < num; i++)
            {
                var tile = list[i];
                if (!messaged.Add(tile.Id))
                    continue;
                if (!packetFilter(packet, tile))
                    continue;
                var tgt = tile as ITpMessaging<T>;
                tgt?.MessageTarget(packet);
            }
        }
        else
        {

            for (var i = 0; i < num; i++)
            {
                var tile = list[i];
                if (!messaged.Add(tile.Id))
                    continue;
                var tgt = tile as ITpMessaging<T>;
                tgt?.MessageTarget(packet);
            }
        }
    }

    var ary = messaged.ToArray();
    PopContextAndDiscard();
    return ary;

}
The line GetTilesWithTag(map, tag, list, tileFilter, region); illustrates this. Without getting too deeply
into the weeds here, that method examines an internal dictionary s_TaggedTiles to locate tiles to message.
It's very fast and (generally) scales linearly to larger number of tiles and/or tilemaps.
Messages Between Objects
TpMessages has a secondary, separate typed-subscription system using the same MessagePacket scheme.
Recall that messages to TPT tiles requires implementation of explicit interfaces. Here, you need to subscribe to a Type of message packet.
public static ulong RegisterMessageTarget<T>(Object? parent, Action<object> target) where T : MessagePacket<T>
You register your target to a particular variety of MessagePacket (which can be any arbitrary blob of data as long as the class is derived from MessagePacket). If the parent is UnityEngine.Object such as a Monobehaviour then null-checks ensure that if the Object becomes null then it is automatically deregistered. Leave parent null when using a static class instance (which can't become null);
The target is an Action which receives a c# object which you have to cast back to the Type of the MessagePacket.
For example (not complete and just for illustration):
public class Example :  Monobehaviour
{

        public void Start()
        {
            Messages.RegisterMessageTarget<PositionPacket>(this, PlayerMoveCompleteTarget));
            return;


            void PlayerMoveCompleteTarget(object obj)
            {
                var packet = (PositionPacket) obj;
                Debug.Log($"Player moved to {packet.m_Position});
             }

        }
If this Monobehaviour's parent GameObject becomes null then the 'registration' is auto-deleted.
Calls to RegisterMessageTarget return a ulong ID which can be used to unregister.
There are two Unregister methods:
public static bool UnregisterMessageTarget(Type parentType, ulong id)
public static bool UnregisterMessageTarget(ulong id)
The first method is faster. Both return false if the operation failed.
Sending a Message
public static bool SendToTargets<T>(MessagePacket<T> packet) where T : MessagePacket<T>
This generic method sends the message packet to all targets for that particular message packet Type. In the context of the above example:
var packet = new PositionPacket();
packet.m_Position = new Vector3Int(1,2,3);
Messages.SendToTargets(packet);
This is a simple but powerful way to have event-driven messages controlling your gameplay systems without lots of dependencies.
Zone Actions
Zone Actions are similar to Event Actions but they're not automatically invoked in the same way as EventActions.
These are normally invoked by MessageTarget methods: the targets for SendMessage.
While it's certainly possible to invoke a ZoneAction's Exec method from anyplace in your code where you have the tile reference, it's a great way to introduce bugs. It's best to invoke these from TPT tile MessageTarget methods rather than have invocations scattered around your codebase.
Here's an example from TpSlideShow (edited for brevity):
void ITpMessaging<ActionToTilePacket>.MessageTarget(ActionToTilePacket sentPacket)
{
    if (sentPacket.SourceInstance == this)
        return; //avoid recursion.
    if (!m_AcceptsClicks)
        return;
    if (sentPacket.Delay != 0)
    {
        TpLib.DelayedCallback(this,()=>ChangeSlide(SlideIndex == 0,false,false),
                             "DelayATTP_Slideshow", sentPacket.Delay);
        if(m_ZoneAction)
            m_ZoneAction.Exec(this, this.GetType(), m_ZoneTargetTag,
                    ObjectPacket.EventsPropagationMode.ZoneEvents,"",SlideIndex);
    }
    else
        ChangeSlide(slideIndex == 0, true,sentPacket.PostEvent);
}
So this MessageTarget is a recipient of Messages from TpActionToTile which is the S.O. that converts clicks to tile positions. Having found one, it sends this message and (if there's a delay) invokes the ZoneActions's Exec method.
The Exec method declaration:
public virtual bool Exec(TilePlusBase                       sourceInstance,
                         Type?                              targetType,
                         string                             tagString,
                         ObjectPacket.EventsPropagationMode eventPropagationMode = ObjectPacket.EventsPropagationMode.None,
                         string                             optionalString       = "",
                         int                                optionalInt          = 0,
                         bool                               optionalBool         = false,
                         object?                            optionalObject       = null)
As you can see, the parameters have some specific information like:
- targetType (here passed-in as the Type of the invoking TPT tile)
- tagString (here passed-in as a specific value from the invoking TPT tile)
and some general parameters:
- optionalString
- optionalInt
- optionalBool
- optionalObject
These can be whatever you want. In this example, optionalInt is used to pass an index for which slide (sprite) should be displayed.
It's probably obvious that the invoking tile has to know what a ZoneAction needs and the ZoneAction has to be designed for a specific purpose: there's an unavoidable dependency.
To be clear, a TPT tile could do whatever the ZoneAction does within its own code. The idea of Zone Actions is that often there will be actions that different varieties (Types) of TPT tiles perform. Using a Scriptable Object plugin like this means you don't have to have similar code peppered throughout your project, improving maintainability and making debugging easier.
Similar to Event Actions, avoid having any state variables in the Event Action Scriptable Object since it may be re-used among several different tiles.
Zone Actions may relay messages to other tiles. This is commonly used by the UI tiles but there's no restriction. If you examine the base-class Zone Action (TpTileZoneAction.cs) you'll see that what it does is relay a message to other tiles within the BoundsInt region of whatever tile invoked the Zone Action, with filtering.
The filter has this code:
bool FilterFunc(ITpMessaging<ObjectPacket> pkt, TilePlusBase tpb)
{
    if (!tpb)
        return false;

    // ReSharper disable once Unity.NoNullPatternMatching
    if(tpb is not IZoneActionTarget receiver )
        return false;
    if(!receiver.AcceptsZoneAction)
        return false;

    if (!checkTag)
        return true;
    //this can be slow if you have many tags.
    (var count, var tags) = tpb.TrimmedTags;
    return count != 0 && ((IList)tags).Contains(tagString);
The filter rejects TPT tiles that don't implement IZoneActionTarget. That interface has one property: AcceptsZoneAction which is simply a way for a TPT tile to say "leave me alone."
The the filter checks for a tag match and discards TPT tiles without matching tags.
TpTweener
The TilePlus system optimized Tweener for Tiles, GameObjects, and custom uses.
Tweener Service
Intro
TpTweener is a TPT service that can be used for tweening TilePlus tile sprites, GameObjects; just about anything. The Tweener also has support for sequences. Tweens and Sequences can be Awaited or used from Coroutines.
When used with TilePlus tiles, tweens are used within TilePlus tile code, ZoneActions, or EventActions. The main restriction is that a TPT tile reference must be provided when creating Tweens or Sequences for TPT tiles.
When used with GameObjects you can use built-in methods to tween GameObject position, rotation, scale, or Color as well as a method to tween a GameObject position along a Bezier path.
To tween anything else, you create a small class containing start and end values, and some custom code that is called when the tween is evaluated. The custom code uses the 'small class' instance to:
- Reference whatever it is that's being tweened
- Update a current value for diagnostic use.
You can see how this works in the provided examples in the next few pages. It's pretty easy to extend the Tweener service.
Careful null-checking ensures that if a tile or GameObject is destroyed then the tween and/or its parent sequence is auto-killed. This is especially important when used with the TilePlus Layout system where tiles and prefabs are frequently added and destroyed (or restored to a pool).
Important
TpLibInit (Runtime/Resources/Tp) has a checkbox Tweener Safe Mode.
When checked, additional null checks are used in the Tweener. Advised to leave on.
- If this is not checked and a tweened object becomes null there can be an exception.
- Primary reason to uncheck this is for profiling.
Why Another Tweener?
But why create another Tweener in the first place? The Unity Asset store is full of free Tweeners on the Unity Asset Store and DemiGiant's DOTween is really great.
Here's why: none of them support natively tweening Tile sprites.
- You can do it in DOTween with Getters and Setters but DOTween can't handle tiles suddenly becoming null (if they're deleted) in the same way as it does for GameObjects.
- TilePlus Toolkit has a 'DOTween Adapter' which handles some of that, but it's inconvenient (and deprecated).
- DOTween is great but is way more complex than needed just for tiles.
TpTweener is non-generic and hard-coded, but can tween anything. It doesn't have a lot of frills such as the ability to pause tweens or start with a delay (easy to do with a sequence): low GC pressure and speed were the most important design considerations.
Unlike most other Tweeners, TweenerService Tweens and Sequences can be Awaited. Coroutine support is trivial, read about it here.
It's not supposed to be a substitute for DOTween but you can make it do almost anything that DOTWeen does with some custom code.
For Tiles
You use it by first obtaining a service handle from protected static TpTweener TweenerService property within any TPT tile code.
For example:
var tId = TweenerService.CreateTween(this,
                    Vector3.zero,
                    Color.red,
                    Matrix4x4.identity,
                    TpEasingFunction.Ease.Linear,
                    TpTweener.EaseTarget.Color,
                    1,
                    0,
                    Tpweener.LoopType.PingPong,
                    -1,
                    OnFinished);
This creates and starts a Color tween (EaseTarget.Color) with the final color being Color.red. The return value is a long which is used as an ID or 'handle.'
Although the Linear easing function is specified here, it's ALWAYS linear (Lerp) for Color tweens (the value is ignored for Color tweens).
The duration is one second. The -1 means that this tween repeats a PingPong tween until killed. When the tween is killed then the OnFinished callback is invoked. When you use PingPong for tweens, the duration value is used for each phase, hence, a two second duration for a tween running in ping-pong mode takes a total of 4 seconds to complete per loop.
The first four parameters are a reference to the tile itself (this), a Vector3 value, a Color value and a Matrix value. For the Vector3, Color, and Matrix parameters you just use the one you need for a particular tween.
Here, the Vector3 field is set to Vector3.zero and the Matrix field is set to Matrix4x4.identity because this is a Color tween.
The Vector3 field is used for tweens that use Vector3 values like Position, Rotation, or Scale.
The Matrix parameter is used for Matrix tweens which are a special tween variety.
Demos
TilePlus Extras has a TpTweener folder with a few example tiles and several scenes.
- TweenerFlexTile has fields for all possible types of tweens (except DELAY) and the fields which are shown change with what's being affected
- I.E., if the tween target is Color then a color picker is available, but for, say, position, a Vector3 field is shown.
- TweenSpecTile uses a TpTweenSpec asset to run a tween from that asset.
- TweenSpecSequenceTile uses all the entries from a TpTweenSpec asset to create and run a sequence. You can also check a toggle for interactive use. This allows you to tweak the TweenSpec asset while the Editor is playing: each time the sequence ends it re-loads from the asset rather than internally repeating the cached sequence.
These three tiles are part of the normal distribution in the Plugins folder but for many uses, in a real app, you'd run a tween as the result of a Message being sent to a tile or because of a Zone entry or exit.
However, the stock 'Tweening' tiles are great for your experimentation with this feature; especially TweenSpecSequenceTile.
To use tweens in the code for Event or Zone actions, check out the TpTweenerSubObject. SubObjects are scriptable objects which are attached as references to TpTileZoneActions or TpTileEventActions.
TpTweenerSubObject can be used by a TileAction to easily tween the tile's sprite when an event is handled (EventAction) or when a Zone is entered or exited (ZoneAction.)
This approach is used in the TileFabDemos/LayoutSystem demo.
Tweens and Sequences
Tweens
You can tween Position, Rotation, Scale, and Color of Tile sprites.
For color tweens you can also specify 'Constant A', which means that the alpha value doesn't change from the value found when the tween begins.
You can also tween the Tile's Matrix, or the Matrix with Color, or the Matrix with Color-Constant-A. These let you create a single tween that can change Position, Rotation, Scale and/or Color/Color-Constant-A, with optional fine-grained control over which parts of the transform change. For example, one could specify a Matrix tween where only position and scale are changed.
- Matrix tweens also allow specifying different Ease functions for Position, Rotation, and Scale.
- MatrixColor and ColorConstantA use Lerp for the Color tween.
- Color Tweens always Lerp
It's incredibly flexible, albeit a bit more work to set up.
Don't get confused: if you use one of the Matrix varieties, including those with Color, it's one tween. When the tween updates it can affect Postion, and/or Rotation, and/or Scale, and/or Color in one operation. It's not three or four tweens in parallel.
To that end, the TweenSpecSequenceTile has an interactive mode. In this mode, the sequence is forced to not loop. When the sequence completes, it restarts with a fresh set of value fom the Tween Spec asset. Hence, if you change values of this asset while the editor is Playing, such changes will be seen when the sequence restarts. As is true for project assets, the changes will remain after you exit play mode. It's a great way to play with sequences and Matrix-style tweens.
The tweener supports one-shot, looping, and ping-pong tweens. For looping tweens there's a loop count and as usual if the loop count is -1 the loop continues forever until cancelled or the tile is deleted.
Delay tweens can also be created, but they're only for sequences.
Sequences
A sequence can be created and tweens can be created with automatic adding to a sequence. Sequences do what you'd expect: run all the tweens in a list of tweens. Delay tweens can be added to a sequence. They don't tween anything, just time out. Since a callback can be issued each time the sequence changes to the next tween, a sequence of just Delay tweens can be used to create a simple sequencer.
Callbacks
Individual tweens have callbacks for each Update, on completion, and when a looping tween loops. Tweens are auto-deleted when their parent tile becomes null. Since a callback is issued to a tile and the tile is null in this case, the tween-ending callback is not issued.
Note that callbacks for each update can get extremely processor-intensive depending on how many tweens are running and what is done during execution of the callback. For example, if you have 100 tweens running then you'd get 100 callbacks every frame. Hence, these are recommended ONLY during development but there's no explicit restriction on this.
Note that while each callback provides a reference to the specific tween that caused the callback, most of the values in the instance are read-only properties so
- Do not hold a reference outside the local scope. These are pooled at at the end of the tween: it is returned to the pool and reset.
- You can't change anything except a "Diagnostics" property.
- You can't copy a tween and inject it back into the system.
Sequences have callbacks when complete and when the next tween in the sequence begins.
Sequences intercept the individual tween callbacks for the sequence's internal use but don't relay them to tiles.
Create a tween
There are four ways to create and run a tween.
- Use the Create methods
- CreateTween: create any sort of tween.
- CreateDelayTween: Don't tween anything, just wait. Sequences only.
- CreateTweenFromSpec: Use the TpTweenSpec asset to create tweens.
- TpTweenSpec.Tween are the individual specs in a list of specs in the asset.
- CreateGoTween: support for Rotation, Position, Scale, and Color tweens for GameObjects.
- This method supports custom tweens.
- See the next few pages for more information.
Create methods return a long integer which is the ID of the tween.
Tile Tweening
For tiles, tweens are relative: for example, if you tween position, the value provided as an endpoint is the CHANGE that you want and NOT the absolute position.
For example: Creating a tween that changes Position with an EndValue of Vector3(2.2,3.5,0) doesn't move the Tile's sprite to (2.2,3.5,0). It offsets the position by 2.2 units in the X direction and 3.5 units in the Y direction from the tile's position in the tilemap: it's relative to the tile.
So if the tile is at (0,0,0) for this example, the tile's sprite would move to 2.2,3.5,0. If the tile were at (10,15,0) then the tile's sprite moves to (10+2.2, 15+3.5, 0+0) = (12.2,18.5,0).
And that makes a lot of sense in this context: the tile itself doesn't move while you're tweening its color or transform. You're actually affecting the Tilemap and how it displays the tile's sprite. Nothing in the tile's data changes at all.
Similarly, if affecting rotation, the change is relative to the existing rotation of the tile's sprite, and if affecting scale, the change is relative to the existing scale of the tile's sprite.
Color tweens are a little different: you're tweening between the color when the tween is launched and an absolute end color specified in the CreateTween method call.
GameObject Tweening
GameObject tweens are normally absolute: for example, if you tween position you provide the initial position and the end position. If you don't specify an initial position, the Tweener uses the current position as the initial position and adjusts the end position, turning the tween into a 'relative' tween.
GameObject tweens have different Create methods but the workflow is similar.
- GameObject tweens can be created from a project asset which defines the tween parameters.
- GameObject tweens can be in sequences.
- Adding GameObject tweens to sequences with Tile tweens or vice versa will cause the tween to be rejected.
See the next section for more information about GameObject tweening.
CreateTweenFromSpec
In a practical application, CreateTweenFromSpec is the most useful. Most likely you'll have several tweens that you'll use repeatedly for many tiles. Note that this doesn't support GameObject tweens.
Rather than have individual tiles have all the fields for specifying tweens (as in TweenTileExample) you use a Tween specification from a TpTweenSpec asset; this can be seen in TweenTileExample2.
You can also use specs from this asset when creating sequences.
Ignoring CreateDelayTween, the Create methods launch the tween immediately. If you need a delay, create a two-element sequence with a DELAY as the first tween in the sequence.
Operations on Tweens
Most of these use the id or 'handle' returned from the Create methods.
-
A running tween can be cancelled with KillTween.
-
Get a reference to a running tween with GetTween. However, since these are pooled items, do not hold this reference outside a local scope or you WILL get memory leaks.
-
Get an unpooled copy of a running tween with CopyTweener. Note that this is NOT pooled but is a COPY of the running tween at that point in time.
-
Get the ToString of a running tween without affecting the instance with GetTweenInfo.
-
Tweens are auto-deleted if their parent tile or the parent tile's Tilemap become null.
Create a sequence.
- Use CreateSequence, add tweens using a Create method, and use PlaySequence to run the sequence.
- Note that you use one of the input parameters to CreateSequence to indicate if this is a sequence of Tile tweens or of GameObject tweens: they can't be mixed in the same sequence.
- Use CreateSequenceFromSpec and use PlaySequence to run the sequence.
CreateSequenceFromSpec uses the tween specifications in a TpTweenSpec asset and makes a sequence out of the tweens.
- An array of indices into the List of Tweens in a TpTweenSpec asset can be used if you want only specific tweens from the list to be used.
- Don't do this unless really needed: if you change the TpTweenSpec asset later you have to update the array.
- If the array is null (the default) then the entire list of Tweens is used.
CreateSequence and CreateSequenceFromSpec return a long integer which is the ID of the sequence.
If you're not using CreateSequenceFromSpec:
-
Create a sequence using CreateSequence.
-
Use CreateTween or CreateDelayTween and supply the ID of the sequence in the method call.
- When the sequence ID is supplied, the created tween is NOT immediately run, but its data structure (a TpTween instance) is added to the sequence.
-
Use PlaySequence to start the sequence.
Operations on Sequences
Just like Tweens, the id/handle retrurned from the Create methods for sequences is used as an identifier for the following:
- Delete an unused sequence with DeletePendingSequence.
- Kill a running sequence with (wait for it...) KillRunningSequence.
- Sequences are auto-deleted if their parent tile or the parent tile's Tilemap become null.
Reset
Reset the tweener with ResetTweener and the Sequencer with ResetSequencer. Both release all active tweens and those which are included in the sequences' lists of tweens.
Observe
- Use the Tween Monitor (menu item). This opens an Editor window which displays all of the information about running tweens and sequences.
- If you have many tweens running this can slow down your game.
- Use the Services Inspector (menu item). This shows all running services (including this one).
Tweener and GC
When you tween the tile sprite the Tilemap will execute one or more callbacks, with allocations for each one. For example, the Tween demo called "StressTest" runs about 400 tweens and generates about 60 Kb of garbage every Update. Of course this is an extreme example but it's important to bear in mind.
- This is entirely a Tilemap phenomenon.
Tweening GameObjects
Intro
TpTweener can also be used to tween GameObjects' Position, Rotation, Scale, or Color; or to tween a GameObject's position along a Bezier path.
Unlike tweens for TPT tiles, there's no equivalent 'Matrix' tween that can tween all of these at once.
CreateGoTween is the most basic entry point for GameObject tweening:
public long CreateGoTween(GameObject?            gameObject,
                          Action<TpTween,float>? gameObjectAction,
                          TpEasingFunction.Ease    ease,
                          float                    duration,
                          long                     sequenceId         = 0L,
                          LoopType                 loopType           = LoopType.None,
                          int                      numLoops           = -1,
                          Action<TpTween>?         onFinished         = null,
                          Action<TpTween, float>?  onRewindOrPingPong = null,
                          Action<TpTween>?         onLoopEnded        = null,
                          Action<TpTween, float>?  onUpdate           = null )
This is very flexible: provide a target GameObject and an Action to modify same. The Action gets the Tween instance and a 0 - 1F progress value. The remaining parameters are the same as for TPT tile tweens: ease function, duration, etc.
One can also create a sequence and add GameObject tweens to the sequence just like with TPT tile tweens. However, one cannot mix GameObject and TPT tile tweens in the same sequence: you'll get a 0L return value, indicating an error.
There are also two higher-level methods with preset Actions: GameObjectTrs and GameObjectColor
GameObjectTrs allows transform-related GameObject tweens for the most common use: supply an enum value indicating which component (position, rotation, scale) to affect.
The startValue parameter is nullable. If this is null when the method is invoked then the GameObject's transform.position, transform.rotation, or transform.scale is used for startValue and this obtained value is added to the endValue: that is, the tween is 'relative'.
For example, if:
startValue== nullendValue= Vector3(5,6,7)- the GameObject's transform.position was (3,4,5)
Then internally:
startValuebecomes (3,4,5) (the tranform.position from the GameObject)endValuebecomes (5,6,7) + (3,4,5).- This can produce strange results when tweening rotation or scale.
- Another way to have greater control is to always supply the startValue but make the tween 'relative' by modifying endValue yourself before calling the method.
If startValue isn't null then the tween is absolute:
- If the current position, rotation, or scale doesn't match the value of
startValuethen the current position, rotation, or scale becomesstartValue- For example, in the case of position, the GameObject's position will instantly change when the tween starts.
endValueisn't changed.
public long GameObjectTrs(GoEaseTrsTarget trsEaseTarget,
                          GameObject              go,
                          Vector3?                startValue,
                          Vector3                 endValue,
                          float                   duration,
                          TpEasingFunction.Ease   ease,
                          long                    sequenceId         = 0L,
                          LoopType                loopType           = LoopType.None,
                          int                     numLoops           = -1,
                          Action<TpTween>?        onFinished         = null,
                          Action<TpTween, float>? onRewindOrPingPong = null,
                          Action<TpTween>?        onLoopEnded        = null,
                          Action<TpTween, float>? onUpdate           = null)
GameObjectColor is for color tweening. The startValue parameter is evaluated in the same way: use the value if provided but if null use the current color value.
This method accomodates SpriteRenderers and Renderers. It will use the first one it finds in the GameObject or its children.
public long GameObjectColor(GameObject              go,
                            Color?                startValue,
                            Color                 endValue,
                            float                   duration,
                            TpEasingFunction.Ease   ease,
                            long                    sequenceId         = 0L,
                            LoopType                loopType           = LoopType.None,
                            int                     numLoops           = -1,
                            Action<TpTween>?        onFinished         = null,
                            Action<TpTween, float>? onRewindOrPingPong = null,
                            Action<TpTween>?        onLoopEnded        = null,
                            Action<TpTween, float>? onUpdate           = null)
The Tween instance variables for GameObject-related tweens have public property accessors rather than internal so you can modify them just after creation (as seen in the code for these two methods). Modifying these during the execution of a tween is unsupported and may cause exceptions or other issues.
Like all other Tween instances, GameObject tween instances are pooled. If you hold a reference to a tween instance it will become invalid at some point and may interfere with the pooling operation.
Creating GameObject Tweens from an asset
Similar to TPT tile tweens, you can use an asset TpGoTweenSpec to create GameObject tweens or Sequences of same.
There are corresponding methods:
- CreatGoTweenFromSpec: use an individual GameObject tween spec from the list of these in the asset.
- CreateSequenceFromGoSpec: use all or some of the asset's GameObject tween specs to create a sequence.
NOTE: since the 'spec' is a project asset you can't modify its fields without affecting everything that uses this 'spec'. If you want to modify fields in a spec prior to sending it to the Create method you need to clone it first and then make changes to the cloned spec's fields. Then send the cloned instance to the Create method.
NOTE: you can add Delay tweens to the 'spec'. However, as usual Delay tweens can only be used in sequences.
Other uses
One can create a tween using CreateGoTween with an Action that modifies other values besides the transform or color.
For example, when using GameObjectTrs to create a Position, Rotation, or Scale GameObject tween, the Action supplied to CreateGoTween actually performs the calculations and transform changes. Instead, you can use the progress value passed to the Action to change, say, the intensity of a Light.
Note that if you just want a periodic timer, use TpLib.InvokeRepeatingUntil instead. It's way more efficient.
An example custom tween is shown below. This is built-in to the Tweener.
There's an example of a custom Tween affecting the character size of a TextMesh. Find it in the Demos folder, and see the next page for a deeper dive.
Bezier Curve Position Tweening
public long GameObjectPositionBezierTween(GameObject              go,
                                          Vector3[] points,
                                          float                   duration,
                                          long                    sequenceId             = 0L,
                                          LoopType                loopType               = LoopType.None
                                          int                     numLoops               = -1,
                                          Action<TpTween>?        onFinished             = null,
                                          Action<TpTween, float>? onRewindOrPingPong     = null,
                                          Action<TpTween>?        onLoopEnded            = null,
                                          Action<TpTween, float>? onUpdate               = null)
This is similar to GameObjectTrs. Provide a set of points and the GameObject's local position will tween between these points.
- Inclusion in sequences is allowed.
- points[0] is the start position.
- If not the current position of the GameObject then the GameObject will immediately move there.
- points[N] is the end position.
- The size of the points array must be between 2 and 16.
- LoopType.Loop means that the GameObject will jump back from points[N] to points[0] before repeating.
- LoopType.PingPong means that the GameObject will tween back to points[0] from points[N] when repeating.
Custom Tweening
The Tween class' properties are mostly {get; internal set;} so you can't make changes. However, there are some deliberately-exposed properties that you can use for custom tweening.
/// <summary>
/// The GameObject reference for GameObject tweens
/// </summary>
public GameObject? GameObject { get; set; }

/// <summary>
/// The Action for GameObject tweening
/// </summary>
public Action<TpTween,float>? GameObjectAction { get; set; }

/// <summary>
/// Custom user data, example: Used for Bezier curve evaluation.
/// </summary>
public object? UserData { get; set; }

/// <summary>
/// Copy of original user data for rewinds
/// </summary>
public object? OriginalUserData { get; set; }

/// <summary>
/// The Renderer for Color Tweens
/// </summary>
public Renderer? Renderer { get; set; }

/// <summary>
/// The SpriteRenderer for Color tweens
/// </summary>
public SpriteRenderer? SpriteRenderer { get; set; }

/// <summary>
/// TRUE for GameObject tweens using the SpriteRenderer
/// </summary>
public bool IsSpriteRenderer { get; set; }
These exposed properties let you create custom tweens that don't use the built-in actions. Care must be taken NEVER EVER change any of these once a tween is running.
The field and property values of whatever you use for UserData are modified during the custom tween's execution. The UserData class' ToString method is used to show information in the Services Inspector and the Tween Monitor windows. You can see how this custom data is used below.
As mentioned earlier, tweens created by one of the Create tween methods launch immediately. However, immediately means the next Update. So a new tween can change these public properties right after creation.
Here's an example of a Component that can be attached to a legacy TextMesh component to tween the character size. Obviously this same approach can be used to tween anything that takes a float value. In essence, this approach is similar to using DOTween's 'Getters' and 'Setters' for specialized tweens.
Follow along: additional comments in CAPS
[RequireComponent(typeof(TextMesh))]
public class TextFontSizeTweenExample : MonoBehaviour
{
   private class ActionData
   {
      public float StartValue { get; set; } = 0;   //THE START VALUE
      public float EndValue   { get; set; } = 1;   //THE END VALUE

      public float CurrentValue { get; set; }      //CURRENT VALUE

      public TextMesh? TextMesh { get; set; } = null;   //TEXTMESH REFERENCE

      /// <inheritdoc />
      public override string ToString()
      {
          return $"Char Size: Current: {CurrentValue}";
      }
   }


    /// <summary>
    /// Min
    /// </summary>
    [Tooltip("Minimum Character size")]
    public float m_MinimumCharSize = 1f;

    /// <summary>
    /// Max
    /// </summary>
    [Tooltip("Maximum Character size")]
    public float m_MaximumCharSize = 1f;

    /// <summary>
    /// duration
    /// </summary>
    [Tooltip("tween duration")]
    public float m_Duration = 2f;

    void Start()
    {
        var textMesh = GetComponent<TextMesh>();
        if (!textMesh)
            return;

        //GET THE TWEENER SERVICE HANDLE
        var tweener          = TpServiceManager.GetServiceOfType<TpTweener>();
        if (!tweener)
            return;

        //CREATE AND INIT AN INSTANCE OF OUR CUSTOM DATA
        var ld = new ActionData
                 {
                     StartValue   = m_MinimumCharSize,
                     EndValue     = m_MaximumCharSize,
                     TextMesh     = textMesh,
                     CurrentValue = textMesh.characterSize
                 };

        //Create a custom GameObject tween with our own custom GameObjectAction.
        var id = tweener.CreateGoTween(gameObject,
                                       GameObjectAction,
                                       TpEasingFunction.Ease.CustomEase, //this enum value causes GameObjectAction to be invoked.
                                       m_Duration,
                                       0,
                                       TpTweener.LoopType.PingPong,
                                       -1);


        var tween = tweener.GetTween(id); //note that this would be incorrect if the tween was part of a sequence.
        //If we have a sequence ID use GetTweenFromSequence.
        //If it's not known then generally use:
        //   tween = sequenceId != 0 ? GetTweenFromSequence(sequenceId, id) : GetTween(id);

        if (tween == null)
            return;

        //ADD CUSTOM DATA REFERENCES TO THE TWEEN
        //Add our data to the tween, it's sent to the Action below.
        tween.UserData                = ld;
        tween.OriginalUserData        = ld;
        return;

        //This action does exactly the same thing as built in actions
        //but we use the User data items.
        //The Tweener handles looping, etc.
        //One can hook into the OnRewindOrPingPong to customize this to some extent.
        void GameObjectAction(TpTween t, float progress)
        {
            //unboxing
            if(t.UserData is not ActionData d || d.TextMesh == null)
                return;
            //get start and end values for Lerp
            var sValue = t.Forward ? d.StartValue : d.EndValue;
            var eValue = t.Forward ? d.EndValue : d.StartValue;

            //compute a new value
            var newValue = Mathf.Lerp(sValue, eValue, progress);

            d.CurrentValue = newValue;
            d.TextMesh.characterSize  = newValue;
            //THE TARGET FOR THIS TWEENED VALUE CAN BE ANYTHING THAT TAKES A FLOAT, JUST CHANGE THE ACTIONDATA CLASS.
        }
    }


}
Other examples
See the TilePlusExtras/SimpleDemos/TpTweener/GameObjectExamples project folder.
Future Expansions
Additional built-in tweens for various Unity 'things' will be added over time. But they are really easy to create on your own, as seen here.
Coroutines and Awaitables
Coroutines
TilePlus generally uses Awaitables rather than coroutines. However, it's easy to make a coroutine wait for a Tween or Sequence to complete:
var tId = TweenerService.CreateTween(.....);

yield return new WaitUntil(() => !TweenerService.IsRunningTween(tId));
Here we just poll TweenerService to see if the tween we created is still running. The Coroutine waits until IsRunningTween returns false.
However, if all you want is to know when the tween or sequence completes, just use one of the 'Finished' callbacks and save the coroutine overhead.
Important: You'll note below that Awaitable tweens and sequences can't have infinite loop counts and will fail if the loop count value passed to the create method is < 0. A similar situation exists for using Coroutines: if the loop count is infinite then the coroutine won't ever terminate. However, you need to handle this yourself or wrap the create method so that that circumstance is avoided.
Awaitable
Tweens and Sequences can be wrapped into Awaitable methods. The main restriction is that one cannot have Awaitable tweens or sequences with infinite loop counts (i.e., < 0).
Examples of how to use this feature are part of the TweenerFlex and TweenSpecSequence tiles.
Here's a bit of the code for the TweenerFlex tile:
private async Awaitable WaitForCompletion(long tId)
{
    if (m_LoopCount < 0)
    {
        //NOTE: The TweenAsAwaitable call below will fail if the loop count is < 0
        Debug.Log("infinite loop count tweens should not be awaited!");
        return;
    }
    var at = TweenerService.TweenAsAwaitable(tId);
    if (at == null)
        return;
    //The elapsed time calculation is obviously not required.
    var now = Time.time;
    var s   = TweenerService.GetTweenInfo(tId);

    await at;
    Debug.Log($"Awaitable tween complete, ET: {Time.time-now}. Id = {tId}\n{s}");
}
A simpler version (untested) could be:
private async Awaitable WaitForCompletion(long tId)
{
    var at = TweenerService.TweenAsAwaitable(tId);
    if (at == null)
        return;
    await at;
}
Since it's almost impossible for the TweenerService to be null, one could do this:
private async Awaitable WaitForCompletion(long tId)
{
    await TweenerService.TweenAsAwaitable(tId);
}
Or inline that type of statement in any async method that needs it.
It's pretty simple to use Awaitable tweens. Awaitable sequences are very similar, but you'll note that the Awaitable method is cancelled if the Sequence can't launch for some reason.
TpLibTasks has this helper method for Awaitables:
public static async Awaitable WhenAll(List<Awaitable> awaitables)
Using this method one can run a number of tweens and Await for them ALL to complete.
Version 6 Improvements
Tweens can be paused with PauseTween. Pause state can be queried with TweenIsPaused.
RUNNING sequences can be paused with PauseSequence. Pause state can be queried with SequenceIsPaused.
PENDING sequence instances (live but not running yet ie PlaySequence not used) can be obtained with GetPendingSequence.
The TweenMonitor has been updated to show paused state for Tweens and sequences.
TpTweenerFlex and TpTweenerSeq tiles have a new button that can be used to pause a tile or sequence.
- These tiles also have a new info field in the inspector which shows running or paused states.
Sequences have an added 'UserData' property for adding an arbitrary object.
PlaySequence can have a UnityEngine.Object as the parent, not just a TPT tile.
The IsRunningSequence property can be used to determine if a sequence is running.
A new callback is available for tweens: Finalize. This is an Action internally-called by the Tweener just before OnFinished is invoked.
- Can be used by a custom tween for cleanup such as restoring the original position of a GO, see ShakeGameObject
Added new special GameObject tweens:
- ShakeGameObject
- SpriteRendererAlphaTween
- SpriteRendererShaderTween
- Awaitable MoveGameObject
- Generic tweens for any Vector3 or float value: provide a Func for 'Get' and an Action for 'Set'.
Runtime Utilities
Various Utilities
Utilities
Various Utilities
PerkinsStringUtils
This small library has one function: Word Wrapping for the UiAsciiString Tile. Attribution in C# source and in "Third Party Notices" in the Asset Store package.
EditorBridge
This provides Editor support for Tiles and other code which otherwise would not be able to access code in an Editor folder. Doesn't exist in a build.
TileUtils
TpTileUtils is a set of utility/convenience functions which are very useful when dealing with tiles and Tilemaps.
Transform Utilities
These can be used to get or set tilemap sprite transform components and colors.
BoundsInt Utilities
BoundsInts are used throughout Tilemap-land and inside the TilePlus system.
4- and 8-way Position Utilities
Given a tile's position, there are either four or 8 possible adjacent locations.
-
Up, Right, Down, Left
-
Up, RightUp, Right, RightDown, Down, LeftDown, Left, LeftUp
These positions are encoded into Enums: the values are in clockwise order.
Utilities in this group can be used to obtain adjacent, opposite, or perpendicular positions.
Others
Simple block deletions, tile sprite utilities, and RectInt to BoundsInt conversions.
Diagnostics
Diagnostic tools for TilePlus
System Information
The Tools/TilePlus/System Info menu command opens UIElements inspector that has a multitude of instrumented data from various parts of the TilePlus system.
Please note that this window refreshes constantly, even in Play mode, but only when the window is visisble. Depending on what's being displayed it can even slow down your system in Play mode.
The image below shows a typical appearance:
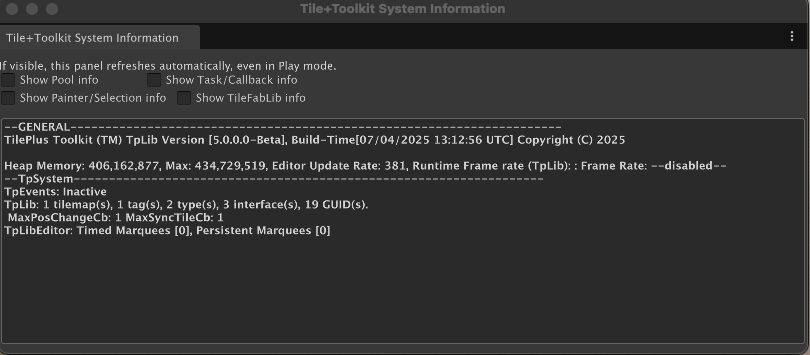
Each checkbox controls the display of additional information:
- Show Pool Info: status and size of TpLib internal pools.
- Show Task/Callback Info: status of TpLib's internal event/callback queues and what sort of Update (Awaitable or PlayerLoop) is in use.
- When checked, two more buttons appear:
- Details: a complete list of all of the running tasks. If there are a lot of them it can affect editor performance.
- Dump Tasks: the same information as Details is snapshotted and saved to a file. Works even if the Details checkbox is unchecked.
- When checked, two more buttons appear:
- Show Painter/Selection Info: internal state of TilePlus Painter.
- Show TileFabLib Info: internal state of the Layout system.
The info value in the task details section is set by the caller to TpLib.DelayedCallback. In this example, these info values have INV_REP prepended which means that the timer function InvokeRepeatingUntil was used. See the TpLib section for more info (near the bottom of the page).
Services Inspector
The Services Inspector is a UIElements-based window that can be opened with the Tools/TilePlus/Services Inspector menu item.
If you open this window in Unity's Edit mode it'll look empty. That's because Services (e.g., Tweener, Spawner, etc) don't run in Edit mode.
Here's an example of how it looks in Play mode for the Layout demo.
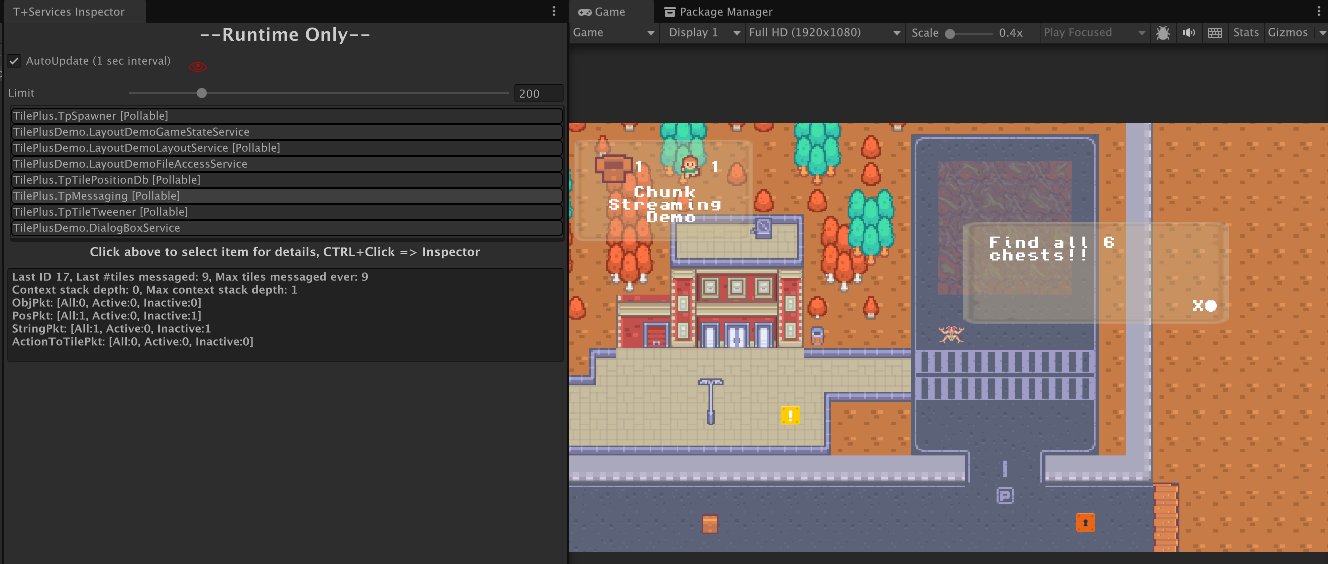
Note that the dialog box is open and the DialogBox service shows up in the list of Services. When you click the X button in the dialog you'd see the Dialog Box Service disappear.
That's because this tool automatically adds and deletes services from the list as they start running or are terminated.
The AutoUpdate checkbox auto-refreshes the details list every second.
The Limit slider can be used to limit how many lines appear in the bottom section of the window. Some services, the Tweener for example, can emit thousands of lines if you have many tweens running simultaneously.
[Pollable] on a services's line in the list means that the service can be polled for auto-refresh. Not all services support this: it's a design decision.
For example: here's the information shown by the LayoutDemo's Layout service:
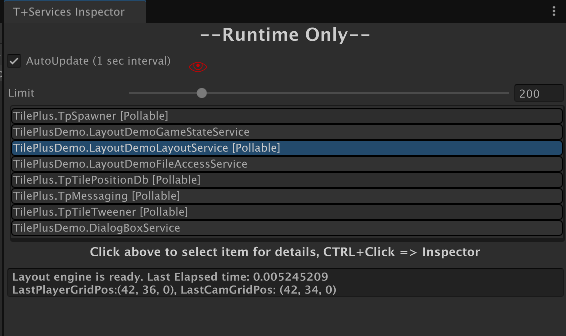
It just shows the most recent camera and Player positions as well as the elapsed time for the most recent Layout pass; about 5 mSec in this case.
This window is most useful when
- Debugging
- Developing new Services
Note that the text shown in the details section may not look exactly like what's shown in these images.
Tween Monitor
The Tween monitor displays information about all running tweens. It's handy to use when creating tweens because you can see every detail about the tween and its progress.
If there are many tweens running at the same time this window WILL affect performance and can cause stuttering.
Here's an example of a single tween:
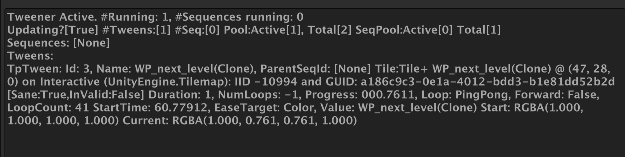
Basic Information about the Tweener itself includes:
- How many Tweens and Sequences are running.
- The size of the 'object' pools for Tweens and Sequences.
This is followed by a list of the 'ToString' methods of each Tween and Sequence.
Let's break up this Tween status string to see what it means:
-
Tween ID and the name of its parent TPT tile.
- If the name of a tween or sequence starts with
[GO]then it's a GameObject tween (or sequence) and not a TPT tile tween.
- If the name of a tween or sequence starts with
-
If the Tween is part of a sequence it's sequence ID is next.
-
The name, location, and Tilemap for the parent TPT tile and the tile's Instance ID and GUID.
-
Sanity Informaition: Sane means that the important variables haven't suddenly become null.
- A TPT tile can be deleted during a tween so this is important!
- Invalid true means that the tween is going to be deleted:
- It's complete
- It's become 'Unsane'
-
The Tween's Duration (how long it takes to complete)
-
How many loops.
-
The progress: ranges between 0 and 1.
-
What type of loop?
-
If Ping-Pong is the loop in the forward (ping) or backward (pong) part of the loop?
-
How many loops have completed.
-
What time the Tween started.
-
What's being tweened (EaseTarget)
-
Starting and current values
This is a lot of information but it's very structured and easy to understand after a while.
Position DB Dump
The command is not available unless the Editor is in Play mode.
The output is similar to what you'd see in the Services Inspector when viewing the Position DB service. That list can become longer than the 200 item maximum in the Services Inspector, so this command lets you see everything that the PositionDb is doing.
Here's an example 'dump':
TilePositionDB Data Dump on 7/5/2025 6:15:33 PM UTC, [DEBUG MODE? False]
[UpdateLimit:2147483647]
[QueueLen:0, PosHashSize:0]  [Num Maps:1]
Monitored Maps:

********Normal tiles *************************
********Tilemap: Tilemap***************************************
(12, -1, 0)
(13, -1, 0)
(14, -1, 0)
(12, 0, 0)
(13, 0, 0)
(14, 0, 0)
(12, 1, 0)
(13, 1, 0)
(14, 1, 0)
----->>>>>Total: 9<--------

********Enlarged sprites [9]********************************
Map: Tilemap, Position: (5, -1, 0) : Center: (5.50, -0.50, 0.00), Extents: (0.60, 0.60, 0.50)
Map: Tilemap, Position: (6, -1, 0) : Center: (6.50, -0.50, 0.00), Extents: (0.60, 0.60, 0.50)
Map: Tilemap, Position: (7, -1, 0) : Center: (7.50, -0.50, 0.00), Extents: (0.60, 0.60, 0.50)
Map: Tilemap, Position: (5, 0, 0) : Center: (5.50, 0.50, 0.00), Extents: (0.60, 0.60, 0.50)
Map: Tilemap, Position: (6, 0, 0) : Center: (6.50, 0.50, 0.00), Extents: (0.60, 0.60, 0.50)
Map: Tilemap, Position: (7, 0, 0) : Center: (7.50, 0.50, 0.00), Extents: (0.60, 0.60, 0.50)
Map: Tilemap, Position: (5, 1, 0) : Center: (5.50, 1.50, 0.00), Extents: (0.60, 0.60, 0.50)
Map: Tilemap, Position: (6, 1, 0) : Center: (6.50, 1.50, 0.00), Extents: (0.60, 0.60, 0.50)
Map: Tilemap, Position: (7, 1, 0) : Center: (7.50, 1.50, 0.00), Extents: (0.60, 0.60, 0.50)
As you can see, tiles with enlarged sprites are separate from those which have sprites of one unit or less.
- UpdateLimit is the # of positionDb updates per PositionDb update.
- If there are many tiles in the queue the update can take too long.
- The default is
int.MaxValue
- QueueLen and PosHashSize show the state of the updating queue.
- Recall that while tile deletions are handled immediately, additions are processed in the Services' Update method.
- This is followed by a list of Tilemaps:
- Each Tilemap entry shows
- Normal (scaled <= 1) tiles.
- Scaled (scaled > 1) tiles.
- Each Tilemap entry shows
Please see PositionDB for more information.
TileFabs and Bundles
Introduction
You probably work with Tilemaps that are part of a scene.
This is the easiest way to use TilePlus tiles: just paint and edit them to do what you want.
This long section of this book attempts to progress from the lowest-level concepts through those that are higher-level (such as Monobehaviours). What this means to you is that there's a lot of exposition coming up. Have patience!
Saved with a Scene
When you paint a TPT tile it’s saved with the scene and will be present in a build.
- The TPT tile in the scene is not affected by changes to the asset in the Project folder.
- The asset in the Project folder is not affected by changes to the tile in the scene.
If you paint over the TPT tile, it’s deleted from the scene and will no longer be saved. Essentially, the TPT tile becomes like any other Object in the scene.
Once you edit the painted TPT tile in-scene you can save it as a new tile asset, drag that into the palette or Painter’s Favorites list, and paint it. This is especially useful when prototyping or for creating backups.
This is the easiest way to make the most of this new type of tile. Remaining in the scene, you can have references to Scene Objects like GameObjects, Components, etc. in your tile scripts. Once a tile is painted, you can select it with the Palette, edit it in the Tile+Brush Selection Inspector or Tile+Painter, and drag references such as GameObjects into the painted TPT tile fields. Think of it as a Tile promoted to a GameObject, just without a Transform component. That’s close enough for rock and roll.
Scene References
When a TPT tile is in the Scene, it can have references to other Objects in the Scene. For example, you can have a reference to a GameObject and access its components for scripting, right within the TPT tile’s code if you like.
BUT: what if you want to load/unload tiles as your camera moves around. Prefabs don't make sense for that sort of use. Solution: Use the TileFab system. Tilefabs allow preserving one or more Tilemaps and any child prefabs into a position-independent archive format.
TileFabs are the key technology component underlying the TilePlus layout system, which streams chunks of tiles in and out of the scene as the Camera moves.
Why Not Make Prefabs?
It's a bad solution
When you create a prefab by dragging a Grid with child Tilemaps to the Project folder, all references to Objects in the Scene are lost just like any other Prefab that you might create. This includes all TPT tiles. If you were to open the Prefab, the locations where TPT tiles had been placed would be replaced with pink or other oddly colored tiles.
TilePlus Won't Let You
If you mouse-drag a Tilemap or any GameObject that has Tilemaps as child GameObjects into a project folder to create a prefab, and there are any TPT tiles, the system will warn you in the console and will unlink the items you dragged from when you created this prefab so that the scene Tilemaps won’t be corrupted. You may as well delete the prefab that you created as it isn’t useful.
You Probably Don’t Want Tilemap Prefabs
They’re not really that useful except in limited circumstances. Each time you drag in a Tilemap prefab, it instantiates an entirely new Grid with Tilemap children. This is true for any Tilemap prefab, even one created normally by dragging a Grid GameObject from a scene to a project folder.
What’s more useful is being able to load tiles in groups to existing Tilemaps. You may already do this with Tilemap block move methods and so on.
TilePlus’ TileFabs and Bundles handle all this for you and are easy to create as you'll see.
TileFabs and Bundle assets are not Prefabs!
Please note that the TileFab and Bundle assets are NOT prefabs: you can’t drag either of these into a scene.
However, a TileFab archives the original source Tilemap names and/or tags.
The TilePlus library functions for placing TileFabs in a scene expects to find these same names and/or tags to place the multiple archived Tilemaps correctly. That is, which Bundle assets referenced by a TileFab should be ‘painted’ on to which Tilemap. It can’t guess.
Bundling Workflow
To make a compatible prefab:
OR
- Select a Grid with child Tilemaps or a single Tilemap,
- Make a Grid Selection using the Tile Palette or Tile+Painter.
Then use the Hierarchy window’s TilePlus Bundler context-menu command or the main menu’s Tools/TilePlus/Archive Tilemaps command.
If a Grid or a single Tilemap is selected, then all the tiles and child Prefabs of the Tilemaps are bundled.
If a Grid Selection exists, you’ll be prompted to confirm that you want to use the Grid Selection to limit which tiles and Prefabs are bundled. If so, ALL tiles and Prefabs in all of the Grid's child Tilemap(s) within the selection are archived.
This command archives Tilemap contents into one or more TpTileBundle assets (Bundles, from now on).
These are the two modes of operation:
- Archive a single selected Tilemap into a Bundle asset along with a TileFab asset.
- Archive a single selected Grid and its child Tilemaps into multiple Bundle assets along with a TileFab asset.
To be clear: You can only archive a Grid with child Tilemaps and any Prefabs parented to the Tilemaps. If you try to use a multiple selection, or any Grid or Tilemap are in or part of a prefab, then the process will complain and quit.
The bundler generally follows this process:
- Is the Grid or Tilemap in a prefab or are you editing in a preview scene? Start again.
- If the selection was not a grid, you’re asked if you want to continue. No: Start again
- If the selection isn’t a grid, then you can’t make a prefab, just archives.
- For each tilemap:
- Is the Tilemap part of a Prefab? Start again.
- Select destination folder. Advice: use a different folder each time!
- Is the folder the Assets folder? Start again.
- You can provide a 'base' name for the generated assets.
- If the selection was a single Tilemap, you’re asked if you want to add any Prefab instances which are children of the Tilemap GameObject.
It’s simpler than that sounds! The choices are presented to you via several dialog boxes and file pickers.
With this information, the bundler creates the TpTileBundle assets: one for each Tilemap, then adds all the TPT tiles to the asset. For Unity tiles, it preserves the information in the Tilemap for each tile (color, transform matrix, and flags) as well as a reference to the original Unity tile asset.
If you elect to archive prefabs, please note that references to the prefab assets are archived; new copies of the prefabs aren’t created. This means that if you delete one of these prefabs then the reference is null, and the prefab won’t be available when the TpTileBundle asset is used.
Note that GameObjects that are instantiated because the Tiles’ GameObject field caused the Tile to instance a GameObject into the scene are not archived. When the TpTileBundle asset is painted (programmatically or via the Tile+Painter) the Tiles re-create the prefab in the scene for you.
A TileFab asset is also created in the same folder. This asset has references to all the new TpTileBundle assets and is used with the TpAnimZoneLoader tile or for loading using methods in the TileFabLib library.
TilePlus tiles archived into Bundles have a special status: they're 'Locked'. This locked status is a hint to Tile+Painter and the Tile+Brush to use particular care when it encounters TilePlus tiles in that state. Normally, such tiles are either cloned prior to placing them onto a Tilemap in a live scene or they clone themselves when placed. So this Locked state is usually invisible to you as a user.
Details
As mentioned before, TpTileBundle (Bundle) assets are used to archive all or a section of a Tilemap. TpTileFab (TileFab) assets combine references to several Bundles, creating an archive of one or more Tilemaps; a multiple-Tilemap prefab of a sort.
In Bundles, cloned tiles in the scene are changed to Locked tiles and are stored as sub-objects of the Bundle asset. In other words, the cloned tiles are changed to Project folder assets and stored as part of the Bundle asset.
When normal Unity tiles are archived, just their transform, color, and flags settings are preserved, along with a reference to the tile asset in the project folder.
Prefabs which are children of the selected Tilemaps are archived by reference only: no asset copying occurs.
Note that Prefabs can be bundled from a Scene hierarchy or from a Project folder. This implies differences in how the transform information is archived:
- When bundling Prefabs from a scene, the stored rotation and scale are the rotation and localScale of the root GameObject of the Prefab in the scene hierarchy.
- When bundling Prefabs from a project folder, the stored rotation and scale are the rotation and lossyScale of the root GameObject of the Prefab in the Project folder.
It’s encouraged to use a different folder each time you create Bundles or TileFabs, although this isn’t enforced.
Associated Components
You can use the TpBundleLoader component to load a single Bundle to a Tilemap. Place the component on any compatible (same layout, etc.) Tilemap’s GameObject and drag in the Bundle asset reference. Switch to Play mode and loading will happen automatically. Or you can click the Load button if you wish to test or perhaps restore a Tilemap.
If you maintain references to several Archive assets in your Scene (to ensure availability in a build) then you can change the asset reference in TilePlusLoader and call the Load method of the component.
Similarly, you can use the TpFabLoader component to load a TileFab.
Here are two other ways to use TileFabs, plus there’s a lot more about them as you read on in this section.
- Paint a TileFab (or a single Bundle) using Tile+Painter. This is discussed in the Painter documentation.
- Load all or some of the Bundles in a TileFab on to different Tilemaps in your scene at runtime.
The second use listed above is particularly useful. Coders can use methods in TileFabLib to load one or more Tilemap sections dynamically from Bundles and TileFabs. For example, the TpAnimZoneLoader tile can be used to specify TileFabs to load when an entity passes into or out of a trigger zone. The TileFabLib static library has comprehensive methods to load TileFabs and Bundles, and enables higher-level elements such as ZoneManagers and ZoneLayout, the key elements of the Layout (Chunking) system.
The Bundling Process
When you use the Bundle Tilemaps menu command, the bundling process asks you some questions, as outlined in the User Guide. Using this information, the bundler creates the TpTileBundle (Archive) assets: one for each Tilemap. Then creates copies of all the TPT tiles and adds them to the asset, saves any asset references to Unity tiles, and saves all the information required to rebuild a Tilemap, including position, transform, color, and flags.
Since the values for transform, color, and flags are often the same for large numbers of tiles (especially so for Unity tiles), these are stored in indexed look-up tables.
After all the Bundle assets are created, a TileFab is created in the same folder. References to the Bundle assets are stored in this new asset.
If there are any prefabs as children of the Grid or Tilemap GameObjects then the Project folder references to these prefabs are added to the TpTileBundle.
To reiterate:
- When bundling Prefabs from a scene, the stored rotation and scale are the rotation and localScale of the root GameObject of the Prefab in the scene hierarchy.
- When bundling Prefabs from a project folder, the stored rotation and scale are the rotation and lossyScale of the root GameObject of the Prefab in the Project folder.
The created Archive asset contains all the converted, Locked tile assets. A name for the asset is created from the base name that you provide in the dialog box and/or from the scene and Tilemap names.
This is just for convenience so that you can have an idea of where the asset was created from.
If you inspect the asset, you’ll notice that it has a few fields:
- Time Stamp: The creation time, in UTC time.
- Scene Path: The Scene path with dot notation.
- Original Scene: The name of the scene that the asset was created from.
- A flag that informs whether this Bundle was created from a Grid Selection.
- A flag that controls whether Tile+Painter includes this asset in its painting sources list.
- A User flag (a boolean) and a user string. Optional use.
- An Icon reference. Used to display an Icon for the asset in Tile+Painter.
- A GUID. This is used in the Layout/Chunking system.
- Various asset lists.
The Time Stamp, Scene Path, and Original Scene aren’t used in this distribution (but are used in the project that TilePlus was developed for).
TileFabs require a set of compatible Tilemaps to exist in advance. So, if you have a scene with some Tilemaps and load a TileFab, the tiles load onto the existing Tilemaps. If you load the same TileFab 10 times the same tile would be written 10 times to the same locations.
The power of TileFabs comes when you consider that they can be painted anywhere on the Tilemaps. If you offset the placement of each of the 10 TileFab loads, they can be used to fill-in an area of a Tilemap. That can’t be done with Prefabs. A bonus is that Bundles and TileFabs can be painted with Tile+Painter.
Notes
Other Uses for Bundled Tilemaps
When using Tile+Painter, Bundle assets and TileFabs appear in the Painting Source (center) column and behave as if they were a single tile: you can paint them onto Tilemaps. This means that you can create chunks of tiles and paint them as if they were a single tile. For Bundles, you can paint the entire Bundle or view a list of all the tiles in the Bundle and paint them individually. These features are discussed in the Tile+Painter Guide.
If a TileFab is created from a Grid Selection then you can almost think of it as a rectangular piece of layer cake, with the Tilemaps being the layers. As just mentioned, you can then paint multiple pre-filled layers with one mouse click. Or you can use the supplied basic chunking system to move chunks of tiles in and out of a set of Tilemaps as they move in and out of the Camera view. Chunking is only supported on Orthographic cameras and only tested on the default Tilemap layout, that is, a top-down view.
For simpler uses, you can add the TpBundleLoader component to any Tilemap’s GameObject. This component loads a single Bundle. Place the component on any compatible Tilemap (same layout, etc.) and drag in the Bundle asset reference. Switch to Play mode and loading will happen automatically if the component’s LoadOnRun toggle is checked. Or you can click the Load button to make a quick test.
Similarly, you can add the TpFabLoader component to any Grid’s GameObject. It works in the same fashion as TpBundleLoader. However, it can’t work correctly if the Grid’s child Tilemaps do not match the names and/or tags of the Tilemaps embedded in the TileFab asset. That’s up to you.
Finally, you can use a TpBundleTile. This simple tile takes a Bundle reference as a parameter. You can copy it to a Unity Palette or to Painter’s Favorites list and paint it on a Tilemap. When you do, the tile loads the bundle and deletes itself. This tile is discussed more fully in the Tile+Painter User Guide.
Bundles and TileFab assets can be used in a running game to dynamically load tiles into Tilemaps using the TpBundleLoader or TpFabLoader components, a TpBundleTile, TpAnimZoneLoader tile, the TpZoneManager, or at the lowest level, the TileFabLib and TpZoneManager libraries.
One other note: When you make an archive, all Scene references are lost as usual. TPT tiles can have Scene references but if your tile doesn’t have any then this doesn’t matter.
Updating TileFabs
One of the goals of this system is rapid iteration.
One final annoyance comes from the fact that if you change anything on a Tilemap after you've archived it the Bundle or TileFab needs to be recreated. The TpFabUpdater component can be used to update Bundles in a few seconds!
TpFabUpdater: new EXPERIMENTAL Component.
Briefly:
- Add to a Tilemap's parent GRID.
- Add asset references for a TileFab or a ChunkZoneSelector.
- If both are provided, the TileFab asset referenced in the Selector is used.
- When using the Layout system use the Selector because that ensures that the proper bundles are updated.
- Used to update a referenced TileFab's BUNDLES from the child Tilemaps of the GRID.
- See the component's code for more info. VERY HANDY for iterative level creation using TileFabs.
- IMPORTANT NOTE: bundles created with from a multiple-selection PICK are incompatable with FabUpdater
Details:
- A component that can be added to a GRID's GameObject for updating a Tilefab's Bundles.
- Provide a Selector and/or TileFab reference.
Use:
- Create a TileFab normally via menu commands or from Painter Grid Select panel.
- When you want to update this TileFab due to changes in the Tilemap you don't need to follow that process again.
Add this TpFabUpdater component to the parent GRID of the TileMaps and drag the created TileFab asset reference into the 'TileFab' field. If you've created a Selector for the Layout system you can use that instead. If this component sees both it will always use the Selector (which has a ref to the TileFab).
One reason to use the Selector is to ensure that the same TileFab that the Selector is using is actually the one that you want to modify.
When either field is not-null, an 'Update' button will appear. Clicking that will update selected TileFab's bundles with the current set of tiles using the GridSelection size and position embedded in the TileFab. If there are TilePlus tiles on the Tilemap the existing saved and locked tile assets are removed (they are sub-objects to the Bundle asset) and replaced with new locked tile assets.
The TileFab is NOT affected at all. The Selector isn't affected either. The Bundles are affected: those which have been changed have new timestamps as well as new internal data baed on the archived tiles and prefabs.
BACK UP YOUR ORIGINAL BUNDLES JUST IN CASE
Specific error messages may appear in the component editor:
- Duplicate Tilemap names: the connection between TileFabs and actual Grid+ChildTilemaps uses the Tilemap name to locate the tilemap.
Unlikely:
- If the Grid+Maps are part of a Prefab. Unpack the prefab first.
- If the Scene View is a Prefab Editing context.
Fields:
- TileFabAsset is a ref to the TileFab - which is mostly a list of the child TileBundles.
- Selector is an optional ref to the Selector used by the layout system
CONTROLS:
- Confirm: if checked, a confirmation dialog is shown before anything is affected.
- Update Prefab - if this is checked, all the prefab asset references in the Bundle are updated.
- Note that all prefabs which are chilren of the Tilemap's GameObject are stored as asset references along with positioning data. The prefabs aren't affected.
- Similarly, normal Unity tiles are stored as a single reference along with all positioning, color, flags, and transform data for each Unity tile.
- Color, flags, and transform data are stored in indexed lookup tables since they are often repeated.
- for example, Color is usually White and transform is usually Matrix4x4.Unity.
- this approach matches the serialization approach for the Tilemap component.
Under the checkboxed is a (hopefully scrollable) list of the child tilemaps of this Grid which have Bundles that correspond to the referenced TileFab.
Check boxes allow you to choose which Bundles to update.
- These can be all toggled ON or OFF or have their states toggled using buttons at the bottom of the component's editor.
ALSO IMPORTANT: if you have an existing TileFab and a corresponding set of bundles and THEN you add a new Tilemap to the Grid you have to go thru the TileFab creation process again. That's because there's no bundle which corresponds to the the new Tilemap: nothing exists that can be updated.
SIMLARLY: if you have several Tilemaps as children to a parent Grid but some of the Tilemaps have no tiles when you first create a TileFab AND then you add tiles to the previously empty Tilemaps then you need to create the TileFabs again. That's because the TileFab won't have any reference to the empty Tilemaps - empty Tilemaps aren't archived so there's nothing to update. You'll notice that the Editor for this component only shows checkboxes for Tilemaps that are currently archived.
Compatability with older assets:
IMPORTANT: Using this feature requires a new field in TpTileBundles with the original GridSelection so that the position of the archived area can be determined. In older Bundles this will exist but the value will be invalid and you'll get an error in the console.
FIX: create new bundles OR manually edit that field (OriginalTilemapBoundsInt) appropriately.
The size of that field should be the same as 'TilemapBoundsInt' but the position should be set correctly, which can be hard to do.
TileFabLib, ZoneManagers, and Layout
Exposition
A TileFab can encompass all the tiles and Prefabs contained within a Tilemap hierarchy (Grid with child Tilemaps). The simplest use for this sort of a TileFab is to just load the whole thing at once to populate an area of a scene with tiles in one operation.
However, when you create a TileFab from a Grid Selection they’re more like rectangular pieces of layer cake, as seen in this crude illustration:

Rather than repeat “TileFab from a Grid Selection” let’s just call this a Chunk. This section is mostly about ways to use Chunks.
A Chunk is a TileFab, but there are several important differences regarding how position data is stored.
TileFab
- The CellBounds (a BoundsInt) of each Tilemap are used to limit what is stored in each Bundle.
- The stored BoundsInt for each Bundle is the CellBounds of each Tilemap.
- The stored positions of tiles and Prefabs in the Bundles are the raw positions from the Tilemaps.
- The m_FromGridSelection field is false.
Chunk
- The Grid Selection defines the limiting area.
- The stored BoundsInt for the Chunk always has a zero-based origin. The size is that of the Grid Selection.
- The stored positions of tiles and Prefabs are adjusted to have a zero-based origin relative to the lower-left corner of the Chunk.
- The m_FromGridSelection field is true.
This means that a Chunk’s size is always defined by its BoundsInt’s size. All stored positions in a Chunk are relative to the position of its BoundsInt, i.e., all positions are relative to the lower-left corner (the Position property) of the Chunk.
Or you can think of it as “relative addressing” since you can paint a Chunk anywhere but the tiles within the chunk retain the same relative positions.
Conversely, a TileFab’s stored positions are the raw positions directly from the Tilemap. If you paint a Tilefab with the Painter, all objects’ (tiles and Prefabs) positions are added to the mouse pointer position.
TileFabs are good for saving and loading entire Tilemaps. In real life, Chunks are more useful.
If you paint a Chunk or one of its Bundles using Tile+Painter, you’ll notice that the mouse pointer position is always at the bottom-left of the group of tiles in the Chunk.

This is because Chunks are organized in the scene using RectInts, and a RectInt’s position is the lower-left corner. This is important to remember, as you’ll see later.
Ways To Use Them
- Load a Chunk (or any TileFab) anywhere you want.
- Paint TileFabs, Chunks, or Bundles using Tile+Painter.
- Load automatically as the camera moves.
Loading
The easiest way is to use a TpAnimZoneLoader Tile. One can paint one of those Tiles on a Tilemap, view its fields using Tile+Brush or Tile+Painter, and set up a trigger zone. Your program periodically sends the position of your Player (or something else) to this Tile using the TpMessaging library. The Tile posts a Trigger event when that position is within the trigger zone. Your code observes this and calls a method in TileFabLib to load some TileFab.
Please note that this is a 'legacy' tile from earlier releases: it may not work properly with the layout system.
You can also call the LoadTileFab method in TileFabLib. This provides fine-grained control over the process, including optional filtering during the load process.
Painting: See the Tile+Painter documentation.
Automatically: Monitor the position of your camera and add/delete chunks as they move in and out of the camera view. This feature is used in the Layout demo programs.
Infrastructure
Review
Bundle: an archive of all the tiles and Prefabs for a single Tilemap. TileFab: references a group of Bundles.
Let’s review what type of data are in a Bundle asset:
- A List of TilePlus Tiles.
- A List of Unity Tiles.
- A List of Prefabs.
- Indexed Lists of Tile Flags, transforms, and Colors.
- The BoundsInt for the group of tiles as calculated for TileFabs or Chunks.
It’s not difficult at all to take all this information and populate a Tilemap with the tiles in the Bundle. Even a caveman could do it! There’s a method in the Bundle asset called TileSet which unpacks the various Lists in the asset and returns a List of data items, each with the tile reference and Flags, transforms, and Color for each tile. Methods in TileFabLib and TpZoneManager provide higher-level APIs for both TileFab and Chunk use.
Caching
Bundle assets cache all non-TilePlus tiles the first time that the TileSet method is used. This increases performance when the same Bundle is used repeatedly and most of the tiles are ‘normal’ Unity tiles (basically, anything that isn’t a TilePlus tile). There is a method that clears the cache if you need to.
Chunkifying
Bundle assets can also subdivide themselves into square chunks of arbitrary size. For example, a 1024 x 1024 Bundle can be divided into smaller chunks ranging from 4 x 4 (64K smaller chunks) to 256 x 256 (4 smaller chunks). After this operation, the Bundle turns this information into data ready to be loaded to Tilemaps using their block move methods. This cache can also be released when no longer needed.
This is the method used by the Layout system, and provides a way to set the loading chunk size at runtime. In other words, you can optimize the system at runtime based on the capabilities of the target system.
Essentially, this process creates a cache of TileChangeData for each subdivision. That's the format used by Tilemaps for fast block loads of tiles.
For example, if a bundle's size is 256x256 then:
- If a bundle was completely filled with tiles (all positions filled) that would be 64K tiles.
- If the chunk size is 4 tiles then there are 4096 chunks of 4x4 (16) tiles in each chunk.
- And Chunkifying will create a set of 4096 precached sets of TileChangeData.
Precaching does take a litle time, but not that much. A completely-filled bundle of size 256x256 chunkifies to 8x8 chunks in about 30 milliseconds (processor dependent, of course). If 'Firehose' messages are allowed via the TilePlus Configuration dialog then the elapsed time for this process is printed to the console.
Prefab Caching
Prefabs are never cached since they must be instantiated each time they are placed.
HOWEVER if a prefab has a TpSpawnLink component (or a derived component) then the Spawner Service is used. If the same prefab is used again, it's pooled and not repeatedly instantiated.
Software Components
Support for TileFabs comprises TileFabLib, TpZoneManager, and TpZoneLayout. Each of the three components present successively higher-level APIs for using TileFabs.
TileFabLib is a static library which provides the basic functions for loading TileFabs and Bundles to Tilemaps in a scene, during Editor sessions and at runtime. For example, if you’d created a TileFab from a complex scene with 10 layers of Tilemaps comprising thousands of tiles, you can paint that TileFab to a Scene using Tile+Painter, or load it to a Scene in a running app. It’s also used to create TpZoneManager instances at runtime.
TpZoneManager is a Chunk Manager. Instances of TpZoneManager Scriptable Objects are created at runtime. It has an API for chunk management, and loading/unloading chunks.
TpZoneLayout is a MonoBehaviour component that queries a single TpZoneManager instance: it’s a base-class for loading and unloading chunks as they move in and out of the Camera range. This is a basic implementation, and TpZoneLayout can be subclassed or rewritten by you to work differently if you want.
See the Side-Scroll layout demo for an example of how to use the ZoneLayout component directly: it's pretty easy.
At a higher level, ChunkedZoneSelectors, TpSceneManager, and TpSceneList assets can be used to organize TileFabs into TileScenes which can be loaded and unloaded in their entirety without loading or additively loading a Unity scene.
TileFabLib
TileFabLib.LoadTileFab loads the Bundles referenced by a TileFab asset. The TileFab asset has references to one or more Bundle assets, which include all the information required to recreate the tiles. There are both Async and non-Async overloads for this method.
TileFabLib.LoadBundle loads the tiles from a single TpTileBundle asset. You normally don’t need to use this, although you can if you just want to load tiles from a single Bundle (this is how Tile+Painter paints single Bundles). Otherwise, use LoadTileFab: a TileFab is created even if you only bundle one Tilemap and LoadTileFab is easier to use.
If you were only loading one Bundle to a Tilemap you’d intrinsically know which Tilemap to use as a target for placing the tiles extracted from a Bundle. This is why you can use the Tile+Painter to paint a Bundle anywhere you want to.
However, the normal use case, and the one supported by TpZoneManager, is to use a TileFab. That asset is a wrapper for any number of Bundles, along with the tags and/or names for the source Tilemaps that the Bundles were created from.
Why archive these two items? Because that information tells you what the Tilemap is for each Bundle; that is – where do you paint a Bundle that’s part of a TileFab?
Using the original Bundle assets’ names and tags, LoadTileFab tries to locate the target tilemap; first with its tag, then by name. For faster performance, a mapping between stored Tilemap names and specific Tilemap instances can be passed to LoadTileFab. This avoids searching for GameObject tags or names.
Each TpTileBundle asset is evaluated and the destination Tilemap must be found. The search is performed in the following order:
- Provided by the name-to-Tilemap instance mapping. (fastest)
- Provided by using the Tag to Find the parent GameObject of the Tilemap.
- Provided by using the Name to Find the parent GameObject of the Tilemap. (slowest)
- If a TPT tile reference is passed-in to LoadTileFab then the parent Grid of the tile is found, and the Tilemaps which are children of that Grid are examined for matching names (variable speed but faster than using Find).
If all those methods fail, then LoadTilefab silently fails, nothing happens, and no tiles are loaded from that TpTileBundle asset.
You can see this in action if you try to paint a TileFab containing multiple Bundle assets and one of the named Tilemaps isn’t present. If no Tilemap is located, then there’s no way to load the tiles and that Bundle asset is ignored: no preview or painting. If no Tilemaps are located for any of the Bundles, then nothing is painted at all, and no previews are possible.
If you’re using Tile+Painter to paint a single Bundle’s tiles, the destination Tilemap had already been selected in the leftmost column. Hence, you can paint a Bundle on any Tilemap quite easily.
If you want to ensure that loading TileFabs or Bundles recreate what you’re expecting, bear in mind that the Tilemap Component and Tilemap Renderer Component settings matter too:
- Tilemap: Frame rate, Color, Anchor, Orientation
- Tilemap Renderer: Sort Order, Sorting Layer and Order in Layer
If any of these are different than the setup when you originally archived the tiles, then the resulting visual appearance after the loading will be different.
Using LoadTileFab
LoadTileFab has several overloads for both synchronous and async use.
Let’s examine the method parameters for LoadTilefab:
- tileParent: The parent of the calling object (Only needed if calling from a TPT tile, otherwise ignored and can be null)
- tileFab: a TpTileFab asset reference
- offset: The Offset from tiles' stored positions – you use this to set the location where you want the tiles placed. For example, if you used Vector3Int(100,200,0) then the tiles will be placed relative to that location.
- rotation: optional rotation – unimplemented
- fabOrBundleLoadFlags: A set of control flags for LoadTileFab. See below.
- filter: a Func returning a bool. If non-null, this Func is used to filter out tiles that you don’t want.
- targetMap: A dictionary mapping tilemap names as found in the TileFab to actual Tilemap instances. Used to override the names from the Tilefab.
- zoneManagerInstance If using a ZoneManager, pass its instance.
the async version adds this parameter:
- intervalBetweenBundles For the Async version, a wait time between bundles.
Returns: Instance of TilefabLoadResults class. If null is returned, then there was an error of some kind.
fabOrBundleLoadFlags is a value from the FabOrBundleLoadFlags enumeration. These are Flag enums so they can be ORed. The combined value ‘Normal’ is the common case.
- None: usually not used
- Load Prefabs: Normally true
- Clear Prefabs: Normally false
- Clear Tilemap: Normally false
- Force Refresh: Normally false.
- New GUIDs for TPT tiles: Normally true
- FilterOnlyTilePlusTiles: Normally true
- NoClone: Normally false.
- MarkZoneRegAsImmortal: Normally false
- Chunkified: Normally false
- NormalWithFilter: LoadPrefabs | NewGuids | FilterOnlyTilePlusTiles
- Normal: LoadPrefabs | NewGuids
- ChunkifiedDefault: LoadPrefabs | Chunkified | FilterOnlyTilePlusTiles
The meanings:
- forceRefresh: Executes Tilemap.RefreshAllTiles after the tiles are loaded.
- loadPrefabs: Load any prefabs found in the TileFab
- clearPrefabs: Delete all prefabs attached to the target Tilemap’s GameObject.
- clearTilemap: Clear all tiles on a target Tilemap prior to loading new tiles.
- newGuids: Provide new GUIDs for all TilePlus tiles. Use when placing these assets at runtime to avoid duplicate GUIDs. There’s a discussion about this a bit farther down.
- filterOnlyTilePlusTiles: If the filter is provided then the filter is only applied to TilePlus tiles, which is often sufficient and saves much time.
- NoClone: Do not clone TilePlus tiles within the Bundle. The TPT tiles will clone themselves.
- MarkZoneRegAsImmortal: Used with the Chunking/Layout system. See Immortalizer tile
- Chunkified: The TileFab and its bundles are already Chunkified: See Chunkifying
Most of these are easy to understand and the Normal value for fabOrBundleLoadFlags is usually a good choice. You use the offset to set the origin for placement.
What happens is different depending on whether or not the TileFab is a square 'Chunk' as described earlier:
- Chunk: the 'offset' or placement position is the lower-left corner of where the TileFab's Bundles are placed.
- Not Chunk: the 'offset' is the lower-left corner of the bounds of the entire Archive.
This is automatic, and is mostly handled internally. You can see what happens differently for the two varieties with Painter: the tiles in a TileFab or Bundle assets are placed using LoadTileFab. The offset value is the mouse position converted into Tilemap (Grid) positions. You can see how that’s done by examining the code in TpPainterSceneView.
When you paint a Chunk the lower-left corner of the Chunk will start at the mouse position.
When you paint a TileFab that isn't a Chunk (not captured with a Grid Selection) then the entire Tilemap had been archived. The mouse pointer position is the lower-left corner of the bounds of the Tilemap.
It sounds confusing but you can try this out for yourself to see the difference. In any case: if you do not want to load an entire archived set of Tiles you use Chunks. In practice they're way more useful.
TileParent is null unless this is being called from within a TPT tile, such as the TpAnimZoneLoader. It’s used when trying to find the painting Tilemap, as mentioned in the preceding section.
ZoneManagerInstance can be left null (the default) if you’re not using it. If not null, the results of the loading operation are archived in the TpZoneManager instance that you provided.
NewGuids: A new GUID is created for each TilePlus Tile in the Bundle. When the Bundle is created, the GUIDs of the TilePlus tiles are saved in the Bundle, and when the Bundle is painted by Tile+Painter or via code, the GUID of the painted TilePlus tiles are the same as when the tile was archived. But this isn’t always desirable. For example, if you wanted to use a TileFab repeatedly in a game you’d end up with the same GUID for multiple tiles.
That’s an issue because the GUIDs are supposed to be unique: the TilePlus system rejects TilePlus tiles with duplicate GUIDs and an error message is issued. If NewGuids is false, GUIDs are unchanged.
Filtering
What’s the filter for? There are several uses for this feature: limiting the number of tiles loaded to those within a certain area, extracting information from the loaded tiles, eliminating certain tiles, changing the Color or transform for a tile, or for replacing a tile with different one (like for seasonal events). You can also adjust the position of a Prefab.
As input, the filter is provided with:
- An object containing information about the Unity tile, TilePlus Tile, or the prefab asset with position information.
- A value from the FabOrBundleFilterType enum. This tells you what the object is.
- The BoundInt for the Bundle.
Note that for Prefab assets or Unity tiles: these are the actual project assets so don’t modify the asset. Changing to a different tile (not TPT) asset can be OK if it contextually makes sense.
When the filter receives a TPT tile it’s a clone so you can change its fields if you want to. Each of these objects has different types of information:
- Unity tiles: TileSetItem: a tile reference (as TileBase), position, color, transform, and tile flags Again, note that the tiles are assets.
- TilePlus tile: the TPT Tile reference and the position.
- Prefab: the prefab asset reference and the placement position.
If you want to change values for the actual objects such as the Unity Tile or the TPT tile, please be aware that:
- Don’t change from a TilePlus tile to a non-TilePlus tile or vice versa.
- Prefabs and Unity tiles are project assets and should not be altered.
- TilePlus tiles should be clones. If they are not, they auto-clone when painted on the Tilemap, which depends on the settings of TpLib.MaxNumClonesPerUpdate. To clone a TilePlus tile, call its Cloner method with the newGuid parameter = true.
- Since there are so many possibilities, this sort of use is unsupported aside from (our) bugs.
Loading from a List
Another way to load TileFabs is by providing a list of loading parameters and using LoadTileFabsAsync. The Layout system uses this approach. This method allows specifying the delay between loading TileFabs and a delay between loading each Bundle in each individual TileFab.
The delays allow you to spread out the loading over time. Since the loading happens outside the camera view this can be advantageous.
Grid Selections
One might recall from the User Guide that you can create TileFabs and Bundles using a Grid Selection. A Grid Selection is when you use the Palette or Tile+Painter to make an area selection in a Tilemap. If the Bundler tool sees an active Grid Selection, it will ask if you want to use it. If you agree, the selection is used to limit what is archived. Normally, the Archiver grabs every tile on a Tilemap, and every Prefab parented to the Tilemap’s GameObject.
One of the things that’s stored in a Bundle is the BoundsInt for what was archived. When archiving a GridSelection, that selection supplies the BoundsInt.
Say that you want to paint (load via TileFabLib) a Chunk at Vector3Int.Zero. All the tiles in the bundle will be painted relative to Vector3Int.Zero as shown below. In other words, the stored locations of the tiles in the bundle are pure Tilemap “grid” coordinates regardless of where the Tilemap’s origin was placed.
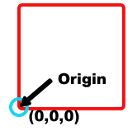
Note that all the tiles and Prefabs are placed relative to the position of the Chunk at the lower left corner, i.e., to the upper-right of the placement position for the Chunk.
Having a good understanding of this concept is important if you don’t want to get confused by what’s next.
TpZoneManager
TpZoneManager is a chunk management subsystem. Your code interacts with instances of the TpZoneManager class, which are Scriptable Object instances created at runtime by using TileFabLib. The Layout demo programs illustrate how to use the system.
TileFabLib implements some simple management features for creating, locating, and destroying TpZoneManager instances. Let’s call them ZMs to avoid me having to type TpZoneManager over and over.
To save memory, the data structures used for management are not initialized until you enable the subsystem by setting the TileFabLib.EnableZoneManagers property to true. This enables the subsystem and allocates memory to manage the ZMs, which you create with TileFabLib.CreateZoneManagerInstance.
For efficiency, the GUID remapping data tables discussed earlier are also maintained within TileFabLib.
public static bool CreateZoneManagerInstance(
  out TpZoneManager? instance,
  string iName,
  Dictionary<string, Tilemap> targetMap)
TileFabLib.CreateZoneManagerInstance requires that you provide a string as a unique identifier, and a mapping between Tilemap names and Tilemap instances. The ZM instance is placed in the out-parameter instance.
Don’t use the same Tilemaps with different ZMs.
Once created you can always get this specific ZM instance by using TileFabLib.GetNamedInstance.
Delete a named ZM with TileFabLib.DeleteNamedInstance. If you delete a named instance and there are no more, TileFabLib disables the subsystem and releases memory subject to GC.
Once you have a ZM, you initialize it with ZM.Initialize, providing the chunk size, the world origin coordinates (in the Tilemap address space), and an initial number of chunks expected.
For a single ZM instance, restrictions apply:
- Chunks (TileFabs) all need to be all the same size: square, with even-number dimensions such as 64 x 64.
- The smallest chunk size is 4x4.
- Chunks are always aligned to the super-grid defined by the chunk size.
- A Tilemap should not be used with more than one ZM. A ZM is unaware of Tilemap positions that may have had Zones filled or deleted by another ZM, and conflicting chunk sizes between different ZMs would naturally be problematic.
Each ZM can be set up completely differently. Just don’t cross the streams…. uh, share Tilemaps between ZMs.
When you provide a ZM instance to TileFabLib.LoadTileFab it sends the results of the load to the ZM, which creates a ZoneRegistration.
Why are Chunks Square?
Chunks must be even dimensioned due to integer math. If a Chunk had an odd size, division could introduce a positioning error. They don’t have to be square (they could be rectangles), but for this implementation they must be square with even dimensions because it makes the logic and math easier and much faster. It’s also more intuitive.
The Super-Grid
When you initialize a ZM with a chunk size and world origin you’re defining a higher-dimension or super-grid (sGrid) virtually layered on top of the normal Tilemap Grid.
In the illustration below, one Chunk is any number of Tilemap locations, from 4x4 to 128x128 or any reasonable value. If the chunk size is 4x4 then this 5x4 super-grid below actually comprises 20x16 tile positions. The position of a chunk is its origin, the lower-left corner.
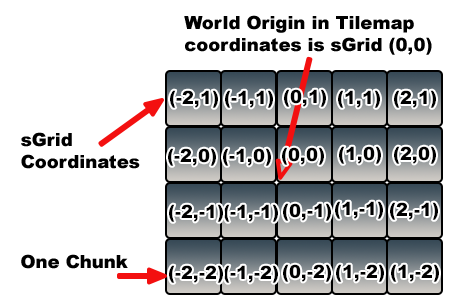
The sGrid coordinate system’s origin is the same as the world origin provided when the ZM instance is created. It’s also important to understand that each sGrid only applies to one ZM, even those created with the same chunk size and world origin. ZMs are completely unaware of each other, by design.
The array of Chunks is a sGrid virtually layered on top of the Tilemap’s grid. Array elements are called Zones and are addressable using Locators. Each Zone comprises one Chunk.
Locators are RectInts, which are a 2D version of a BoundsInt: a RectInt is also a struct and its position is also in the lower-left corner. They’re used throughout ZMs to define Zones, and to access and/or query data from a ZM instance.
Each Locator must be aligned to the sGrid of the ZM. This means that its position must be divisible by the chunk size, e.g., a chunk size of 4 means the sGrid addresses must be divisible by 4. The size of each locator is usually the size of a chunk, but doesn’t have to be, as we’ll see later.
Here’s a detail of one Zone, outlined in red. Each Zone is aligned with the sGrid. The size of each Zone is the size of a Chunk. In this example, the size of a Chunk and of Zones is 4 x 4 Grid locations. Hence, the sGrid is 4x the Tilemap Grid.
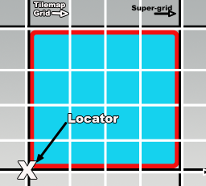
The Locator of a Chunk can be used to locate a particular chunk on the sGrid just like a Tilemap position addresses a specific location on a Tilemap.
There are several ZM instance methods to convert between Tilemap Grid address space and sGrid address space.
- GetLocatorForGridPosition takes a Tilemap Grid position and returns a Locator.
- GetLocatorForWorldPosition takes a world coordinate position and returns a Locator. There are also instance methods to check for and convert to sGrid alignment.
- IsAlignedToGrid takes a Tilemap Grid position and returns true if it’s aligned to the sGrid.
- AlignToGrid takes a Tilemap Grid position and returns one that’s aligned to the sGrid.
- GetLocatorForSgridPosition takes a sGrid position and returns a Locator.
- GetGridPositionForSgridPosition takes a sGrid position and returns a Tilemap Grid Position.
You don’t need to use the sGrid, just be aware of it. But if you do need the conversions offered by the last two methods above, they’re available for your use. Note that the conversions will produce different results on ZMs with different chunk sizes and/or world origins. In a way, a chunk is like a giant tile and the sGrid is like the Tilemap grid with bigger element sizes.
The GetLocator for GridPosition and WorldPosition methods have an align parameter which if true (the default value) will automatically use the AlignToGrid method on the Tilemap Grid position.
Referring to the above illustration, any Tilemap grid coordinate within the Zone will return the Locator for the Zone when AlignToGrid is used. IsAlignedToGrid will only return true when the Tilemap grid coordinate matches the exact position of the Locator, shown here as X.
Useful Methods, Camera Projection, Notes
The GetLocator methods allow you to also pass in a Vector2Int dimensions parameter. This lets you create arbitrary-sized Locators. Normally, Locators are the size of a chunk. If you do not pass-in dimensions, that’s the size that’s used. Using a different dimensions value allows you to size a Locator however you want.
Why do that? Let’s say you want to find out which Zones are inside a Camera Viewport, and which are outside. The Viewport is (usually) bigger than a single chunk. Passing in the dimensions of the Viewport creates a Viewport-sized locator. That’s handy for use with GetZoneRegsForRegion and FindRegionalZoneRegs.
GetZoneRegsForRegion takes a Locator for input and returns a list of all the ZoneRegs within the Locator.
FindRegionalZoneRegs takes a Locator for input and populates a HashSet with all the individual Locators within the input Locator and populates a List with all the individual ZoneRegistration instances found outside the input Locator. This is a specialized method that’s used by another component called a ZoneLayout, we’ll discuss that in a later section.
To get individual ZoneRegistrations, use these instance methods:
- GetZoneRegsForGridPosition
- GetZoneRegsForWorldPosition
- HasZoneRegForLocator
- GetZoneRegForLocator
Camera Projection
A ZM is agnostic to the camera’s projection mode. However, there’s a big difference in how one calculates the viewport bounds for the two types of cameras. This matters for ZM clients such as TpZoneLayout, which only supports Orthographic cameras.
Multiple ZoneManagers
You can have as many as you want. Note the warning about sharing the same Tilemap with different ZMs. Don’t do it. Besides that, ZMs are independent, and can have different chunk sizes, world origins, and so on.
Scene Loading and Unloading
In general, you are responsible for deleting ZMs when a scene that they are in is destroyed. An example of how that’s done can be seen in the TpZoneLayout component’s OnDisable event handler, which handles this for you.
TpZoneLayout
At an even higher level, the TpZoneLayout MonoBehaviour component leverages a ZM to implement a basic camera Viewport chunking system. This component can be used as is, or as a base class for something more complex. Examine the “Layout” demo to see how to use it.
The following crude illustration shows an array of chunks on a Tilemap, some type of Player character, and a camera tethered to the Player, that is, a simple Top-Down view of a Tilemap.
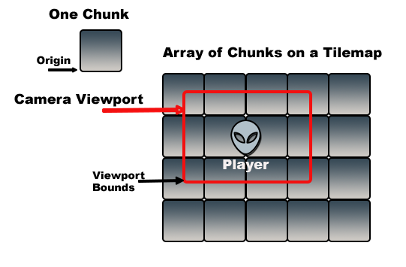
Example Zone Layout
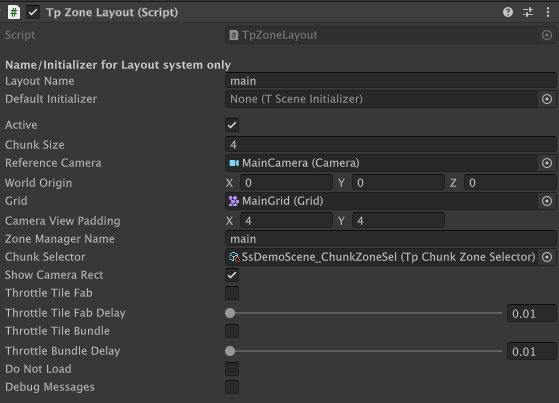
ZoneLayout places TileFabs in the visible area of a camera viewport and deletes them from outside the viewport. The provided implementation only supports orthographic cameras. The location for each of the Chunks shown in the above illustration corresponds to a Locator maintained by a ZoneManager instance.
As the Player moves, so does the Camera. As the Camera moves, its Viewport moves, and overlaps different chunks after each movement, akin to a window sliding over the sGrid and the Tilemap. When a chunk moves out of view it should get deleted, and when there’s an empty chunk in the view then a Chunk should be placed there.
The TpZoneLayout component does most of the initialization work for you.
Let’s look at some of the ZoneLayout fields:
- LayoutName: A name for this ZoneLayout. Used with ChunkedSceneManager.
- DefaultInitializer: The default Initializer Scriptable Object asset. Used by ChunkedSceneManager.
- Active: Handy for debugging, if unchecked then this layout is ignored.
- Chunk Size: Size of chunks 4,6,8… This value is used to subdivide or 'Chunkify' the TileFabs and their Bundles.
- Reference Camera: the Camera you want to use for its viewport. In many situations this value will be the same for multiple layouts. But it doesn’t have to be.
- World Origin: the origin of the sGrid. Can be different on each layout.
- Grid: the parent Grid of the Tilemaps that this layout will be using. When using multiple layouts, it is important to ensure that this is the correct Grid for the Chunks that you’ll use.
- Camera View Padding: adds some extra space around the Camera viewport.
- Zone Manager Name: Must be unique for each Layout. If not, one of the duplicates will be ignored.
- Chunk Selector: A Scriptable Object asset that selects which Chunk to use at a particular Locator.
- Show Camera Rect: displays a marquee around the Viewport. Useful for debugging.
- Not shown in the image above: Show Zones. When a layout pass occurs, draw boxes for the zones using chunk-sized squares showing how it is subdivided.
- Note that when these boxes appear the Camera Rect display, if enabled, is temporarily not drawn.
- Throttle TileFab and Delay: add a delay between TileFab loads.
- Throttle TileBundle and Delay: add a delay between loads of a TileFab’s individual bundles.
- Do Not Load: No Chunks are ever loaded. You can watch the marquees move about without any distractions. Can get hypnotic.
- Debug Messages: exactly what it says...
TpZoneLayout uses a method in TpZoneManagerUtils to calculate a RectInt which describes the viewport.
Please note that if either 'throttle' checkbox is on, padding is automatically increased by (1,1) to avoid visual artifacts.
Since the viewport size is floating-point and a RectInt is not, the calculations always round up, so in general, the RectInt computed as the viewport size is bigger than the actual viewport. This is completely OK and is desirable as the effect helps to reduce visual artifacts.
Even with the rounding-up of the viewport size, you always need to add some padding so that there are no visual artifacts. This is very app dependent.
Then ZoneLayout uses the ZM to detect which chunks are within the viewport and which are not. Chunks outside the viewport are deleted from the Tilemap. Any empty Zones within the viewport are filled in with a Chunk provided by either a ChunkSelector asset or via a callback provided during initialization of the Layout (that’s not done in the Layout demo programs). The TileFabs can have filtering if you provide a filter callback.
If Prefabs Will Move
IMPORTANT: a TpTileBundle may contain prefabs which were parented to the archived Tilemap when the Bundle was created. Such prefabs are added to the Tilemap when the Bundle is loaded by TpZoneLayout and deleted when the Bundle is unloaded. However, these prefabs should not move. If they move into another Zone they won’t be deleted until that other Zone is deleted.
Hence, prefabs that will be moved should be tracked by your own code. See the TopDown Layout demo to see how that works: The GameController's PreFilter and the GameState service handle this aspect.
- GameStateService subscribes to TpServiceManager Service Messages sent by the Spawner Service when a prefab is spawned and despawned.
Special TileFab User Fields
Each TileFab has two user fields: a boolean and a string. These can be used for various things, dependent on your game structure. One use might be in the LoadingFilter callback passed to TpZoneLayout. UpdateTickAsync.
Selectors and ChunkSelectors
By now you’re wondering what this new bit of jargon is all about. A Selector is a bit of code that ZoneLayout invokes to obtain the Chunk to place at a certain location. At a low-level, a callback for this can be provided when initializing the ZoneLayout from code. A ChunkSelector is the same thing, except it is embedded inside a Scriptable Object so that it’s easier to use in the Unity Editor environment.
Since they’re essentially the same thing, we’ll just call them Selectors from now on.
ChunkSelectors use the IChunkSelector interface, which contains methods for initialization and Selection.
TpSingleFabChunkSelector couldn’t be simpler: it just returns the same Chunk every time. This is useful when you want to fill a solid background layer.
TpChunkZoneSelector is almost the same: it returns a single TileFab. However, internally it subdivides the archived tiles into areas of an arbitrary size, effectively precaching all the data required for quick loading to a Tilemap using that class’s bulk-move methods.
To dig into this more, see this for an extended discussion, including more information about a higher-level component called TpChunkedSceneManager.
TpChunkedSceneManager lets you load one or more Tilemap “Scenes” using the ZoneLayout/ZoneManager layout system.
You define Tile Scenes or TScenes using a specialized editor window.
The TpChunkedSceneManager MonoBehaviour component allows you to load TScenes by name, an index in a list of TScenes, or by the TScene’s GUID. Using the GUID is preferred for save files. ChunkedSceneManager also handles all the work involved in the creation and re-use of Zone Manager instances.
A flexible system of SceneInitializers lets the ChunkedSceneManager automatically invoke code that can extract information from the loaded tiles (e.g., waypoints, spawners) when the TScene is loaded.
Callbacks invoked at several stages of the loading process are used to
- Indicate that the current TScene is about to be unloaded.
- Indicate that a new TScene is about to be loaded.
- Indicate that the new TScene loading was completed so you can do any final initialization.
Layout System : Introduction
TilePlus Toolkit’s Layout system was changed in Versions 4 and 5. It’s more memory efficient and sports better performance.
The older system required the use of a Template Tool to break up a set of layered Tilemaps into numerous TileFabs and their child TileBundles, one TileFab for each subdivision (AKA, Chunk) of the Tilemaps. It had two disadvantages:
- The TemplateTool can take a while to run, up to several minutes, which is annoying when iterating designs.
- The chunk size chosen when the TemplateTool runs can’t be changed later.
The new system does away with the TemplateTool. One just creates a TileFab by creating a GridSelection and TilePlus Toolkit tools. The created TileBundles subdivide themselves and cache these subdivisions at runtime with a chunk size of your choice that’s also provided at runtime. Hence, if certain rules are followed, any chunk size can be used.
These are the rules:
- The bounds captured in a TileFab and its child Bundles must be square.
- The size of the bounds must be divisible by 2.
- The selected chunk size must be evenly divisible into the bounds; for example:
- TileFab of 256x256. Square: check. Divisible by 2: check. A Chunk Size of 12 = error.
- TileFab of 200x200. Square: check, Divisible by 2: check. A Chunk Size of 16 = error.
This is tested and if you get it wrong there will be errors and warnings printed to the console. In general, sticking to powers of 2 works best.
So, what does the layout system do?
In its current form, it supports top-down games and loading of multiple “Tile Scenes” or TScenes within one Unity scene. There’s also a handy Tile-scene manager that lets you easily load TScenes without dealing with the underlying complexity.
The system can also support side scrolling as seen in the Side Scroll Layout Demo, however, that's a very basic demo.
Layout System Nomenclature
| Name | Class Type | Use |
|---|---|---|
| TileFabLib | Static | Loads TileFabs, supervises ZoneManager instances. |
| ZoneManagerLib | Static | Utilities for ZoneManagers |
| TpChunkedSceneManager | Component | Loads TScenes (Tile Scenes) under your control. |
| TpZoneLayout | Component | Controls layout as the camera moves |
| Selector | Scriptable Object | Selects what to load |
| TpZoneManager | Scriptable Object | Manages what’s loaded and where |
| TSceneInitializer | Scriptable Object | Initialize your app after TScene loaded |
| TSceneList | Scriptable Object | A list of TScenes used by TpChunkedSceneManager |
| TScene | C# class | A field in the TSceneList with one or more TSceneSpecs. |
| TSceneSpec | C# class | A field in the TScene, specifies the TpZoneLayout to use. |
| TpTilePositionDb | Scriptable Runtime Service | Optional ‘database’ of occupied positions on the Tilemaps. |
We also use TScene to refer to the actual Tile Scene, that is, the original design scene where you create the design using tiles and prefabs.
In words, the TSceneList describes the TScenes to be loaded by TpChunkedSceneManager. Each TScene definition comprises one or more TSceneSpec instances. TSceneSpec instances connect a Selector and its TileFab to a specific TpZoneLayout to use for layout of the Selector’s TileFab.
Your program calls a method in TpChunkedSceneManager to load a TScene based on what’s specified in that specific TScene definition.
TpChunkedSceneManager sets up the load and several callbacks into your code are used to customize exactly what happens.
Selectors, TpZoneLayouts and TpZoneManagers handle almost all of the layout work for you, again, using a few callbacks for customization. TSceneInitializers are Scriptable Object assets that are used to refactor common initialization steps. You add TSceneInitializers to TScene specifications and a default TSceneInitializer to TpZoneLayout components. Using Scene Initializers is optional.
That’s a brief overview.
Creating and editing the SceneList is made simple with the SceneList Editor. You can access this by inspecting a SceneList asset and clicking the EDIT button or with the ChunkedSceneManager component’s EDIT button.
Preparing a TScene
Now, how do you create a TileFab for use with this system?
You create a TScene in a Unity scene that you use for design purposes only. There are examples of design scenes in the Layout Demo programs.
Add a Grid and as many Tilemaps as you need. Design it as you will, with tiles and prefabs. Ensure that prefabs are parented to one of the Tilemaps. Proper parenting happens automatically if you use Painter to paint prefabs.
Create a Grid Selection (square, with a size that’s divisible by 2) and use Tools/TilePlus/Prefabs/Bundle Tilemaps or use Painter’s Grid Selection mode to accomplish the same thing: creating a TileFab for the Grid and Tilemaps: an archive of all the tiles and prefabs on all the Tilemaps.
-
Using Painter's Grid Selection
Create TileFabwhile holding down SHIFT automatically creates a TpChunkZoneSelector asset and populates it's TileFabSource field with the newly-created TileFab's reference. -
If you use the Menu command, you'll need to use the Asset Create menu to create a TpChunkZoneSelector asset in the same folder where you saved the TileFab. Drag the TileFab reference into the TileFabSource field. Ensure that the Load Flags are set to ChunkifiedDefault.
Create a TSceneList asset somewhere in your project, like in a folder called TScenes.
Scene List Editor
Now that you have a TSceneList asset, let's edit it.
Examine the asset in an inspector and click the button to open the customized editor window and you’ll see something that looks like this:
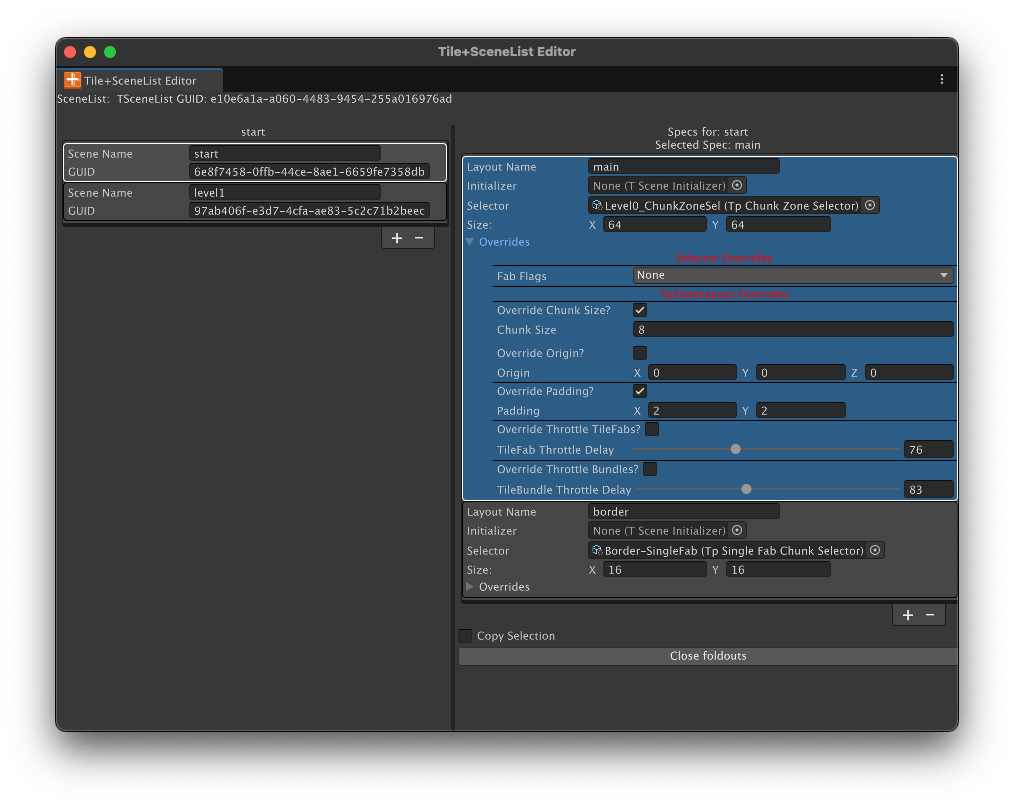
The left column lists all the TScenes in the asset; there are only two shown but more can be added with the + button. The Scene Name, the index of the TScene in the list, or the GUID can be used to load the scene using TpChunkedSceneManager.
The right column lists all the TSceneSpecs for the TScene shown in the left column. You can add more TSceneSpecs but often one is all you need. The reason for more than one will be discussed a bit later.
The TSceneSpec contains the name of the TpZoneLayout component to be used with this Spec, making the connection to the layout engine’s setup for this TSceneSpec. Again, more on this later.
The TSceneSpec also has a reference to a Selector; drag its reference into the field. When this field is populated, the non-editable SIZE field shows the total size of the area that the Selector represents: the size of the largest bounds of all the TileFabs referenced in the Selector.
Each Spec contains overrides for the Selector and for the ZoneLayout being used by the Spec.
Fab Flags allows overriding the LoadingFlags chosen in the Selector. Note that None won’t set the flags to None but rather indicates “no overrides.” To actually set the LoadingFlags to None use “Override None”.
The remaining overrides allow changing fields of the TpZoneLayout named in the LayoutName field. For example, to change the Chunk Size that’s in the ZoneLayout component just check the Override Chunk Size checkbox and whatever value is in the Chunk Size field below the checkbox will be poked into the ZoneLayout when the TScene is loaded.
Changing the Chunk Size is the most common override.
Please note that if either 'throttle' checkbox is on, padding is automatically increased by (1,1) to avoid visual artifacts.
Relationships: Chunksize, Padding, Selector
This system is flexible, but it is easy to make mistakes. If you have the chunk size set too large and use large values for padding it’s entirely possible that the entire TileFab for the TScene gets loaded all at once; i.e., no chunking.
Internally, the TileFab is Chunkified (broken up into smaller areas of ChunkSize x ChunkSize) regardless of what the padding values are set to. Padding is very sensitive to layout.
If you try tweaking the overrides for the Level0 Selector in the demo so that:
- Override Chunk Size checked
- Chunk Size set to 16
- Override Padding checked
- Padding set to 4,4
Ensure that the Scene View is visible and click PLAY. You’ll see that the entire TScene is loaded. What’s actually happening is that padding of 4,4 expands the Camera view bounds enough to cause the layout system to load every chunk within the TileFab.
This is not a bug and doesn’t hurt anything but there’s no reason to use a chunking system if you want to load the whole thing at once; there are simpler ways to load an entire TileFab at once.
Most of the time you want to use the smallest possible chunk size that makes sense for performance; noting that you have a lot of control over this with the ‘Throttling’ feature of the ZoneLayout component. Adjust padding while watching the Scene view as your player moves around. The idea of Padding is to ensure that new chunks (Zones) are loaded outside of the camera view even if your player is moving.
At Runtime...
During your Unity scene initialization you can load the first TScene by calling TpChunkedSceneManager.
When the OnAfterTSceneChange callback is handled by your custom code you call the UpdateTickAsync method in TpZoneLayout which fills in the initial camera view with chunks of tiles using the Chunk Size that you’ve chosen.
Then, as the camera moves, your custom code continues to call the TpZoneLayout.UpdateTickAsync method and the chunks outside the camera view are deleted and chunks that will be within the camera view are added automatically.
If you change to a new Unity scene, use ClearScene in TpChunkedSceneManager. This will delete all loaded zones prior to you changing scenes.
The TpChunkedSceneManager MonoBehaviour component allows you to load TScenes by name, an index in the list of TScenes, or by the TScene’s GUID. Using the GUID is preferred for save files rather than using an index or name as it reduces the chance for errors that could occur if you change names or order of TScenes in the asset file used to record all that information.
A flexible system of SceneInitializers lets the ChunkedSceneManager automatically invoke code that can extract information from the loaded tiles (e.g., waypoints, spawners) when the TScene is loaded.
Callbacks invoked at several stages of the loading process are used to
- Indicate that the current TScene is about to be unloaded. All Tiles and Prefabs will be deleted.
- If you’ve spawned any Prefabs that aren’t parented to any of the Tilemaps, delete them.
- Indicate that a new TScene is about to be loaded.
- Indicate that the new TScene loading was completed so you can do any final initialization.
You can optionally enable a Tile Position Database (TPDB). If enabled, the TPDB keeps track of all positions occupied by tiles for specific Tilemaps; you specify which ones during your initialization.
Simple path-testing and ‘position occupied’ methods in TPDB can be used to avoid collider issues in many situations. This is illustrated in the demonstration program.
Layout System Block Diagram
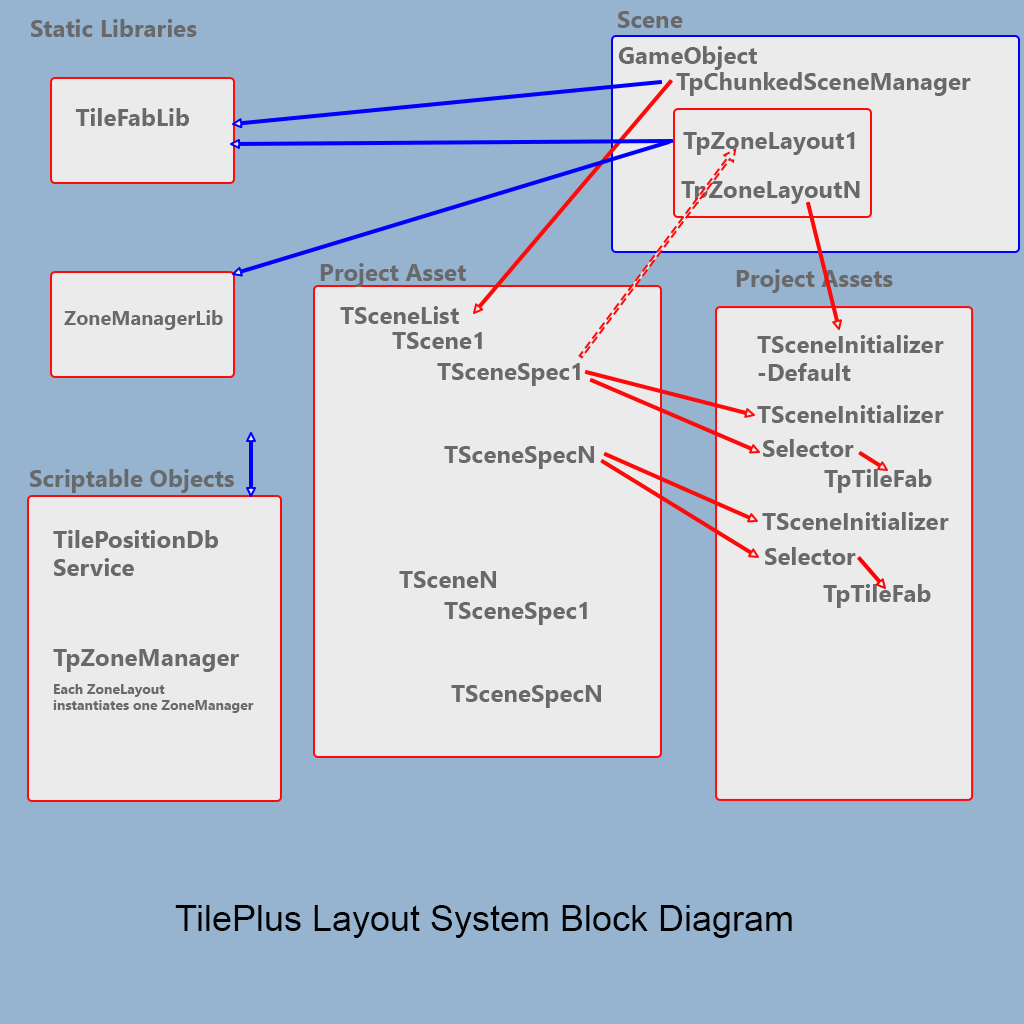
This block diagram illustrates the main parts of the Layout system.
The lowest-level APIs are within TileFabLib and ZoneManagerLib. These libraries handle all the tile/prefab loading and unloading as the camera moves around.
The next highest-level component is a ZoneLayout. This is attached to a GameObject in your Unity scene. As your camera moves, your custom code calls a special Update method in the ZoneLayout to unload/load tiles and prefabs as they move out of and into the camera view.
Each ZoneLayout component will instantiate a ZoneManager scriptable object at runtime. The ZoneManager tracks which chunks are currently loaded.
It’s entirely possible to have more than one TPZoneLayout, as I’ll discuss a bit further on.
The Layout Name field in the TpZoneLayout component is used to link the TSceneSpec to the ZoneLayout (the dashed line in the block diagram). The TpChunkedSceneManager component uses the Layout Name to determine which TpZoneLayout to use for a particular TSceneSpec.
The next highest-level component is the TpChunkedSceneManager. It has a public field which can be used to provide a List of TpZoneLayouts, but it will automatically use those which are attached to the same GameObject.
The ChunkedSceneManager uses data in the TSceneList project asset file to load Tile Scenes or TScenes.
The Layout system can be used with TScenes although that's not a requirement. See the Side Scroller demo for an example that doesn't use the ChunkedSceneManager.
One or more TSceneList project assets (in the middle of the picture) are referenced by the ChunkedSceneManager (upper-right).
You create an instance of this SceneList asset in a project folder as you normally would. The inspector for the asset prompts you to click a button which opens a customized Editor window for the asset.
The SceneList asset is added to the ChunkedSceneManager as a reference (dragging it in or by code). Then your code can make calls to ChunkedSceneManager to load one of the individual Tile Scenes (TScenes) within the SceneList. One can use the index of the TScene in the SceneList, the SceneName string value (part of the TScene data but can be changed by you) or the GUID of the TScene (added automatically when they’re created and not alterable).
It would probably be helpful to open TSceneList.cs. Scroll down to about line 200 or so and you’ll see m_TileScenes. That’s the list of TScene instances. Each of these can have one or more TSceneSpec instances. TSceneSpec instances connects the Selector (selects what TileFab to load) to the appropriate Layout.
In your scene and on some GameObject, add the TpChunkedSceneManager component and as many TpZoneLayout components as there are groups of Tilemaps. A Tilemap group is a single Grid with one or more child Tilemaps.
TSceneList
Each TSceneList asset comprises information about one or more TScenes (Tile Scenes). These are shown in the left column of its editor window. You add or delete TScenes with the + and – buttons under the list. When you select a single TScene the right column shows a list of TSceneSpecs for that TScene.
You add or delete TSceneSpecs with the + and – buttons under the right-column list. If adding a TSceneSpec when one is already selected in the List -and- the “Copy Selection” checkbox is checked, then all the fields of the selected TSceneSpec are copied to the new TSceneSpec except for the Selector.
The Layout Name field in a TSceneSpec must match the name of the TpZoneLayout that the TSceneSpec should use. The Layout Name field in the TSceneSpec and in the TpZoneLayout components default to "layout_name".

Please note that the Layout Name is case-insensitive and is always evaluated as lower-case characters. In the SceneListEditorWindow and in the ZoneLayout inspector whatever you type in the Layout Name fields is converted into lower-case letters automatically.
TpZoneLayout
You may have noticed in TSceneList that each TScene can have multiple TSceneSpecs. What’s that for?
Each TSceneSpec helps ChunkedSceneManager understand which TileFab is used to add tiles to a particular Tilemap group.
A Tilemap Group comprises a Grid with one or more child Tilemaps. Each Tilemap group uses one Chunk Size. For example, a Chunk Size of 32 means that 32x32 areas of Tiles are swapped in/out for all the Tilemaps which are in the group.
One limitation is that a Tilemap Group must be exclusive to a single ZoneLayout. Using a Tilemap Group with multiple ZoneLayouts will produce undefined results and possible exceptions.
Different Tilemap Groups can have different Chunk Sizes. For example, you can have two Grids with their child TileMaps. Each Grid/Map group is ‘handled’ by a TpZoneLayout. The SceneSpec tells ChunkedSceneManager which TpZoneLayout to use for a Tilemap Group.
In the demo program, the first TScene has two TSceneSpecs, implying two Groups. The second one paints a TileFab as an outer border and uses a single-TileFab Selector. Very simple, it just returns the same TileFab each time.
Since TpSceneSpecs are in a project asset and a TpZoneLayout is a component in a Unity scene, a direct connection by reference isn’t possible. That’s the reason for the Layout Name field of the TpZoneLayout component. At runtime, the name embedded in the TSceneSpec is used by TpChunkedSceneManager to locate a particular TpZoneLayout.
It’s all handled automatically, behind the scenes. All your code needs to do is to call the ZoneLayout’s UpdateTick method as your character moves, and handle several callbacks:
From ChunkedSceneManager
public event Action<TpChunkedSceneManager, TSceneList.TScene?>? OnBeforeTSceneChange;
Invoked just before current TScene is unloaded.
public event Action<TpChunkedSceneManager, TSceneList.TScene>? OnNewTsceneChosen;
Invoked just before the new TScene is loaded.
public event Action<TpChunkedSceneManager, TSceneList.TScene>? OnAfterTSceneChange;
Invoked just after the new TScene is loaded.
public event Action<TpChunkedSceneManager, TSceneList.TScene?, TSceneLayout, ZoneReg, TpZoneManager>? OnZoneRegAddedForLayout;
Invoked when a Zone Registration was added. You don’t normally need to handle this.
public event Action<TpChunkedSceneManager, TSceneList.TScene?, TSceneLayout, ZoneReg, TpZoneManager>? OnZoneRegDeletedForLayout;
Invoked when a Zone Registration was deleted. You don’t normally need to handle this.
public event Action<TpChunkedSceneManager, Tilemap, List<TilePlusBase>>? OnTptTilesWillBeDeletedForLayout;
Invoked when TilePlus tiles will be deleted. This is handy for extracting any save-file information before the tile is deleted. The demo program shows how this works for the particular save file scheme used in the demo.
Using Multiple ZoneLayouts
This is a really useful feature. You might have a Tilemap Group comprising a Grid with, say, 8 child Tilemaps and want to use a Chunk Size of 16 and a second Group comprising another Grid with a single Tilemap, but you want a Chunk Size of 64 for this Group because you want to expose sections for a ‘fog of war’ type of situation (which can be done but isn’t further discussed here).
In this hypothetical case you’d have two TSceneSpecs for that TScene along with two TpZoneLayout components. Each TpZoneLayout component has a field that you can use to name it; you copy the names into the two TSceneSpecs.
Then when ChunkedSceneManager loads a Tile Scene (TScene) it can easily make the connections between Layouts and their data sources and load/unload tiles and prefabs from the two different Tilemap Groups automatically using two different ZoneLayouts with different Chunk Sizes.
Chunked Scene Manager reconfigures the TpZoneLayout parameters on a per-scene basis, so you only need as many TpZoneLayout components as the most complex TScene requires.
This is implemented in the demonstration program where a second ZoneLayout is used to load a border. This is an example of two TpZoneLayouts with two separate Grids: MainGrid and BorderGrid.
This uses a second TileFab and Selector in Chunking/DesignTileFabs/Border. This is a single-TileFab selector, which simply means that it returns the same TileFab every time.
Note that the Border-SingleFab selector has the LoadFlags set to None. This selector doesn’t support ‘Chunkifying’ but that’s not needed.
This Border TileFab was created in the same ‘DesignScene’ as the actual TileScenes, and the source tiles were painted on the “Overlay” Tilemap. But the name of the target Tilemap is different: BorderTilemap. Normally this would mean that TileFabLib will look for the Overlay map to place the TileFab’s tiles. But that’s not what we want. There are two ways to handle this:
- Edit the TilemapName field in the BorderTileFab asset.
- Provide a remapping Dictionary to LoadTileFab.
Just to illustrate how to do it, a remapping is performed in ChunkingGameController.LoadingFilter in the section that begins with if (layout.m_LayoutName == "border"). The remapping Dictionary is updated in OnAfterTSceneChange, where we know the Current Scene and can determine if there’s a border or not. This is true in Level 0 but not Level 1.
In general, it’s much easier to just change the name in the asset.
Zones and LoadFlags
Zones
A Zone is a square area of a Tilemap which is internally represented by a RectInt. The X and Y sizes are the same and are the Chunk Size. So, for Tilemap Groups using a Chunk Size of, say, 16, each Zone is 16 x 16 tiles. Hence, the layout of all the Zones on a Tilemap acts as a sort of Super- or Higher-order grid.
LoadFlags
LoadFlags control specific aspects of the loading process. They are of flag Enum type FabOrBundleLoadFlags.
/// <summary>
/// Options for LoadTileFab and LoadBundle
/// </summary>
[Flags]
public enum FabOrBundleLoadFlags
{
    /// <summary>
    /// No flags used.
    /// </summary>
    None = 0,
    /// <summary>
    /// Use this in a TSceneSpec to indicate clearing all the Selector flags.
    /// </summary>
    OverrideNone = 4096,
    /// <summary>
    /// Load Prefabs. Normally true
    /// </summary>
    LoadPrefabs = 1,
    /// <summary>
    /// Clear Prefabs. Normally false
    /// </summary>
    ClearPrefabs = 2,
    /// <summary>
    /// Clear Tilemap. Normally false
    /// </summary>
    ClearTilemap = 4,
    /// <summary>
    /// Force Refresh. Normally false.
    /// </summary>
    ForceRefresh = 8,
    /// <summary>
    /// New GUIDs for TilePlus tiles. Normally true
    /// </summary>
    NewGuids = 16,
    /// <summary>
    /// Apply filtering only to TilePlus tiles. Normally true
    /// </summary>
    FilterOnlyTilePlusTiles = 32,
    /// <summary>
    /// Do not clone TPT tiles in TpTileBundle.Tileset
    /// </summary>
    NoClone = 64,
    /// <summary>
    /// Mark a Zone Reg as immortal. Note: ONLY valid when using ZoneManager and Layouts.
    /// </summary>
    MarkZoneRegAsImmortal = 128,
    /// <summary>
    /// Indicates to TileFabLib.LoadTilefab that this load is from a Chunkified bundle
    /// and the raw tile data is already cached. Note that this doesn't include
    /// any prefabs. Those still must be instantiated.
    /// </summary>
    Chunkified = 256,
    /// <summary>
    /// Most common set of options, with filtering only TPT tiles
    /// </summary>
    NormalWithFilter = LoadPrefabs | NewGuids | FilterOnlyTilePlusTiles,
    /// <summary>
    /// Most common set of options, with filtering for anything (if a filter is provided)
    /// </summary>
    Normal = LoadPrefabs | NewGuids,
    /// <summary>
    /// Default for Chunkified loads: see TSceneList
    /// </summary>
    ChunkifiedDefault = LoadPrefabs | Chunkified | FilterOnlyTilePlusTiles

}
Selectors have a field for specifying what flags to use when loading a TileFab or a section thereof.
The value of LoadFlags in the Selector is the default value for LoadFlags, but this value can be changed at other points of the processing.
When using the ChunkZoneSelector you need to use Chunkified at a bare minimum. ChunkifiedDefault is usually what you want. Note that this Selector’s Select method enforces the flag bits for Chunkified = true and NewGuids = false.
There are several ways that the LoadFlags from the Selector can be overridden on a TScene-by-TScene basis:
Each SceneSpec has a field called OverrideFlags which can be used to change these if needed for a particular TScene.
In other words, if the SceneSpec’s OverrideFlags aren’t ‘None’ then the SceneSpec’s OverrideFlags are poked into the Selector. Use OverrideNone to actually set the LoadFlags to None (OverrideNone has no meaning aside from this and shouldn’t be used except in a SceneSpec).
Note that these new values will be retained unless changed in another SceneSpec.
When using the LayoutTick method in ZoneLayout you can optionally modify these flags if you’ve provided a LoadingFilter callback. This is used in the demonstration program to mark Zones as Immortal (not removable) when an Immortalizer tile is found in a Zone.
Selectors
Selectors are used by the layout system to determine what and how to load. Each Selector has a reference to one or more TileFabs (but usually just one) and a LoadFlags field.
There are two types provided with this distribution: SingleFabChunkSelector and ChunkZoneSelector.
SingleFabChunkSelector is very simple and just causes the same TileFab to be painted to each Zone. This Selector does not accommodate variable Chunk Size: Chunk Size is the size of the TileFab referenced by the SingleFabChunkSelector.
ChunkZoneSelector is almost the same, however, its Chunkify method causes all the child Bundles of the referenced TileFab to subdivide themselves into the specified chunk size.
When Bundles “Chunkify” themselves, they ready their tiles for Tilemap loading using SetTiles(TileChangeDataArray). The tiles from the Bundle asset are reorganized into groups of tiles for each Chunk. For example, if a Bundle has a size of 512 x 512 and the Chunk Size is for the TScene is 128 then the Bundle is subdivided into 16 chunks arranged in a 4 x 4 matrix. Since this is performed at runtime, you can use any applicable chunk size.
This is a big advantage since you can easily tweak the chunk size during development or even in a deployed app for performance optimization on different platforms.
Useful Selector Methods
public List<RectInt>? AllLocators Get all of the locators for this Selector.
This subdivides the entire bounds of the TileFab into N RectInts of a size equal to the Selector's Chunk Size.
BoundsInt SelectorTotalSize(TpZoneLayout layout)
The returned BoundsInt defines the size of a single complete image ie the entirety of the Selector's TileFab. By default this is placed in Quadrant 1 of a 2D plane whose origin is at m_Layout.m_WorldOrigin
and the size is always a square.
Selector Query
List<TemplateSelectorQueryResults<T>> GetTilePlusTilesOfType<T>(Func<T, string, bool>? filter  = null,
                                                                    int size = 16,
                                                                    object? options = null)
Note: the options parameter is reserved.
where SelectorQueryResults is:
/// <summary>
/// name of TileMap
/// </summary>
public readonly string m_MapName;

/// <summary>
/// the tile instance of type T
/// </summary>
public readonly T m_Tile;

/// <summary>
/// the position
/// </summary>
public readonly Vector3Int m_Position;
So the return value is a list of TPT tiles of Type T in the entire TileFab, the name of the Tilemap that they're placed on, and the position.
New to TPT Version 6
One shortcoming of the method shown above is that it scans all of the TPT tiles in each bundle: time consuming. In TPT6 each bundle has a TypeCache, a Dictionary of Types (keys) and each Type's Instances. The Typecache is generated only when used.
List<TemplateSelectorQueryResults<T>> GetBundleTilesOfType<T>(Func<T, string, bool>? filter = null, int size = 16)
and
public override List<TemplateSelectorQueryResults<TilePlusBase>> GetBundleTilesWithInterface(Type interfaceType, int size = 16)
Each uses the Bundles' TypeCache and is more efficient than the older method shown above (retained for compatability). Note that GetBundleTilesWithInterface returns tiles cast to TilePlusBase.
What are these methods used for for?
When you load a new TileScene you will need information from it. For example, if you are using waypoints you might want to find out all the waypoints so you can position your player at a specific location: the most recently enabled waypoint.
But since in general only those chunks near the camera are loaded, not all of the TPT tiles in the TScene are actually loaded yet and hence are not locatable via the TpLib query methods.
You've loaded a save file with a GUID of a 'Start' waypoint but how do you find it if it isn't loaded yet??
Using GetBundleTilesOfType<T> is an easy way to extract this information. You can see how it's used in the next section.
This is a generic Query method which examines the Selector's TileFab, returning a list of information about each TPT tile.
The method accesses ALL the TileFab's bundles to create a list of a particular type of TPT tile, with filtering. Intended to be used during a scene or game init as this can take a while, depending on how many bundles are in the TileFab and how many TPT tiles are in each bundle.
It's NOT something to use inside a Monobehaviour Update: since the results are the same for each method call (unless the TileFab is changed, which is unlikely) , so cache the results if not needed immediately.
If you do cache the results please note that holding on to any tile references after the TScene is unloaded will result in memory leaks, so avoid that if at all possible or ensure that the references are nulled when you change TScenes.
The filter uses the tile ASSET and name of Tilemap as input params, returning a bool. If that bool is false then the tile is excluded from the method's output.
It's important to note that:
- The tile returned is a locked TilePlus tile ASSET in the PROJECT and not an INSTANCE in the scene.
- So don't mess with it. Reading the contents of fields is A-OK.
- Only the string name of the Tilemap (as preserved in the TileFab) is available.
- The bundles aren't unarchived, the locked TilePlus tile assets are examined directly
- In general it's a bad idea to maintain references to these tiles; doing so will cause a memory leak. So don't cache the TemplateSelectorQueryResults outside of the calling method.
TSceneInitializer
You use one of the SetScene overloads of ChunkedSceneManager to change TScenes.
The very last thing that TpChunkedSceneManager.SetScene does prior to invoking the OnAfterTSceneChange callback is to evaluate all the Initializers for each TSceneSpec in the TScene and each Initializer referenced by the TpZoneLayout that’s specified by name in the TSceneSpec.
Quite a mouthful. But what’s a TSceneInitializer, anyway?
It’s a Scriptable Object asset in your project. It must subclass TSceneInitializer. It has one method that you need to override: Exec(), and one serialized field: AugmentDefault.
TSceneInitializers are evaluated in a simple hierarchy: the TSceneInitializer referenced by the TpZoneLayout is the default and the TSceneInitializer referenced by the TSceneSpec (if any) is secondary: it can be used in addition to the default (augments) or instead of. The state of AugmentDefault is used to control what happens when there are two TSceneInitializers:
AugmentDefault on the TpZoneLayout’s TSceneInitializer is ignored.
Possible cases:
-
TSceneSpec has TSceneInitializer and so does TpZoneLayout
-
TSceneSpec TSceneInitializer has AugmentDefault = true
- exec
TpZoneLayout TSceneInitializer - exec
TSceneSpec TSceneInitializer(augments whatever the ZoneLayout’s TSceneInitializer does).
- exec
-
TSceneSpec TSceneInitializer has AugmentDefault = false
- exec TSceneSpec TSceneInitializer
-
-
only TpZoneLayout has TSceneInitializer
- exec TpZoneLayout TSceneInitializer
-
only TSceneSpec has a TSceneInitializer
- exec TSceneSpec TSceneInitializer
In words, if there’s a TSceneInitializer attached to the TpZoneLayout it’s the default and ChunkedSceneManager will always invoke its Exec method. If there’s also a TSceneInitializer in a TSceneSpec it can be used in addition to the default (augment) or instead of the default, or, if there’s no default at all then that one is used.
What are TSceneInitializers used for?
Entirely up to you. Examine MainGridSceneInitializer in the Layout demo for an example.
When loading a level you often need to do further configuration based on what was loaded. For example, your level might have waypoints, and you want to have a list of where they are so that you can position your Player character at the last waypoint. You may have some special features that are in some levels and not others.
Often this devolves into having lots of tests specific to particular levels. Using initializers allows you to have post-load operations that are generic to all levels in the TpZoneLayout’s referenced TSceneInitializer; sort of like a refactoring.
Then, for levels with specific initialization requirements, use another TSceneInitializer referenced by a particular TSceneSpec. The AugmentDefault setting on this secondary TSceneInitializer can be used to control whether it is used in addition to the default TSceneInitializer or instead of the default TSceneInitializer.
Let’s examine the MainGridSceneInitializer with some added comments:
/// <inheritdoc />
/// <remarks>Here the passed-in object to the callback is the TpChunkedSceneManager component</remarks>
public override bool Exec(TSceneList.TSceneSpec tSceneSpec,
                          TpZoneLayout          zoneLayout,
                          TpChunkedSceneManager sceneManager,
                          Func<TSceneList.TSceneSpec, TpZoneLayout, object?, object>? callback)
{

    //get all the waypoints in this Tscene
    var selector = tSceneSpec.m_Selector;
    if (selector == null)
        return false; //should not occur

    var zm = zoneLayout.LayoutZoneManager;
    if (zm == null)
        return false; //should not occur.

    ChunkingDemoGameState.m_TemplateWaypoints.Clear();
    ChunkingDemoGameState.m_TemplateWaypoints
                         .AddRange(selector.GetTilePlusTilesOfType<CdemoWaypointTile>(zoneLayout,
                                       WpFilter, 32));      \\FINDING ALL THE WAYPOINTS

    //filter does nothing, use is illustrative only.
    //the tile is an asset from a TileBundle.
    //the string is the tilemap name embedded in the bundle's parent TileFab.
    bool WpFilter(CdemoWaypointTile tile, string s)
    {
        return true;
    }

    ChunkingDemoGameState.m_TemplateNpcSpawners.Clear();
    //get all spawners.  This is just as an example; the returned value isn't used in this demo.
    ChunkingDemoGameState.m_TemplateNpcSpawners       FINDING ALL THE SPAWNERS
                         .AddRange(selector.GetTilePlusTilesOfType<NpcSpawnerTile>(zoneLayout));

     //FINDING ALL THE IMMORTALIZER TILES

    //get all Immortalizer tiles. This tile is a totally passive tile that describes an area.
    //ALL layout zones in this area will be immortal ie won't be deleted until
    //ALL zones become deleted on a change scene.
    var immortalizerTiles = selector.GetTilePlusTilesOfType<TpImmortalizer>(zoneLayout);
    ChunkingDemoGameState.S_TemplateImmortalZones.Clear();
    ChunkingDemoGameState.S_TemplateImmortalZonesLocatorPositions.Clear();
    //A hashset of all the locators. Hashset ensures no duplicates
    foreach (var qr in immortalizerTiles)
    {
        var pos     = qr.m_Position;
        var locator = zm.GetLocatorForGridPosition(pos);
        ChunkingDemoGameState.S_TemplateImmortalZones.Add(locator);
        ChunkingDemoGameState.S_TemplateImmortalZonesLocatorPositions.Add((Vector3Int) locator.position);
    }

    //now we have a hashset of the locator positions that are immortal. Faster, see loading filter callback.
    //note that even if there are multiple immortalizer tiles in one zone the HashSet will have only one entry.

    return true;
}
You’ll note the repeated use of selector.GetTilePlusTilesOfType.
- Use TPT6's new GetBundleTilesOfType or GetBundleTilesWithInterface: much more efficient.
This is a very handy method that can be used to extract any particular Type of TilePlus tile. It’s assumed that any interactive tile will be derived from TilePlusBase. There’s no similar facility for normal Unity tiles.
Normally there aren’t that many TilePlus tiles in a TScene. Nevertheless, it’s recommended to only use this method during initialization as it has to scan through all of the TilePlus tiles each time that it’s called.
About the Layout Demo
Save Files
There are two different types of save files:
- CdemoSaveFile.txt: contains the GUID of the current TScene (the GUID in the left column of the TSceneList asset’s custom editor window).
- CdemoSaveFile_guidstring.txt: contains JSON representing the data in the ChunkingDemoSavedData for a particular scene. The ‘guidstring’ is the GUID of the TScene that the data is for.
When the demo starts for the very first time, the first scene in the TSceneList is loaded since there aren't any save files. When a waypoint is reached the scene’s data is saved, and the guidstring part of the filename is the same as the currently-loaded scene’s GUID.
After that the CdemoSaveFile.txt does exist, and the GUID found there is used to load the corresponding TScene.
TdDemoGameController.Start
The Start method does all the setup for the demo game. It first calls VerifySetup which validates some of the fields and caches a few references.
Then Start waits for TpLib to be ready. Now let's load and set up our Services.
For simplicity this demo uses a SRS (Scriptable Runtime Service) as a global game state singleton. This demo is complex enough! A number of references are added to the GameState service. Note that this Service is basically just a Scriptable Object attached to TpServiceManager.
Some of the initialization is performed when TScenes are loaded using TSceneInitializers. Here we just set up a list of all the Tilemaps in the Unity scene, some other references and initial values such as a ChunkedSceneManager and CompositeCollider references, and a reference to the Player Prefab. The Player is added to a list of Persistent Game Objects. This list contains GameObjects that the Layout system should never remove.
The ChunkedSceneManager callbacks are set up, then the FileAccess and Layout services are loaded. The handles (references) are kept as local variables since we'll be using them repeatedly in the demo.
The last Service to load requires a bit of initialization: TpTilePositionDb. The initializaton just adds the maps that the PositionDb should monitor.
Next, the FileAccess Service is used to try to get the guidKey. That value is the GUID of the TScene to load. If this is the first time that this minigame starts then that ends up being an empty string.
The next line initializes the SceneManager component. This actually loads the appropriate TScene from the TSceneList reference of the SceneManager Monobehaviour component. If the passed-in GUID is string.Empty or if the passed-in GUID isn't found at all then the very first TScene is loaded. If the GUID matches a different TScene then that TScene is loaded.
In other words: Determining the location and GUID of the waypoint to use for placing the Player requires reading the save files. If found, the location and GUID of the current waypoint for the TScene are available. If not, the zeroth TScene from the TSceneList is used, and the single waypoint with the m_IsStartWaypoint field = true is used as the start position.
The SceneManager callbacks set up earlier:
   sceneManager.OnBeforeTSceneChange += OnBeforeSceneChange;
   sceneManager.OnAfterTSceneChange  += OnAfterTSceneChange;
   sceneManager.OnNewTSceneChosen    += OnNewTSceneChosen;
are used when the initial TScene is loaded and every time the TScene is changed.
-
OnBeforeTSceneChange: called just after SceneManager.SetScene is called. This is used to clean up the current Unity scene, mask the camera during a scene change, or any other housekeeping required before a TScene change commences.
-
OnNewTSceneChosen: The new scene was correctly chosen. In the demo this callback saves the GUID of the new TScene in the filesystem. That way the next time that the demo begins it will use that TScene as the starting TScene.
-
OnAfterTSceneChange: The load is complete. All TSceneInitializers have run. Here one performs any final setup. For the demo this includes:
Once we know where to place the Player, we create one if necessary and/or place it in the proper position. When creating a Player we also set up the Camera follower component (placed on the Camera GO).
Finally, we update all the TpZoneLayout components, which will be discussed next.
It’s important to note that while we know where the initial waypoint location is prior to updating the TpZoneLayouts, the actual TilePlus tile used for the waypoint is NOT actually on any Tilemap until after the TpZoneLayout updating is complete and the tiles are actually loaded.
That’s the reason for this:
if (startWaypointGuid != string.Empty)
{
    var guid = new Guid(startWaypointGuid);
    while (!TpLib.HasGuid(guid))
        await Awaitable.NextFrameAsync();
}
What’s happening here?
Once the waypoint is loaded its GUID will appear in TpLib’s GUID list. This is very conservative and probably redundant but is a good practice if you want to absolutely ensure against a race condition.
Finally, if a save file was located then use the JSON data from the save files to update loaded TilePlus tiles with the current state that they should be using.
Update
The Update method in TdDemoGameController monitors the camera and if the camera orthographic size changes the view is forced to re-layout with the new camera size.
User Input
User input is done in TdDemoPlayerController. It's pretty simple:
- Set up and accept input from the New Input System
- Use the PositionDb Service to see if the Player character prefab can move in the desired direction.
- Ensure that the Player prefab isn't going to move outside of the TScene boundary.
The PlayerController's Update method's local method TestForMove is used to interact with the PositionDb Service and do these and other tests.
- Convert from the Vector2 obtained from the New Input System callback into an enum value which describes what direction to move in.
- Do some conversions and obtain the Grid and World position of the Player prefab.
- Use the PositionDb Service to ensure that the Player stays on the road tiles.
- Use the PositionDb Service to see if there are any blocking tiles.
- Test the set of spawned GameObjects to see if there are any collider intersections.
- Determine what direction the Player should rotate to and perform the rotation.
This shows the hybrid approach used by the Layout system: PositionDb for tile collisions and colliders for GameObjects.
One advantage using the PositionDb for tiles is that the PositionDb responds to changes within one frame with low compute overhead. This is important when using the tweener since you want to be able to collide with the sprite and not the tile. A Tilemap collider can certainly adapt to sprite position and scale changes. However, when tweening these changes are happening every frame and that's extra work for the Tilemap collider.
What about Layout?
In this demo, that's performed in LayoutDemoLayoutService.
When the Player moves, TdDemoPlayerController invokes its OnPlayerHasMoved callback to TdDemoGameController. Let's take a look at that code in TdDemoGameController:
private async void OnPlayerHasMoved(Vector3Int newPlayerGridPosition, Vector3 currentPosition)
{
    if (!layout || !gameState)
        return;
    if (layout.LayoutIsRunning) //if layout is still in progress we just return.
        return;

    //do a layout pass.
    var layoutSuccess = await layout.UpdateLayout(currentPosition,
                                                              newPlayerGridPosition,
                                                              m_Grid!,
                                                              m_Camera!,
                                                              gameState.SceneManager!,
                                                              m_LayoutMessages);
    if (!layoutSuccess)
        Debug.LogWarning("UpdateLayout had error return...");

}
await layout.UpdateLayout is the only substantial action taken by this callback. Note that this whole callback chain is Async, hence, the Layout pass doesn't block anything else. Of course, the Layout code runs on the main thread so it can slow down your app if you set it up incorrectly.
UpdateLayout
- UpdateLayout checks to see if the Player has moved to a new Grid position. If not, there’s no need to re-layout the Tilemap chunks.
- Any null spawned GameObjects are deleted from the spawned GameObjects list.
- Then for each TpZoneLayout which is currently in use an Awaitable is created which invokes the TpZoneLayout’s UpdateTickAsync, which we’ll talk about next.
- WhenAll is used to await the completion of all the Awaitable tasks.
- Tiles are messaged.
Why Message Tiles Now?
Since the Player has moved to a new Grid position, all tiles that take action based on the Player's position need to know about the change.
At this stage, TilePlus tiles that are messaged may post an event to TpEvents.
- Waypoints: Waypoints can just save game data and the current waypoint position, or it can do that AND change to a new TScene.
- The m_IsLevelChange field in the tile controls whether the waypoint changes level or not.
- false: Save the TScene’s data (ChunkingDemoSavedData class is JSONized).
- true: Save the TScene’s data and load a new TScene based on the waypoint’s m_NextLevelGuid field.
- The m_IsLevelChange field in the tile controls whether the waypoint changes level or not.
- Treasure Chests: if the Player is within the Zone set by each chest then the chest animation is run, etc.
Waypoint Saves:
This updates the save data: if the Event was from a waypoint then we record the waypoint’s position and GUID in the ChunkingDemoSavedData instance, then disable all other waypoints in the TScene. Then the GUID of the scene is saved and the overall game data are saved.
TpZoneLayout.UpdateTickAsync
UpdateTickAsync uses information from the method’s parameter list and from the TpZoneLayout’s serialized fields in order to determine what to unload and load. Unloading means removing Chunks of tiles and Loading means adding Chunks of tiles. Chunks can be any size from 4x4 and higher. Note that the Chunk Size is specified as a single integer and not a Vector2Int: this means that chunks are always square. Chunk Size can’t be less than 4 and must be an even number.
Basically, the area in the Camera view area (plus padding) is examined for any empty Chunks using data about already-loaded chunks which are maintained in the TpZoneLayout’s spawned TpZoneManager. As the Camera moves around, new empty chunks will be encountered, and they’re loaded. Additionally, already-loaded chunks will pass out of the Camera view area (plus padding) and such chunks are deleted.
It’s deceptively simple; most of the actual loading and unloading is performed in TileFabLib and the “Chunkifying” of TileBundles is performed in the TileBundle assets themselves.
Using PositionDb Service with Layout
The TilePositionDb is a Scriptable Runtime Service: it’s an optional feature that you can use to keep track of what positions are occupied on one or more Tilemaps. The intent is to make collision detection easier in certain situations; typically, turn-based games.
Read more about it here.
Basically:
TilePositionDb hooks into a Tilemap callback and creates two internal datasets:
- A HashSet of occupied positions.
- A Dictionary of Tilemaps with sprite sizes for each position where the sprite size is more than one unit.
Oversized sprites? That occurs when the tile's sprite transform has an x or y size > 1.0f.
Why is this important? If you have tiles with sprites that are statically larger than 1x1 or if the sprites are changed at runtime, then this feature ensures that you can detect all possible positions that the sprite occupies.
For example, if you use the Tileplus Tweener, sprite sizes and positions are constantly changing. The PositionDb will automatically update its internal data as these values change.
One limitation may occur if you’re using the ‘Matrix’ tweening target, where you can change transform position, rotation, and scale in one tween. It’s possible to do all sorts of weird transformations and the sprite size calculations may not be able to handle every situation.
Interfaces
ITilePlus
This is the main interface for TilePlus tiles. Almost all of the interface is implemented in TilePlusBase. When creating new tiles you'd normally be inheriting from TilePlusBase, TpFlexAnimatedTile or TpSlideShow which complete the remaining methods and/or properties.
ITilePlus exists mostly to provide a Type-independent means of accessing TilePlusBase fields, properties, and methods.
Why so many properties? Fewer serialized fields for things that are just basically boolean switches used by various parts of the system. For subclasses that don’t implement a particular functionality, specific fields aren’t needed, just a constant value.
For those that do, serialized and non-serialized fields allow data to be provided via the properties, or a return value is computed for the property.
The TilePlusBase class implements all the items in the ITilePlus interface except those having to do with simulation: that has default values provided by the properties in the interface (C# 8 feature).
Most of what’s in ITilePlus are used internally and it’s unlikely that you’ll use them at all. But there are three which are especially useful: ParentTilemap, TileGridPosition, and TileWorldPosition.
-
ParentTilemap always has a reference to the tilemap for the tile. This is useful for a lot of things, but beware: if a tile tries to erase itself by using the ParentTilemap reference to place a null tile at the TileGridPosition, Unity will crash.
- Or, it did the last time I tried it. Don't try it. Use TpLib's DelayedCallback to change the timing of the null-tile placement.
-
TileGridPosition always has the location of the tile in Grid coordinates
-
TileWorldPosition always has the location of the tile in World coordinates.
ITpMessaging
ITpMessaging is used to implement targets for data packets sent via TpMessaging.
It's pretty simple:
/// <summary>
/// Interface for using TpLib SendMessage methods.
/// </summary>
/// <typeparam name="T">Type for sending a message</typeparam>
public interface ITpMessaging <in T> where T:MessagePacket<T>
{
    /// <summary>
    /// Send a message of type T
    /// </summary>
    /// <param name="sentPacket">The sent packet.</param>
    void MessageTarget(T sentPacket);

    /// <summary>
    /// Optional "are you ready?" method that can be used in filtering
    /// prior to sending a message. Useful in some edge cases. Override
    /// in implementation if necc. NOTE this is NOT checked internally
    /// somehow. You have to use a filter and test this.
    /// </summary>
    /// <returns>True if the tile is prepared to get the message.</returns>
    bool CanAcceptMessage() { return true; }

}
Message Packets are discussed here.
In your custom tile code you use explicit implementations for these members, for example:
void ITpMessaging<ActionToTilePacket>.MessageTarget(ActionToTilePacket sentPacket)
{
    ActivateAnimation(!AnimationIsRunning);
}
T is ActionToTilePacket. In this example, the packet information is ignored.
Here's a more complex example where the packet contents are used to control what happens. In this case, T is PositionPacket, which just contains a position (like the Player position). This is from TpAnimZoneSpawner.
void ITpMessaging<PositionPacket>.MessageTarget(PositionPacket sentPacket)

{
    var pos = sentPacket.m_Position;
    lastContactPosition = pos;

    pos -= m_TileGridPosition; //remove offset
    if (m_ZoneBoundsInt.Contains(pos))
        SpawnTileOrPrefab();
}
This tile has a 'Zone' (aka, BoundsInt) that describes an area. It doesn't even have to cover the tile itself. But the BoundsInt position is the offset of the zone from the tile's position and not an absolute position: think of it as relative addressing.
That's why the tile's grid position is subtracted from the position information in the packet before seeing if the packet's position information is a point within the BoundsInt.
If the position is within the BoundsInt then we spawn something, based on how the tile is set up.
ITpPersistence
This interface specifies endpoints for save and restore data.
It's something optional and a bit low-level. But it's an easy way to save and restore TPT tile's instance data of your choosing.
public interface ITpPersistence<out TR, in T> : ITpPersistenceBase
      where T:MessagePacket<T> where TR:MessagePacket<TR>
   {
        /// <summary>
        /// Implement to provide data to save
        /// </summary>
        /// <returns>TR.</returns>
        TR GetSaveData(object options = null);

        /// <summary>
        /// Implement to be sent data to restore
        /// </summary>
        /// <param name="dataToRestore">The data to restore.</param>
        void RestoreSaveData(T dataToRestore);

        /// <summary>
        /// Implementations may set this false if either
        /// data has already been restored OR if it doesn't
        /// want data restoration at all.
        /// New in 3.1
        /// </summary>
        bool AllowsRestore { get; }

        /// <summary>
        /// Implementations may set this false if
        /// nothing has changed in the tile.
        /// That avoids saving data from this tile if nothing
        /// has changed since instantiaton.
        /// Default is true;
        /// New in 3.1
        /// </summary>
        bool AllowsSave => true;

   }
There's a chapter on Persistence here.
Layout-Related
ITSceneInitializer
Scene Initializers are used as a way to move scene initialization code into Scriptable Object assets, and are discussed here.
IChunkSelector
Selectors are used by the Layout system to find out what to put where, and are discussed here.
Others
These are mostly for internal use.
IActionPlugin
Used with ZoneActions and EventActions to provide a way to have a second asset (typ, a Scriptable Obj but can be any UnityEngine.Object) be inspectable thru the IMGUI tile editor (selection inspector).
Note that the asset ought to be a PROJECT asset and NOT a SCENE object, although this is not enforced or checked.
IHoverableControl
This is used to mark a tile as a 'Hover Zone', that is, a tile which accepts zone-based hover events. This interface inherits from ITpMessaging<BoolPacket> and the MessageTarget for a BoolPacket must be implemented. See the UiHoverZone script for an example.
When a tile implements this interface (and it is on the SINGLE tilemap used for Hoverable controls) it gets messaged with a BoolPacket (a small class with a boolean value in it) when the zone as described by tile's ZoneBoundsInt (part of every TilePlus tile) when the Zone is entered and exited.
Basically, for Hover Zones the zone is set (as usual) within the HoverZone tile to encompass whatever area you want. When that area is entered, a BoolPacket is sent with the value = true and when the area is exited the packet is sent with the value = true. The HoverZone tile uses this to do whatever it wants; typically the tile will invoke a ZoneAction S.O. which can do whatever arbitrary task you want. As set up in the UI demo they're used for tooltips.
- See this.
IScriptableService
This is used by TpLib's Update dispatcher and by the ServiceManager. See Services.
ITpSpawnUtilClient
This is used by TPT tiles that wish to use the spawner in a particular way. You'll never need it but you can see how it's used in TpAnimZoneSpawner and TpAnimatedSpawner.
ItpUiControl
This provides a Type-independent way of communicating with the TPT UI-variety tiles.
IZoneActionTarget
This interface is applied to tiles that can be targets of Zone Actions. Zone Actions may re-transmit TpMessaging messages to other tiles, but always should test this interface to see if the tile wants to accept such messages. See the Zone Actions chapter.
Attributes
TilePlus Script Attributes
If you’ve done any Unity coding then you’re probably familiar with Attributes by now, such as those having to do with serialization, or those affecting inspectors. The normal Unity Tile Selection inspector only displays the fields of the Tile class and no others. But we’d like to be able to view and modify fields and properties from TilePlusBase-derived tiles.
The Tile+Brush and Tile+Painter Inspectors and underlying library functions control what you see when using the Selection and Brush inspectors. It’s a fair amount of IMGUI code. But normal humans should not have to struggle with that. So here in TilePlus land, we have several new Attributes which can be added to your code to display fields, properties, and even invoke methods or provide custom IMGUI code for functionality that the inspectors can’t handle.
The Selection Inspector and the Brush Inspector (and their associated equivalents in Tile+Painter) use these attributes to display simple fields and properties. Fields can be modified, and the changes are saved in the Scene. Like any other change made to a scene, you need to save the scene to persist the changes. Normally, the Configuration Editor sets “Autosave” on and the save is done automatically for every change you make.
Your original TPT tile in your Project folder will never be altered. Note that field, property, and method declarations need to be public or protected to work with these attributes.
| Attribute | Affected | Description |
|---|---|---|
| [TptShowField] | Selection Inspector | The types of fields that you can use this on are bool, int, float, string, Color, Vector2, Vector3, Vector2Int, and Vector3Int. Ints and floats can optionally use range sliders. |
| [TptShowEnum] | Selection Inspector | Show Enums in a pop-up. |
| [TptShowObjectField] | Selection Inspector | Objects such as GameObjects can be referenced with this attribute. |
| [TptShowAsLabelSelectionInspector] | Selection Inspector | For a field or property, the value returned is displayed with ToString, so whatever you mark with this attribute must have a ToString() method or return a string. |
| [TptShowAsLabelBrushInspector] | Brush Inspector | Same as above. |
| [TptShowMethodAsButton] | Selection Inspector | Invoke a method, see below. |
| [TptShowCustomGui] | Selection Inspector | Create your own IMGUI function |
| [Tooltip] | Selection Inspector, Brush Inspector | This is a normal Unity attribute that you can find in the scripting reference. Note: Fields only. |
| [TptNote] | Selection Inspector | Add a note to a field or method. Note can be a static string or be provided by a property. |
If a tooltip is provided as part of any attribute, then any normal [Tooltip] attribute will be ignored.
Display Order
The display formatter organizes the various attributes in the same order as the class hierarchy for the tile. For example, a TpFlexAnimatedTile tile shows information from TpFlexAnimatedTile followed by TilePlusBase.
In each section, Attributes are processed in the following order:
- Properties with TptShowAsLabelSelectionInspector or TptShowAsLabelBrushInspector.
- Methods with TptShowCustomGui
- Methods with TptShowMethodAsButton
- Simple fields with TptShowField
- Enum fields with TptShowEnum
- Object fields with TptShowObject field
Common Parameters
Common Parameters
These parameters apply to all Attributes except TptShowAsLabelBrushInspector.
| Param | Value | Description |
|---|---|---|
| spaceMode | enum SpaceMode | Adds space or a line before or after the item, or both before and after. |
| showMode | enum ShowMode | Controls visibility: Always, only when playing, only when not playing, or use a property. |
| visibilityProperty | string | When showMode == Property then this is the name (in quotes) of the property is used to control visibility. If the property returns true, then the item is shown. Prepending a ! character to the name of the property inverts the property’s value. |
About “Show as Label” Attributes
- You can create a property just to show it as a label, based on other values in your class. See “Tips,” below.
- The Brush Inspector is only affected by
[TptShowAsLabelBrushInspector], hence, it can only show strings for both fields and properties. This is because what’s displayed is information about the actual asset, and that should only be changed from the Project window and a normal Unity inspector. - These attributes have a few extra parameters:
- useHelpBox: show as an IMGUI HelpBox rather than a label.
- splitCamelCaseNames: controls how field or property names are displayed.
- toolTip: a Tooltip for the field or property.
About TptShowCustomGui
This attribute is placed above a method in a tile’s code. The method should use IMGUI to display whatever information desired. Note that the method name itself is irrelevant.
The method should have a signature like this: public CustomGuiReturn CustomGui(GuiSkin,Vector2,bool)
The GuiSkin may be useful in the method, and the Vector2 has button sizes. You may or may not need these. The boolean value is true if the tile is in a prefab and shouldn't be edited. You can use this to display a warning.
If the access is not public or protected, then the method will be ignored. The return value from the custom GUI method indicates if any fields were modified, whether the tile should be refreshed, and whether to force a scene save.
It’s not advised to make custom GUI methods virtual, but if you do, please use ‘new’ rather than ‘override’ in subclasses as using override will make the generated GUI appear in the same foldout section as the overridden method.
About TptShowField for int and float fields
TptShowField’s min and max parameters control whether ints and floats display editable fields or slider controls. If these are both zero (the default) then normal editable fields are displayed. If not, then a slider using those two values will appear. When the slider is visible and the slider values change, the configuration setting “AutoSave” is ignored, as that results in way too many scene saving invocations as the sliders are moved. The configuration setting “Allow sliders” can be unchecked to revert to editable fields. Using these parameters with other types of fields has no effect.
How to Trigger Methods
The TptShowMethodAsButton attribute is very handy for debugging. If you place this attribute right above a public or protected method, a button will appear which you can use to Invoke the method from within the Selection Inspector. The buttons won’t appear if the tile is simulating. Note that if the method access is private then the method is ignored.
This comes with one restriction: the method must have no parameters, and you’ll see an error message in the Selection Inspector if the method has parameters. You can find numerous examples of this technique in the supplied TPT tiles.
About Object Field Attributes
The TptShowObjectField attribute requires a specification for Type. For example:
[TptShowObjectField(typeof(GameObject))]
public GameObject m_AGameObject;
This field can be used to drag Scene or Project references into fields for GameObjects, Components, Transforms, Prefabs, etc., when the Selection Inspector is focused on a TPT tile.
Another important parameter for this attribute is allowSceneObjects. If this is true, the Object field can include scene objects. Set this parameter to false if the tile will end up in a Prefab or will be archived in a TpTileBundle.
Using TppShowField with Unsupported Types
If the TppShowField attribute is used on an unsupported Type or custom Type, an Object picker is shown, or in some cases just the ToString() representation of the object. If the field represents a UnityEngine.Object (for example, a Scriptable Object) then an Open Inspector button will appear.
For example, TpFlexAnimatedTile uses this feature to display the name of the AnimationClipSet. Since that’s a Scriptable Object asset, the button opens an Inspector where you can edit the list of sprites. Note that the list of sprites is a normal asset, so if you change anything it affects any and every TPT tile that uses the asset.
Field, Enum, Object special feature
The Field, Enum, and Object attributes have another parameter: updateTpLib. The default value is false. If set true and the field, enum, or Object is changed in the Selection Inspector or TilePlus Utility then TpLib.UpdateInstance is called. This feature was created to accommodate multiple tags for a tile, and TpLib.UpdateInstance handles that automatically.
To support custom use of this feature, during Editor sessions, TpLib.UpdateInstance writes an array of field names that were modified to the overridable property UpdateInstance, although it’s unlikely that there’d be more than one field name.
You can use .Contains on the received array to see if there’s a field you’re interested in if you ever need to use this. Examples can be found in TpFlexAnimatedTile.cs and TpSlideShow.cs, where changes in the sprite and slide assets require some internal updates to the tile instance.
In Play Mode
The ShowMode value for attributes can be used to control what is displayed when in Play mode. However, some features automatically change in Play mode or when a TilePlus tile is Locked.
- Unsupported field editor buttons become unavailable.
- All fields display as IMGUI Helpboxes, except if you set ForceFieldInPlay = true
- Note that ForceFieldInPlay is intended for development only and depending on the field Type may have unintended results including crashes.
If you have any concern that the display might affect your playing app, either ensure that the Tile+Painter window is closed, and that the Selection Inspector isn’t focused on a tile or use the Configuration Editor (Tools/TilePlus/Special/Configuration Editor) to toggle the “Safe Play Mode.”
Notes
The '[TppShowAsLabel…]' attributes allow you to display a property. This can be useful in many ways. Here’s an example from TilePlusBase.cs that shows how the Tag property as shown in the Brush Inspector works.
/// <summary>
/// Property to get the optional tag
/// </summary>
/// <value>The tag.</value>
[TptShowAsLabelBrushInspector(true)]
public string Tag
{
    get => string.IsNullOrEmpty(m_Tag)
               ? string.Empty
               : m_Tag.Trim();
    set
    {
        #if UNITY_EDITOR
        if (!TpLib.IsPlayMode)
            #endif
            m_Tag = value.Trim();
    }
It’s not a great idea to do anything too complex since there’s repeated access during an Editor session when the Selection Inspector or TilePlus Utility window are in use.
Another way to add a display string is to use the TptNote attribute, for example:
[TptNote(false, "Only X and Y are used")]
public Vector3 m_EndSize = new(2, 2, 1);
This attribute is only used in the Selection Inspector.
Persistence
TilePlus Persistence
Introduction
Look at any Unity or Reddit forum and you'll see endless posting about how to go about saving and restoring data.
TilePlus Toolkit has a built-in, efficient, and simple to use save/restore scheme designed specifically for TilePlus tiles: TpPersistence.
TpPersistence lets you obtain save data directly from tiles and restore it directly to tiles using the ITpPersistence interface for Type independence.
It's not a TilePlus service like the Spawner or Tweener. Rather, it's a flexible interface specification that lets you easily save and restore arbitrary save-data from TPT tile instances without regard to what Type they are.
The tile class itself decides what it wants to save and restore and supplies that information as a string (e.g., JSON although there's no requirement to do so) and the TPT tile's GUID.
The GUID can be used to look up the tile instance when moving data from the filesystem to a tile.
ITpPersistence interface
The ITpPersistence interface is pretty simple:
public interface ITpPersistenceBase { }


public interface ITpPersistence<out TR, in T> : ITpPersistenceBase
               where T:MessagePacket<T> where TR:MessagePacket<TR>
{
   /// <summary>
   /// Implement to provide data to save
   /// </summary>
   /// <returns>TR.</returns>
  TR GetSaveData(object options = null);

   /// <summary>
   /// Implement to be sent data to restore
   /// </summary>
   /// <param name="dataToRestore">The data to restore.</param>
  void RestoreSaveData(T dataToRestore);

   /// <summary>
   /// Implementations may set this false if either
   /// data has already been restored OR if it doesn't
   /// want data restoration at all.
   /// </summary>
  bool AllowsRestore { get; }

   /// <summary>
   /// Implementations may set this false if
   /// nothing has changed in the tile.
   /// That avoids saving data from this tile if nothing
   /// has changed since instantiaton.
   /// Default is true;
   /// </summary>
  bool AllowsSave => true;
}
If you've already read the Messaging chapter this may look familiar: it uses the same MessagePacket abstract class.
But there are two different 'packets': one for getting save data (TR) and one for restoring data (T).
They're both derived from the abstract MessagePacket<T> class and can be different.
Here's an example from the LayoutSystem demo, specifically, the TreasureChest TPT tile:
SaveDataWrapper ITpPersistence<SaveDataWrapper, StringPacket>.GetSaveData(object? options)
{
    var obj = new TreasureChestSaveData(this, wasEncountered);
    return new SaveDataWrapper() {m_Json = JsonUtility.ToJson(obj, false), m_Guid = TileGuidString};
}

/// <inheritdoc />
void ITpPersistence<SaveDataWrapper, StringPacket>.RestoreSaveData(StringPacket dataToRestore)
{
    if(dataToRestore == null)
        return;
    var data = JsonUtility.FromJson<TreasureChestSaveData>(dataToRestore.m_String);
    if (data != null)
        wasEncountered = data.m_Encountered;
    if (!wasEncountered)
        return;

    //clear the sprite and schedule removing this tile.
    ClearSprite(); //avoids a visual artifact.
    if(ParentTilemap)
        DelayedCallback(this, () => { ParentTilemap.SetTile(TileGridPosition,null); }, "Tchest-deltile");
}
PLEASE NOTE that these implementations are 'Explicit' and should always be written this way.
and this is SaveDataWrapper (part of the standard distribution)
/// <summary>
/// A simple wrapper class for saving data
/// </summary>
[Serializable]
public class SaveDataWrapper : MessagePacket<SaveDataWrapper>
{
    /// <summary>
    /// The JSON string for this object
    /// </summary>
    [SerializeField]
    public string m_Json = string.Empty;
    /// <summary>
    /// The GUID to be used when restoring data
    /// </summary>
    [SerializeField]
    public string m_Guid = string.Empty;

    /// <inheritdoc />
    public SaveDataWrapper() : base(null)
    {
    }
}
So What Does It Do?
Start from the bottom-up: SaveDataWrapper. Two strings. One is whatever JSON-formatted data that you want to save. The other is the GUID of the tile.
The basic idea is that TPT tiles won't usually have a lot of data to save. Create a small class specific to what you want to save. JSON-encode the class into a string, and place that JSON string into an instance of SaveDataWrapper along with the GUID of the tile.
To do this you need to create a class for whatever data you want to save. In the case of the TreasureChest tile it just needs to save a boolean value that indicates whether or not the Treasure Chest has been encountered, i.e., triggered and the opening treasure chest animation has played.
public class TreasureChestSaveData : MessagePacket<TreasureChestSaveData>
{
    /// <summary>
    /// true if the treasure chest was encountered.
    /// </summary>
    [SerializeField]
    public bool m_Encountered;

    /// <inheritdoc />
    /// <param name="sourceInstance">Source of message or null</param>
    /// <param name="encountered">true if this chest was already activated.</param>
    public TreasureChestSaveData(Object? sourceInstance, bool encountered) : base(sourceInstance)
    {
        m_Encountered = encountered;
    }
}
Process
Saving
When a tile handles the GetSaveData implementation it just has to return a string in whatever format it understands. It doesn't have to be JSON although that's really convenient.
SaveDataWrapper ITpPersistence<SaveDataWrapper, StringPacket>.GetSaveData(object? options)
{
    var obj = new TreasureChestSaveData(this, wasEncountered);
    return new SaveDataWrapper() {m_Json = JsonUtility.ToJson(obj, false), m_Guid = TileGuidString};
}
So we create an instance of TreasureChestData, JSON-ize it, and 'wrap' it in a SaveDataWrapper.
Restoring
When a tile handles the RestoreSaveData implementaton it's sent a packet containing a string that can be JSON-decoded as shown below.
void ITpPersistence<SaveDataWrapper, StringPacket>.RestoreSaveData(StringPacket dataToRestore)
{
    if(dataToRestore == null)
        return;
    var data = JsonUtility.FromJson<TreasureChestSaveData>(dataToRestore.m_String);
    if (data != null)
        wasEncountered = data.m_Encountered;
    if (!wasEncountered)
        return;

    //clear the sprite and schedule removing this tile.
    ClearSprite(); //avoids a visual artifact.
    if(ParentTilemap)
        DelayedCallback(this, () => { ParentTilemap.SetTile(TileGridPosition,null); }, "Tchest-deltile");
}
Here, the JSON is unpacked into an instance of TreasureChestSaveData, and the 'wasEncountered' value is restored.
If the tile HAD been encountered before it should be deleted. We clear the sprite and set up a delayed callback that will delete the tile near the end of the current frame.
Why delay it? Unity may/might/can crash if a tile itself does SetTile(position, null).
It's much safer to use DelayedCallback. With no 'delay' time specified, the callback is invoked at the next TpLib Update (which is always near the end of a frame).
In the same Layout demo you can look at the Waypoint tile. There you'll see that the data restore process is used to change the visual appearance of the Waypoint: if it had been encountered before then the Waypoint displays as enabled (a different sprite).
There's Something Missing
- (It's not a chocolate bunny....) What's missing is what you have to do to actually save and restore data. That's of course up to you.
A sample implementation can be found in the Layout demo. In LayoutDemoSaveData.cs you'll see that the JSON and GUIDs from the tiles are saved in a dictionary which is serialized along with all the other save data.
Since that's a Layout system demo, chunks of tiles are added and deleted as the player character moves around. There's an in-depth chapter on this demo which explains how save data is moved beteen tiles and save-files as tiles are loaded and unloaded by the layout system.
A simpler implementation when not using the Layout system could just save the tile JSON and GUIDs as a separate file.
That Interface Specification...
public interface ITpPersistence<out TR, in T> :
ITpPersistenceBase where T:MessagePacket<T> where TR:MessagePacket<TR>
This notation means that the T parameter is covariant and the TR parameter is contravariant.
In practice:
- TR is a value to be returned. In these examples, that's SaveDataWrapper.
- Or any concrete subclass of the MessagePacket abstract class.
- T is a value to be sent. In these examples, that's StringPacket.
- Or any concrete subclass of the MessagePacket abstract class.
(this is a somewhat simplistic explanation for an advanced C# topic).
So you do not have to use SaveDataWrapper, although it is usually a good class to use.
Neither do you have to use StringPacket.
However, these are very flexible and are able to handle most uses case where you'd want to store and restore tile data.
As long as you implement the interface EXPLICITLY you should have no issues.
Notes
You don't have to use JSON. For a simple use like shown above, you could have an empty or non-empty string represent the two states of a boolean value.
wasEncountered = string.IsNullOrEmpty(dataToRestore.m_String);
if (!wasEncountered)
   return;
However, if you look at how the data are handled in the Layout demo, using JSON has a few advantages:
- All tiles use exactly the same process to encode save data.
- It's easy to modify the save-data as Tiles are added and deleted during layout without having to know that tile A uses JSON and tile B does something different.
References
From the .NET docs:
Create Your Own
Create new TilePlus tiles
Basics
In most cases, the class that you want to subclass is TilePlusBase. But you might want to extend from one of the supplied tiles like TpFlexAnimatedTile. Many TilePlus Tiles’ fields, properties, and methods are marked as ‘virtual’ so they can easily be overridden.
When creating subclasses of TilePlus tiles you should specify a namespace. Use Tools/TilePlus/Configuration Editor and add your namespace to the Namespaces field. Then click the Reload button. Namespaces are required for derived TilePlus classes. If the namespace isn’t added to the system via the Configuration Editor, then the Selection and Brush inspectors will not display any fields or properties that you’ve decorated with TilePlus attributes.
Many of the properties in the sections demarked by #if UNITY_EDITOR are things that you can ignore. If you want fields or properties to display in the Tile+Brush Inspector, you can use attributes to display them. The TilePlusBase property “Description” can be used to show some text information about your tile in the Tile+Brush inspector.
It’s helpful to examine the ITilePlus interface as it’s not cluttered up with code, tooltips, attributes, conditional compilation directives, and so on.
Properties
Why so many properties?
Fewer serialized fields for things that are just basically boolean switches used by various parts of the system. For subclasses that don’t implement a particular functionality, specific fields aren’t needed, just a constant value. For those that do, serialized and non-serialized fields allow data to be provided via the properties, or a return value is computed for the property.
The TilePlusBase class implements all the items in the ITilePlus interface except those having to do with simulation: that has default values provided by the properties in the interface (C# 8 feature).
Most of what’s in ITilePlus are used internally and it’s unlikely that you’ll use them at all. But there are three which are especially useful: ParentTilemap, TileGridPosition, and TileWorldPosition.
- ParentTilemap always has a reference to the tilemap for the tile. This is useful for a lot of things, but beware: if a tile tries to erase itself by using the ParentTilemap reference to place a null tile at the TileGridPosition, Unity will crash.
- TileGridPosition always has the location of the tile in Grid coordinates.
- TileWorldPosition always has the location of the tile in World coordinates.
Methods
Simulate can be implemented to use the Editor update event to do something. In TpAnimatedTile and TpFlexAnimatedTile it’s used to show an animation preview. It's unlikely that you'd need to implement this yourself if you inherit from classes that already implement this feature.
TilePlusBase has two other methods that you probably want to override:
- StartUp
- GetTileData
- ResetState.
Overriding StartUp must be done a specific way: a simple example can be found in TpAnimatedTile. Basically, you must call the base method as usual, but pay attention to the return value: if it’s false your override must return false without doing anything else:
//this has to be the first thing to do.
if (!base.StartUp(position, tilemap, gameObject))
	return false;
It would be an extremely bad idea to change any code in the Startup method in TilePlusBase. Worse than being eaten by the Sarlacc on Tatooine or looking into the atomic furnaces of the Forbidden Planet, Altair IV.
GetTileData is probably the most complicated override, aside from being sure to call the base class or duplicating its code, examine some of the examples for guidance. But it’s obviously extremely specific to what you’re trying to do. Be sure to check for a tile actually being on the Palette rather than in the Scene. Otherwise, your tile might animate in the Palette window. GetTileAnimationData code should also test for this condition.
ResetState is used in-editor when using the Bundle Tilemaps menu command or the TilePlus Bundler command in the hierarchy window’s context menu.
It’s also used when you pick and re-paint a clone TPP tile or use TpLib.CopyAndPasteTile.
It's also used at Runtime in certain cirumstances.
For example, if you have some boolean field that you set true after StartUp to indicate that you've initialized something then that should be reset or the field will remain true.
The implementation must reset fields so that stale data isn’t persisted. Be sure to call the base method. This is a misleadingly simple method that you need to think about carefully. You don’t want to reset all fields, or you’ll be undoing changes made to your TPT tile. See the various implementations for examples.
If you're using the Layout system exclusively, you should know that TPT tiles are cloned every time they're placed. Hence, there are no 'stale' cached tiles when using the Layout system.
If you into unexpected tile code behaviour this is a good place to look first.
Namespaces and Interfaces
Namespaces
The GUI formatter for the Brush and Selection inspectors displays information in class-hierarchical order. But it needs to know what not to display, otherwise it will breeze through the class hierarchy all the way to UnityEngine.Object.
Therefore, by default it ignores anything outside of specific namespaces. The TilePlus namespace is hard-coded in.
The configuration editor has a Namespaces text field where you can provide a comma-delimited list of namespaces to use. The default for that text field includes TilePlusDemo.
When creating your own tile classes, place the namespace that you’re using in this list. Don’t forget commas! Note that if you add a namespace, attributes are still required to display information.
For example, if you were to add the UnityEngine.Tilemaps.Tile namespace then the TilePlusBase’ base class of Tile would not appear in a foldout.
- Note: while you can certainly add this namespace and add TilePlus attributes to your own subclasses of Tile, the results might not be what you expect, and any editing changes would affect the project asset; i.e., ALL placed Tiles.
Please click the Reload button in the configuration editor when you change this. Also, be aware that if you click “Reset To Defaults” that you’ll need to re-add the namespaces!
Interfaces
ITilePlus specifies several properties and a few methods that are common to all tiles subclassed from TilePlusBase since that class implements everything in the interface.
Please note that any subclasses of TilePlusBase using ITilePlus properties with default members need to specify the interface to ‘override’ the defaults. This can be seen in the tiles which support simulation (TpSlideShow, TpAnimatedTile, and TpFlexAnimatedTile).
ITpPersistence specifies properties required for tiles using TpLib’s save/restore framework.
ITpMessaging specifies properties required for tiles using TpLib’s messaging framework.
ITpSpawnUtilClient specifies properties required for tiles which spawn prefabs or paint tiles when using the SpawningUtil library methods.
ITpMessaging and ITpPersistence are the interfaces you’ll most likely implement if creating your own tiles and you want to use TpLib’s messaging and save/restore frameworks. If you don’t want to use those then you can ignore those interfaces.
Ui System
UI System?
No, it's not a replacement for Unity's native UI systems. There are enough of those already!
It's a way to have click/touch and hover type interactions with on-screen TPT tiles and can be used to add interactivity to tiles. But there's no UI builder - you have to lay out and configure everything manually.
Generally, you create a UI-Capable tile by implementing the ITpUiControl interface. However, it's recommended that you try to use the suppled UI tile varieties if possible or use those as base classes.
The tiles are controlled by messages: the easiest way to use this is to use the TpInputActionToTile component.
ItpUiControl has two main functions:
- Get information about supported effects and start an effect.
- Set values and get values in various formats.
Setting values is done with one method implementation: SetValue(object value, bool withNotify = true)
You convert the object into whatever your tile requires.
Getting values is done with several implementations for various formats: int, bool, object, string, or Char.
A control can use the AcceptsClicks and AcceptsHover to control what sort of messages it gets.
For example, a control that normally accepts clicks can temporarily return false from the AcceptsClicks property if it is still executing an effect such as a tween which hasn't completed yet. A second click can be inhibited until the effect is complete.
AcceptsHover should only be true if you want to get Hover messages. Hover messages are only sent on state changes, i.e., when the point's position changes to a different Grid position. See the TpActionToTile script for more information and see the UiAnimButtonTile script for an example.
SupportedEffects returns a flags enum that specifies various types of effects such as BumpSize, BumpColor, etc. Return a value which describes which effects your tile actually implements.
RunEffect is used to execute an effect. You can add duration, Vector3, and/or Color endpoint values to use for tweening or color changes.
UI Tiles
UiButton
This is the simplest UI element, implementing a momentary button.
- Subclass of TpSlideShow
- When clicked, the color changes. Hovering isn't supported.
- It doesn't support SetValue (since it's momentary) nor any effects.
- Except for ITpUiControl.GetCharValue, all the GetValue basically return the slide index.
- GetCharValue returns a character based on the slide index
- It's intentionally really simple and easier to understand.
- It can post events and will invoke its ZoneAction if the reference exists.
UiAnimButton
This hoverable button animates when hovered or clicked.
- Subclass of TpFlexAnimatedTile.
- Can be set as momentary or toggle.
- When clicked, the animation starts or changes.
- It can post events but does not use ZoneActions.
- No effects are supported.
- SetValue is supported: input should be a bool value.
- GetIntValue returns 1 if the current animation clip is the clicked animation or 0 if not.
- GetBoolValue is the same but returns true or false.
- GetCharValue returns a space (no real meaning)
- GetStringValue returns the current animation clip name.
- (object)GetValue returns the same thing as GetBoolValue but cast to an object.
- Implements EventActionObject.
UiToggleButton
This implements a toggle button.
- Subclass of TpSlideShow
- When clicked, the slide alternates between two images for ON or OFF.
- Hovering isn't supported.
- SetValue ignores the value.
- Supports posting events and/or Zone Actions.
- No effects are supported.
- Since there are only two possible states, all of the GetValue implementations return a value related to the SlideIndex, i.e., 1 or 0, true or false, etc. GetCharValue returns a space character.
UiRadioButton
This implements a Radio button and a Radio Button Set. Use Tags or the Zone to create a Radio Button Set.
- Subclass of TpSlideShow.
- Effects and Hover are not supported.
- Similar to UiToggleButton, all the GetValue implmentations return a value related to the SlideIndex (0,1 or T/F).
- Always sends an event when clicked. Zone Actions supported.
UiHoverZone
This implements a hoverable but not clickable zone. It does nothing on its own aside from responding to a message that indicates whether the zone is entered or exited. That message is sent by the ActionToTile S.O.
- Doesn't respond to clicks or hover. No Set or GetValue.
- If this tile is present then it is messaged when the pointer enters or exits the boundary of the Zone.
- Must implement IHoverableControl (includes the messaging target, which you must write as an implicit interface implementation.
An example can be see in the TileUi demo: the unwieldly-named UiHoverTileZoneToPromptString_TileZoneAction : TpTileZoneAction pokes a tooltip to an array of ascii characters when a UiPromptHoverZone (subclass of UiHoverZone) area is hovered-over.
UiAsciiChar
This implements display of a single, non-editable, ASCII character from a sprite set.
- Subclass of TpSlideShow.
- 'BumpSize' effect supported, Hover not supported.
- Can post events.
- SetValue supports:
- string : uses first character.
- char: uses the char.
- integer within range: sets the slide (visually, the character)
- bool:
1or0is displayed.
- GetIntValue: the slide index (not really useful)
- GetBoolValue returns true if the character is '1'
- (object)GetValue: same as GetCharValue cast to object.
- GetCharValue: the character.
Normally you'd only care about the character value and you'd be inputting characters to SetValue and returning them (probably never need to) from GetCharValue.
But what if you want a string? That's next.
UiAsciiString
Similar to UiHoverZone, this doesn't do anything visual. You use the Zone Editing feature of all TilePlus tiles to set up a zone which includes any number of UiAsciiChar tiles with optional simple justification and wrapping. You write a string to the UiAsciiString tile and it distributes it to the Char tiles.
- Clicks and Hover are not supported.
- RunEffect relays the passed parameters to each AsciiChar tile.
- Which may or may not implement them. You can subclass AsciiChar to add effects.
- Events are not issued.
- SetValue:
- bool : clear string.
- int : convert to string.
- string : use directly.
- JustifiedString (a custom class): justify and use the string value from the JustifiedString instance.
- GetValue:
- int : 0
- bool : false
- char : first char of string sent previously.
- object : null
- String: string sent previously.
This tile is only a zone. Arrange a seres of UiAsciiCharTiles in a rectangular array (1 col and N rows, or 1 row and N columns or N columns and M rows) and add a UiAsciiStringTile.
Using the AsciiStringTile's Zone controls, draw a zone around the array of AsciiCharTiles. This is easy to do using Painter or Tile+Brush.
Now the AsciiStringTile is a controller for all of the AsciiChar tiles.
At runtime, write strings to the AsciiStringTile and it'll treat the AsciiCharTiles as a group and place the string characters in the proper locations, with simple left, center, or right justification.
- ONLY left-to-right is supported.
- DOES NOT support editing.
- DOES NOT support sparse arrays of AsciiCharTiles: the entire zone must be filled with tiles. If not, you're adding spaces.
The array of tiles can be a horizontal row, a vertical column, or a box.
This tile assumes that the ASCII char tiles are on the same tilemap.
ITpUiControl
public interface ITpUiControl
{
    /// <summary>
    /// Set c# object Value
    /// </summary>
    /// <param name="value">c# object (or boxed UnityEngine.Object) value</param>
    /// <param name="withNotify">permit notification if appropriate</param>
    void SetValue(object value, bool withNotify = true);

    /// <summary>
    /// Run an effect on the control, if implemented
    /// </summary>
    /// <param name="effectType">Value from UiEffect enum</param>
    /// <param name="duration">duration of the effect.</param>
    /// <param name = "endPoint" >endpoint for V3 type effects</param>
    /// <param name = "endColor" >endpoint for Color type effects</param>
    /// <returns>false if unimplemented.</returns>
    bool RunEffect(UiEffect effectType,
                   float    duration,
                   Vector3? endPoint = null,
                   Color?   endColor = null);

    /// <summary>
    /// Returns a value from the FLAGS enum UiEffect,
    /// shows the controls effect capabilities.
    /// </summary>
    UiEffect SupportedEffects { get; }

    /// <summary>
    /// Get integer Value
    /// </summary>
    int GetIntValue { get; }

    /// <summary>
    /// Get bool Value
    /// </summary>
    bool GetBoolValue { get; }

    /// <summary>
    /// Get c# object Value
    /// </summary>
    object GetValue { get; }

    /// <summary>
    /// Get string value
    /// </summary>
    string GetStringValue { get; }

    /// <summary>
    /// Get value as a character.
    /// </summary>
    char GetCharValue { get; }

    /// <summary>
    /// Does this tile accept clicks?
    /// </summary>
    bool AcceptsClicks { get; }

    /// <summary>
    /// Does this tile accept hover?
    /// </summary>
    bool AcceptsHover { get; }


}
IHoverableControl
/// <summary>
/// This marks a tile as accepting BoolPackets for
/// New Input System hover events.
/// When used for zones, the packet value is true when a
/// zone is entered or false when the zone is exited.
/// </summary>
public interface IHoverableControl: ITpMessaging<BoolPacket>
{
    /// <inheritdoc />
    void ITpMessaging<BoolPacket>.MessageTarget(BoolPacket sentPacket)
    {
        throw new System.NotImplementedException();
    }
}
Technical Notes
Miscellaneous Information for delvers
Why Use New GUIDs?
If you want to load the same TileFab multiple times programmatically you need to set the newGuids option true when using LoadTilefab. This is because a TilePlus Tile’s GUID is used in TpLib, and unsurprisingly, GUIDs are expected to be unique.
Recall: if the same TileFab (or Bundle) is used repeatedly the TilePlus tile’s GUID will also be reused, and that tile is ignored by the TilePlus system.
Why does this matter? It might not. If you’re not using TilePlus tiles in a particular TileFab then it probably doesn’t. But if you want to use TilePlus features like sending messages to TPT tiles or dealing with TilePlus events, or finding a tile by tag, Type, GUID, or interface, you’ll find that these unregistered tiles can’t be located.
If newGuids is set true when using LoadTilefab, all the TilePlus tiles have their GUIDs replaced with new ones. This means that they will register properly. Note that true is the default value for this parameter. Ordinary tiles are not affected by this option at all.
Note that the NewGuids feature isn't used by the Layout system since it does not repeat the use of any TileFabs. However, if you're not using the Layout system and are repeatedly loading the same TileFab to many places on one or more Tilemaps, it does matter only if these TileFabs include TilePlus Tiles.
TANSTAFL Dep’t
(There Ain’t No Such Thing as A Free Lunch, originally coined by noted SF author Larry Niven)
There’s another issue, and it’s not strictly a TilePlus issue, but more of a design issue regarding data persistence in saved game information.
Let’s say that your game has some TileFabs containing Waypoints, like what’s seen in TopDownDemo. This isn’t about the chunking system where chunks are added and deleted frequently. Your game loads chunks of gameplay tiles, and some of the tiles are TPT tiles with data that you might want to save, e.g., the most recent Waypoint.
As the game progresses and the Player moves around, new sections are loaded as needed. When the Player moves over a Waypoint then that Waypoint is enabled (perhaps it changes appearance) and a game save is created: it’s reasonable to persist the GUID of the Waypoint TPT tile.
The next time you run the game, it looks in its save data for the GUID of the most recent Waypoint and tries to enable it. But what would happen if the Waypoint was in one of the dynamically loaded TileFab sections? And how do you know what TileFabs to load and where to place them?
The next time the game is played, how do you restore the sections already loaded up till the most recently used waypoint and then place the Player at that proper Waypoint? You can’t preserve the GUID of the waypoint in a loaded section since that GUID changes each time that the TileFab is loaded.
This leads us to a great use for the ZoneRegistrations accumulated in a ZM: they contain all the information that you need to save to reconstruct the game world’s TileFabs and remap GUIDs correctly.
When you load a TileFab using LoadTileFab and provide the ZM instance as one of the parameters, the ZM is sent the results of the load. It adds this information to a “breadcrumbs” list in the form of ZoneReg instances. The breadcrumbs are therefore a list of information about which TileFab assets were loaded and where they were placed.
This list has instances of serializable type ZoneReg, and each instance contains an index, the asset GUID, and the offset and rotation parameters which were used when loading. All the ZoneReg instances, in load order, can be retrieved using the GetAllZoneRegistrations property. The last N Registrations can be obtained with GetLastRegistrations.
However, there’s no one way for these to be used since each game’s requirements are different. However, each ZoneManager instance has other two useful methods that you can build on or use as an example:
- GetZoneRegJson creates a JSON string with all the serialized ZoneReg instances that you can save.
- RestoreFromZoneRegJson takes that exact JSON string and recreates all the TileFabs specified within.
The serialized ZoneReg instances are in ascending order of creation.
Get/Restore works for the simple (but common) use case of wanting to restore everything. It’s possible to only save some of the ZoneRegs, but that’s not handled in any built-in way.
A good starting point to develop a different approach is to use GetAllZoneRegistrations and process it yourself.
The Remapping
RestoreFromZoneRegJson also handles remapping GUIDs, using TpZoneManagerUtils.UpdateGuidLookup. That code scans the asset registrations and creates a lookup table mapping the GUIDs from the TilePlus tiles in the loaded ZoneReg entries with those in the tiles placed from the Bundles. In other words, create a mapping from the GUIDs you may have saved as part of the game state to the new GUIDs that were created when the TileFab was loaded during the execution of RestoreFromZoneRegJson.
The method TpLib.GetTilePlusBaseFromGuidString will try to use the lookup table if it can’t find a match in the primary lookup contained in the TpLib static class. That solves the changed GUID issue. So that saved Waypoint GUID ‘points’ to the proper Waypoint if it was in a dynamically loaded section of the Tilemap.
If you’re ‘rolling your own’ there’s a property in TpLib which allows you to provide your own Guid-to-TilePlusBase mapping. TpZoneMangagerUtils.UpdateGuidLookup can be used to create the mapping. It also creates a reverse mapping, which is needed when Zones are deleted.
It should be noted that the TileFab and Bundle assets must be part of the build. For example, when a TpAnimZoneLoader tile is part of a scene, the asset reference in that tile causes the TileFab, referenced Bundles, and other associated assets such as textures for the tile sprites, to be included in the build.
However, if you’re loading everything dynamically you need to ensure that the assets you need are available in the build. If you’re reading this far you probably know how to do that, but you could place them in a Resources folder or reference them all somehow in a Monobehaviour component attached to some GameObject in at least one scene.
Finally, if you are using the TPT persistence scheme, do not try to Restore to TPT tiles prior to remapping GUIDs. This is important since the restore process depends on the GUIDs being mapped correctly.
Preparing for Builds
When using ZoneManager and ZoneLayout, you need to ensure that the referenced TileFabs are correctly included in a build. This is because the system must use TileFab GUIDs to locate each TileFab when using RestoreFromZoneRegJson.
When calling EnableZoneManagers one of the optional parameters is a map from TileFab GUID to TileFab asset instances. If you’re using ZoneLayout the TileFabs can be easily located at runtime by examining the layout instances. This can be seen in the Chunking demo program.
If that map isn’t provided, then the Resources folder is examined, and a mapping is created automatically. This occurs only once.
If you have references to the TileFabs somehow otherwise included in a build and not in Resource folders, then you can create this mapping yourself.
If you don’t provide the mapping and you don’t have the TileFabs in a Resources folder, then they won’t be located and the loading of such TileFabs will fail: this can confusingly work just fine in the Editor and fail in a build.
Managed Code Stripping
At this time, TPT is incompatible with the HIGH stripping level.
Limitations
Code Changes
Changing code in subclasses may result in missing references in already-placed clone tiles. This is like what happens in the GameObject hierarchy when components’ internal structure is altered. Adding serialized fields or altering the names of serialized fields will result in uninitialized fields in the placed clone tile.
Note that the [FormerlySerializedAs] attribute can be used as a workaround if you use it while editing your code.
Again, this is not an issue exclusive to TPT. Obviously, one can edit the placed clone tile to update the references if needed, but this can be time consuming.
Move Function and Overwrites
When using Painter or the Unity Palette’s “Move” function, it’s not possible to prevent overwrites. At least, I haven’t figured out how to do that yet for every possible edge case.
Mostly Tested in Top-Down Applications
This extension has mostly been tested with square tiles using a top-down XY view.
Picking/Copying TPT tiles
When you Pick one or more TPT tiles with a brush or with Tile+Painter and subsequently paint those tiles, what you’re really doing is painting a copy of a cloned tile. TpLib catches this and re-clones the tile. Two identical tile instances would re-create the problem of asset modification since both tiles share the same instance data.
If you want to copy/paste a TPT tile in a running app, please use TpLib.CopyAndPasteTile, and to move a TPT tile use TpLb.CutAndPasteTile.
TpLibInit and TpLib Memory allocation
The static library TpLib.cs has several Dictionaries that keep track of all TPT tiles.
The initial size of these dictionaries is set by constants in the TpLib.cs file. Similarly, pooled Dictionaries and Lists have a constant size when new pooled instances are created.
These constant size values are small. It is possible to change these allocations during App startup with the TpLib.Resize method. An instance of the TpLibMemAlloc class is passed to Resize.
One could change the constants themselves, however, updating the Plugin will naturally revert these values. Hence, Resize is a better choice.
There’s no reason to use this feature in an editor session. At runtime, use Resize immediately/soon after startup.
Internally, Resize releases all pooled items and resets MaxNumClonesPerUpdate and MaxNumDeferredCallbacksPerUpdate to their initial values.
The TpLibMemalloc values for pooled Dictionaries and Lists affect the size of new pooled instances of
- Dictionary<Vector3Int,TilePlusBase>
- List<TilePlusBase>
These are created and pooled frequently and optimizing this size can have a significant effect on performance.
TpLibInit
This is a scriptable object in a resources folder that you can use to set up memory allocations and certain optional features. It's in TilePlus/Runtime/Resources/Tp. TpLib startup code examines this asset and uses the following fields:
- Name: if 'Informational' messages are active (A setting in the Config dialog) then this name is shown in the console.
- Active: the asset is ignored if this is false.
- Priority: the Active asset with the highest priority is used: others are ignored.
- RefreshRequestsPerUpdate: Maximum number of Tile Refresh Requests per-internalUpdate
- MaxNumClonesPerUpdate: Maximum number of cloning operations per update.
- Queued cloning requests come from asset-state TPT tiles added to a Tilemap.
- Note that this value has no effect on the layout system.
- MaxNumDeferredCallbacksPerUpdate: Affects DeferredCallbacks and InvokeRepeatingUntil.
- TargetFrameRate: useful for diagnostics. Shown in System Info editor window.
- If zero, adaptive features are disabled (not discussed herein)
- Change Player Frame Rate: if checked, then Application.TargetFrameRate is set to the value in the TargetFrameRate field.
- ResizeMemory: if true, use the following info to resize memory.
- MemAlloc: various fields for memory allocations. Read up before changing these.
- InhibitTilemapCallbacks. Normally false. Useful for debugging. Bad for production.
- Tweener Safe Mode: when checked, additional null checks are used. Advised to leave on.
- If this is not checked and a tweened object becomes null there can be an exception.
- Primary reason to uncheck this is for profiling.
- TweenerDiagnostics: not used in a build, Tweener creates extra diagnostic info.
- Help: some information.
- Override Debug Mode and Runtime Debug Mode drop-down fields:
- The RuntimeDebugMode setting is always used in a built app.
- In Editor-Play mode it's only used if OverrideDebugMode is TRUE.
- RuntimeDebugMode controls what sort of error messages appear in editor-run or in a built app.
- If NONE is chosen then NO TP system log messages will appear.
- Note that ALL includes 'FireHose'.
- Same effect as the TilePlus Configuration dialog has in the Editor: this overrides those settings when used in Editor and is the source of those settings in Editor-Play or in a built-app.
- The RuntimeDebugMode setting is always used in a built app.
PlayerLoop
When initiating Play in the Editor or in a built app modifications are made to the PlayerLoop. When TpLib shuts down (app closes) or (Unity state change Play->Edit) it restores the default Player loop.
If you are using PlayerLoop in your app and this doesn't work for you, subscribe to the OnResetPlayerLoop callback (it's not an Event, only one subscriber allowed.). The callback is invoked just before restoring the default Player Loop.
If the callback exists and returns false then the default Player Loop is restored. If the callback returns true then it's assumed that you handled this situation yourself and no further action is taken.
Lifetime of a TilePlus tile
TilePlus lets you treat a Tile script much like a script attached to a GameObject: but Tiles are not GameObjects. It’s easy to forget that a Tile is based on the ScriptableObject class. Here’s part of what the Unity manual says about Scriptable Objects:
Just like MonoBehaviours, ScriptableObjects derive from the base Unity object but,
unlike MonoBehaviours, you can not attach a ScriptableObject to a GameObject.

Instead, you need to save them as Assets in your Project.
What’s left out of that statement is that you cannot attach a ScriptableObject to a GameObject as a Component. But you can attach it as a reference via a field in a script. When you do that, the reference is to the asset in the project folder. Clearly, you can create an actual instance of the Scriptable Object in memory, and it can be placed in the reference ‘slot’. That’s essentially how TilePlus tiles work:
- You paint the tile (or place it programmatically). It’s in the ASSET state at that time.
- The tile’s StartUp method sees that the state is ASSET and queues a cloning request in TpLib.
- The tile is cloned at the next Update and the clone is placed at the same location, replacing the tile asset reference in the Tilemap.
The cloning only happens once: when the tile is placed by an editor tool like the UTE or Tile+Painter or by code.
- Move the tile from one place to another (Cut/Paste): no cloning
- Copy/Paste: the new tile is cloned in TpLib.
Since the clone is referenced in the Tilemap now, it’s saved with the scene.
But it’s still not a GameObject: most of the events are missing. The only really useful events are OnEnable and OnDisable. Fortunately, Tiles have a StartUp method where it is passed a reference to the parent Tilemap and the position. Follow along by examining the StartUp method of TilePlusBase.cs (not every line is discussed):
- A reference to the parent Tilemap for the tile is cached.
- The tile’s position is cached.
- A flag is set if the position has changed (for example, if you’d moved it using the Cut/Paste function of TpLib). From that point there are two code branches depending on whether the tile is already a clone.
- Clone: check for a proper GUID and register the tile with TpLib.
- Asset: queue for cloning in TpLib. The clone replaces the asset reference in the Tilemap via Tilemap.SetTile. This causes StartUp to be executed again.
From this point in time the tile is essentially passive. When the Tilemap calls GetTileData and GetTileAnimationData the information returned from those methods are copied into the Tilemap data structures.
If you message the TPT tile it may perform other actions such as messaging other tiles, tweening, or even deleting itself. But aside from your code causing such actions the tile can't do anything since it doesn't get any events such as Update.
Events
- OnEnable, which generally will execute before StartUp, lets you set up initial conditions. Examples of this can be seen in the animated tile classes.
- OnDisable, can be used for cleanup.
- OnDestroy, while theoretically available, is not useful since it’s not called at any predictable time unless one were to Destroy tile instances programmatically. You’ll not see it used in TPT tiles at all.
Note that the TpLib.MaxNumClonesPerUpdate property controls how many cloning operations are executed on each Update (default is 16). This allows performance optimization. See this.
TPT Tiles are always cloned when painted in the Editor or when added programmatically during the application’s execution. When a Tilemap is Bundled, archived TPT tiles are ‘Locked’ assets. Cloning also occurs when loading TileFabs or TpTileBundle contents to your scene. For efficiency, this is done inline, within the loading process; and all at once.
In other words, TPT tiles will only request cloning when painted in-editor or at runtime, in code. If you want to paint numerous TPT tiles at runtime, consider using TileFabs and Bundles.
This should factor into your setting value for TpLib.MaxNumClonesPerUpdate.
For example, with the default value of 16 for TpLib.MaxNumClonesPerUpdate, painting 1024 TPT tiles will cause 1024 cloning operations. If only 16 are added during each Update, then assuming a 60 Hz Update frequency this would take about 1 second.
Knowing this, you might want to dynamically change this property’s value when you load a scene or instantiate a prefab.
If you’re not painting huge numbers of TPT tiles at runtime, then you don’t need to worry about the value of TpLib.MaxNumClonesPerUpdate.
InvokeRepeatingUntil
If you really need a repeated Update you can use TpLib's InvokeRepeatingUntil. This will automatically terminate under your control or when the tile is deleted.
Inhibiting Callbacks
For performance reasons you might want to temporarily inhibit TpLib from responding to certain Tilemap callbacks, specifically:
- tilemapPositionsChanged
- tilemapTileChanged
For example, if you fill a large area of tiles these callbacks will trigger repeatedly.
Use the TpLib property InhibitTilemapCallbacks to force TpLib to ignore these callbacks. Note that if any TilePlus tiles are added or deleted by whatever you’re doing then TpLib will be out of sync. You can use SceneScan to rescan.
When using the Unity Editor, this property is reset after a scripting reload or when the Editor switches to Play mode.
To have this property set true at runtime, use TpLibInit.
Chunkifying Details
When a Bundle is 'Chunkified' by the Layout/Chunking system the Bundle creates a cache of data in each TileBundle for rapid loading or re-loading of tiles using the TileChangeData and Tilemap.SetTiles(TileChangeData[] tileChangeDataArray, bool ignoreLockFlags).
When the layout system wants to load a chunk of tiles to load in this fashion it uses the Bundle's `LoadCachedTileChangeData(RectInt locator, Tilemap map)' method.
That method combines the cached Unity tile TileChangeData asset references with the cached TPT Locked state TileChangeData for that locator.
During combining, any TPT tiles are cloned in-line. The resultant array of TileChange data is loaded to the map referenced in the method call.
After the data are loaded on the Tilemap, the new clones are deleted from the data.
To repeat: the cached TPT tile references are cloned prior to loading to the Tilemap and deleted right after the loading completes.
What this means is that every time that the chunk of tile data are retrieved in this fashion new, fresh TPT tile instances are created. Immediately after SetTiles is used the clones are deleted. But they're not gone. They're now referenced in only one place: the Tilemap itself.
Why do this, or Why Bother??
Since each TPT tile is an independent instance, once it's loaded to a Tilemap its internal state may change during the time it's actually in the Tilemap; i.e., until it's unloaded. Hence, we really don't want to re-used these modified tiles once they're unloaded.
If these were unloaded and re-loaded later then the modified fields will still be modified, which can cause all sort of bizarre errors that would be hard to troubleshoot. Obviously you'd like an unmodified clone of the corresponding locked tile in the Bundle asset.
The end result here is that the TPT instance which gets loaded to the Tilemap has no references anywhere else. That way, when the tile is eventually unloaded it becomes garbage collected properly rather than be a potential memory leak.
You Need to be Vigilant!
This can be affected by your own code. If you cache a TPT tile reference, it won't be garbage collected and it may not even be actually placed on a Tilemap anywhere when you try to access its fields and properties, some of which may be unexpectedly null.
- This can occur with ANY cached UnityEngine.Object reference!
One approach to follow is to use Unity's pools to re-use Lists of TilePlusBase when you need to provide a list to one of the TpLib query methods. When creating such a 'ListPool' you should ensure that the Release callback clears the list. Get used to the idea of wrapping these methods with using statements to ensure that the lists are returned to the pool.
This type of code block is peppered throughout TilePlus and TilePlusPainter. Examples of pools can be found in the TpLib source.