Unity UI and New Input System
Unity UI can invoke methods in monobehaviour targets using Unity events. That's not useful if you want, say, a button click to send a message to a tile.
If you're using the New Input System it can be handly to translate a mouse click or some other Action to locate and message a tile.
TpGuidToAction
This component can be used as a target for a Unity UI control, it just sends a message to a tile that's specified by a GUID. You can see how to use this in the AnimatedTiles demo (Animation-UnityUI scene).
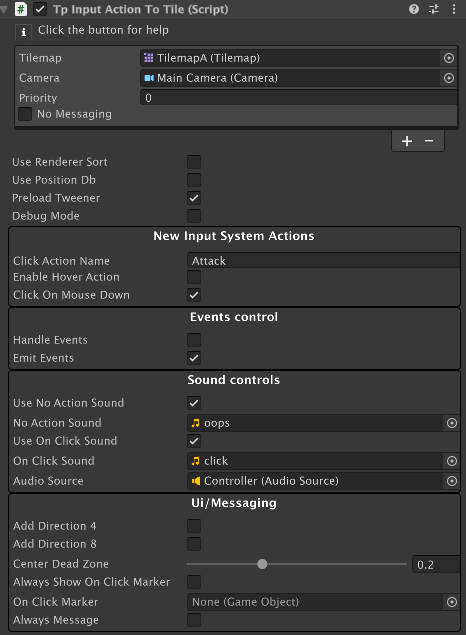
TpInputActionToTile
This component converts New Input System actions into TPT tile locations and can send a message to a target tile if you click on it. An example can be found in the AnimatedTilesDemo (Animation-MouseClicksDirect) and in the Layout demo. It's also used for the 'UI system'
This component is an easy to use front-end for a TpActionToTile scriptable object instance. Check out the source code for this class if you'd like to dig into what's going on. But generally the component is a better way to use this feature.
This is a Ui-Elements custom inspector that expands and contracts fields as needed depending on how you set it up.
There's a lot to unpack:
The very top section is an area where you can specify one or more pairs of Camera and Tilemap. Cameras and Tilemaps go together since both of those components are needed in order to translate from screen coordinates to tilemap coordinates. You can have multiple pairs as needed, and a priority value can be used to select a tile target when two tiles overlap the same position.
The priority value is used when you have multiple tilemaps unless Use Renderer Sort is checked.
- If checked, priority is set with the Tilemaps' Sorting Layers and Order in Layer values.
If No Messaging is checked then evaluation stops prior to sending a message for Clicks (only) and only the OnBeforeMessageSent or OnNoMessageSent callbacks are used for this Tilemap.
If Hoverable is checked then this tilemap is used for Hover messages. This can only be enabled for one Tilemap/Camera pair. If you check this value on more than one Tilemap/Camera pair there will be a warning after the first is found. Note that if 'No Messaging' is checked when Hoverable is checked then messages for the ClickAction are never sent but the Hover messages will still be sent.
Hovering requires ITpUiControl { AcceptsHover: true } to be implemented on the tile for it to get ActionToTile messages from this S.O. and IHoverableControl for the tile to have its ZoneActions invoked. IHoverableControl requires an explicit implementation of a MessageTarget for a specific variety of data packet.
This can be confusing: see the demos for examples.
Basically: AcceptsHover must be true in an implementation of ITpUiControl for a tile to get hovering messages and the tile must also implement IHoverableControl.
But there are two types of hovering situations:
A tile wants hovering messages when it's hovered over.
- Just use an empty function body for the MessageTarget
- The ActionToTilePacket MessageTarget is messaged when the pointer is first over the tile and then again when the pointer is no longer over the tile.
- Use case example: turn animation on and off.
Tiles of Type UiHoverZone or derived from that class:
- A BoolPacket is sent to MessageTarget.
- True = entering the zone, False = leaving the zone.
The Zone is that area described by the built-in Zone that all TPT tiles have. You can create a new tile that inherits from UiHoverZone and take some sort of action or use a Zone Action (that's what the base UiHoverZone tile does).
- Use case example: Show a tooltip when the zone is entered and erase it when the zone is exited (see the UI demo)
When one of these Hover Zones is entered during the exection of the Action for the new input system 'Hover`-ish events (where a constantly changing Vector2 screen position is the input value) then the UiHoverZone tile is messaged.
In the UI demo, this is used for 'tooltips' when you hover over a control.
You can see the difference with the two animated buttons on the left side of the demo screen. The one on the left animates when hovered, and a UiHoverZone that's nearby has a Zone which encompasses that tile so a tooltip appears. The one directly to its right animates when hovered, but there's no UiHoverZone encompassing its position so there's no toolip.
Underneath the Tilemap/Camera pairs section are general settings.
If Use Position Db is checked then the PositionDb Service is used to locate tiles. This is useful when you have tiles with scaled sprites or if you're tweening position and/or scale. When this toggle is checked a few new fields appear:
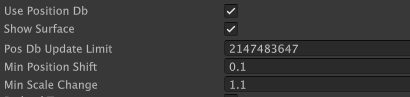
- Show surface: draws boxes around tiles in the highest priority map/Camera pair. Different colors are used for scaled/shifted and non-scaled/shifted sprites, however, the actual size and position of scaled/shifted sprites isn't shown, just a different color.
- PosDbUpdateLimit: how many tilemap changes are processed in each internal update.
- MinPositionShift: position changes in X,Y that are less than this value won't be counted as shifted tiles.
- MinScaleChange: scale changes less than this value won't be counted as scaled tiles.
- Note: setting this value at 1.0 or less will result in no tiles being counted as scaled tiles.
When Enable Hover is checked the HoverAction name field is shown. Note that Hovering requires:
- This checkbox to be checked
- One (and only one)
Hoverablecheckbox set for a Tilemap/Camera pair. - Proper setting of the HoverAction name: it has to match a name in the New Input System settings.
- Must be a Vector2-type action such as
Point
- Must be a Vector2-type action such as
- Proper implemention of ITpUiControl and/or IHoverableControl.
Click On Mouse Down a click = mouse down. If not, a click = mouse up (i.e., after button released).
Handle Events: If checked, handle all events in this component. This only works for cases where ALL of the event response is dictated by Event or Zone actions that can automatically be invoked by TpEvents.ProcessEvents.
Emit Events: If checked, the message sent to the tile specifies that it can post an event if that's appropriate.
The optional Sound Controls section lets you add audio feedback.
The Ui/Messaging section lets you add direction info to packets and show a prefab at the click position.
Add Direction 4 and Add Direction 8 : this is a little harder to explain.
These are used when you want to know where in the tile the mouse pointer actually was. This may sound strange but consider that a tile with an unscaled sprite essentially occupies one Tilemap unit. But the mouse click can be anywhere within that space.
The ActionToTile packet sent by this component includes an offset which is the Vector2 distance from the center of the tile to where the click actually was.
If an add box is checked then that Vector2 position is converted into an angle and then into a value from the Position4 (up/right/down/left) or Position8 (up, upright, right ....). The Center Dead Zone describes what part of the sprite's area is considered as None from the two Position enums.
So what does all that mean? If you enable this feature then a message recipient can determine if it was clicked in the center area or on one of the edges.
You can see this at work in the Oddities/Jumper demo, where clicking on the edges of a tile moves it in the direction of where it was clicked.
When using PositionDb this feature works correctly for scaled or position-shifted sprites, even if they no longer overlap the actual tile position.
Another way of thinking about this feature:
The packets have information about where within the tile the click actually occurred as well as 4 or 8-way direction info (meaning you don't usually have to evaluate the position within the tile).
The direction info is evaluated as a rotation clockwise from straight up. E.G. one can interpret DirectionType4.Right as 'move this tile to the right' or DirectionType8.RightUp as move diagonally up and to the right.