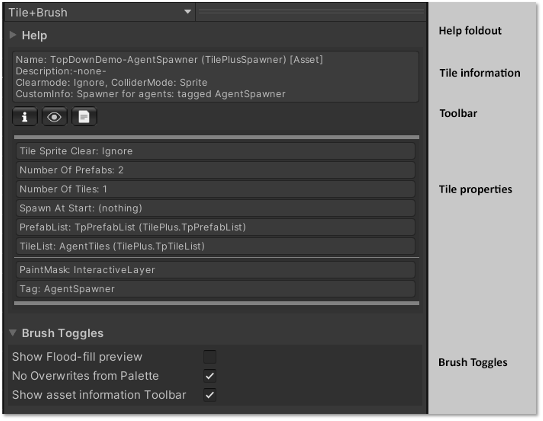
Tile+Brush's 'Brush Inspector'
This is the Brush Inspector seen when using the Tile+Brush with the Unity Tile Editor. It looks a bit different in Tile+Painter.
The Help foldout at the top has some hints about how to use this inspector, followed by information about the tile. Note that the last item on the first line indicates the state of the tile. For this inspector, the state will be Asset or in rare situations, Locked.
The Toolbar allows you to open an inspector for the tile asset, focus the Project window on the asset, or open the asset script in your programming IDE.
The center area has information about the tile asset being inspected.
If there’s a GameObject associated with the tile (via the GameObject field in the asset) then a preview of the prefab is shown, if possible.
Like the Selection Inspector, the tile information is divided according to the class hierarchy, but there are no foldouts, just some thin lines to point out the division. None of the information is editable, but you can click the leftmost toolbar button to open an inspector.
The Brush Toggles foldout has a few options: Flood Fill preview, overwrite protection, and a toggle to hide the Toolbar.
Overwrite protection, available only when the Tile+Brush is the active brush, prevents painting over existing tiles.
You can override the Overwrite protection or the PaintMask by holding down a key defined in Unity’s shortcuts editor (Edit/Shortcuts). The default is ‘1’.
This makes it easy to paint over a tile (overwrite) without toggling the control in the Brush Toggles section, or to paint a tile on a tilemap that’s not in the PaintMask list without changing the Paintmask field in the tile asset.
A strike-through line inside the painting marquee is shown while the shortcut key is held down.

