Selection Inspector Variants
For TPT tiles you’ll see Selection Inspector shown in various images in these docs.
Tile tiles (normal Unity Tiles) are assets so you can only open an Inspector on the asset.
Listing all the positions for a Tile might make the list thousands of items long, which would be useless. However, you can edit a particular Tile position on a Tilemap: use the Pick tool in Edit mode.
The Selection Inspector will look like this:
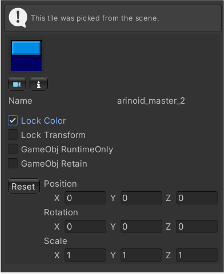
This inspector has the following features:
- See a preview of the Tile’s Sprite.
- Focus on the selected Tile.
- Inspect the selected Tile.
- This action opens a Unity Inspector on the Tile ASSET.
- This is the Tile asset in the Project, so be careful!
- Change the Lock Color or Lock Transform flags.
- Change the two GameObject-related flags.
- Change the Color if Lock Color is unchecked.
- Change the Transform if Lock Transform is unchecked.
If you change the flags, Color, or Transform: The Asset is not affected since these changes only affect the Tilemap at the Tile’s position.
To reiterate: changes in this inspector do not affect the original Tile asset in your Project folder. The only time that that could happen is if you open the asset in a Unity Inspector as mentioned above.
The two GameObject flags are not visible if the Tile doesn’t have a GameObject.
TileBase tiles (i.e., Rule tiles, AnimatedTiles, and the like) just show the tile sprite (from the plugin) and allow you to open an inspector on the TileBase tile asset (again, this is in the Project). If you want to edit the values at the Tilemap position, use the Pick tool at that position. However, results may not be what you expect when using Rule tiles.